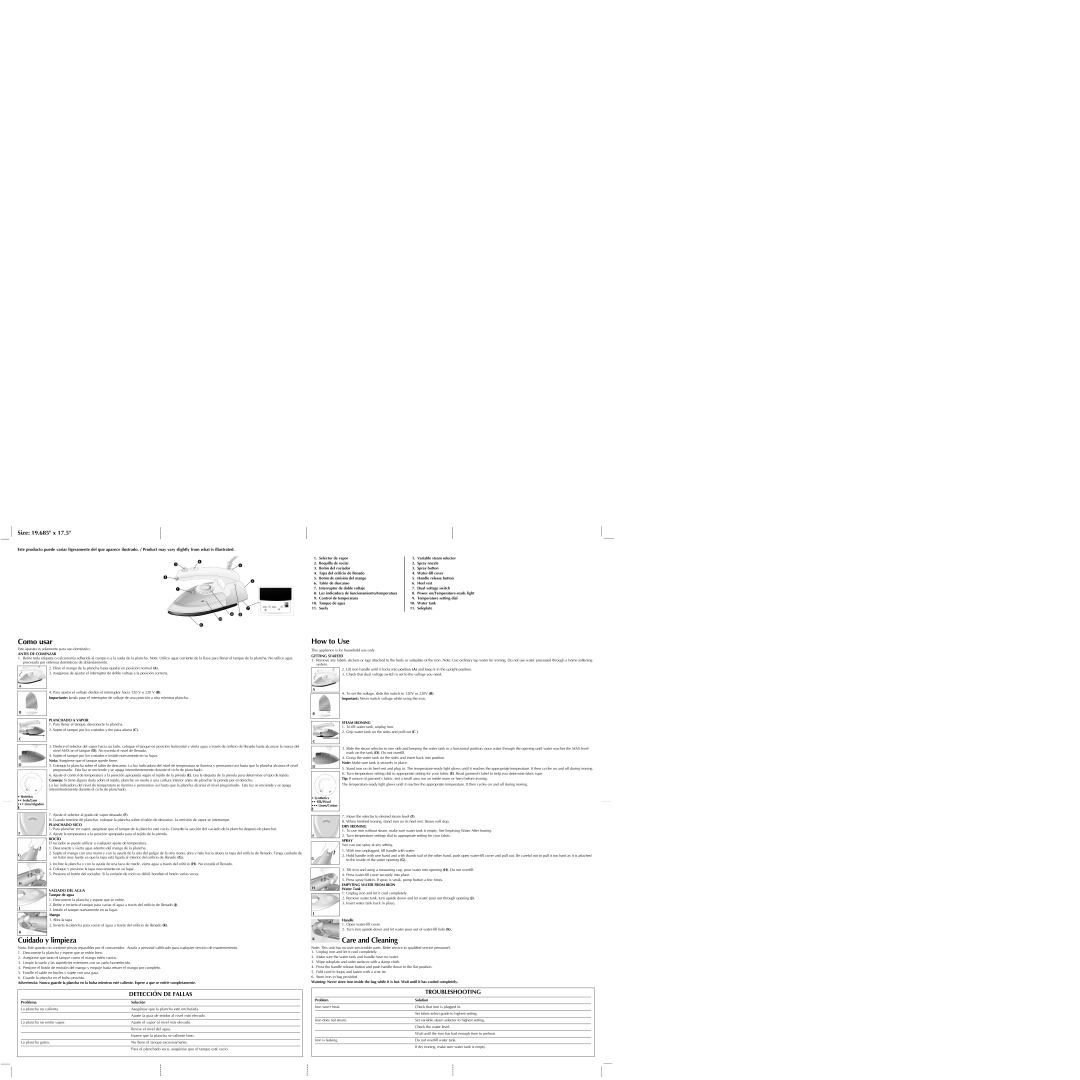
Como usar
Este aparato es solamente para uso doméstico.
ANTES DE COMENZAR
1.Retire toda etiqueta o calcomanía adherida al cuerpo o a la suela de la plancha. Nota: Utilice agua corriente de la llave para llenar el tanque de la plancha. No utilice agua procesada por sistemas domésticos de ablandamiento.
2.Eleve el mango de la plancha hasta quedar en posición normal (A).
3.Asegúrese de ajustar el interruptor de doble voltaje a la posición correcta.
A
4. Para ajustar el voltaje, deslice el interruptor hacia 120 V o 220 V (B).
Importante: Jamás pase el interruptor de voltaje de una posición a otra mientras plancha.
B
PLANCHADO A VAPOR
1.Para llenar el tanque, desconecte la plancha.
2.Sujete el tanque por los costados y tire para afuera (C).
C
3.Deslice el selector del vapor hacia un lado, coloque el tanque en posición horizontal y vierta agua a través de orificio de llenado hasta alcanzar la marca del nivel MAX en el tanque (D). No exceda el nivel de llenado.
4.Sujete el tanque por los costados e instale nuevamente en su lugar.
Nota: Asegúrese que el tanque quede firme.
D5. Coloque la plancha sobre el talón de descanso. La luz indicadora del nivel de temperatura se ilumina y permanece así hasta que la plancha alcanza el nivel programado. Esta luz se enciende y se apaga intermitentemente durante el ciclo de planchado.
6.Ajuste el control de temperatura a la posición apropiada según el tejido de la prenda (E). Lea la etiqueta de la prenda para determinar el tipo de tejido. Consejo: Si tiene alguna duda sobre el tejido, planche un ruedo o una costura interior antes de planchar la prenda por el derecho.
La luz indicadora del nivel de temperatura se ilumina y permanece así hasta que la plancha alcanza el nivel programado. Esta luz se enciende y se apaga intermitentemente durante el ciclo de planchado.
•Sintético •• Seda/Lana
••• Lino/Algodón
E
| 7. | Ajuste el selector al grado de vapor deseado (F). |
| 8. | Cuando termine de planchar, coloque la plancha sobre el talón de descanso. La emisión de vapor se interrumpe. |
| PLANCHADO SECO |
F | 1. | Para planchar sin vapor, asegúrese que el tanque de la plancha esté vacío. Consulte la sección del vaciado de la plancha después de planchar. |
2. Ajuste la temperatura a la posición apropiada para el tejido de la prenda. |
| ROCÍO |
|
| El rociador se puede utilizar a cualquier ajuste de temperatura. |
| 1. | Desconecte y vierta agua adentro del mango de la plancha. |
G | 2. | Sujete el mango con una mano y con la ayuda de la uña del pulgar de la otra mano, abra y hale hacia afuera la tapa del orificio de llenado. Tenga cuidado de |
| no halar muy fuerte ya que la tapa está ligada al interior del orificio de llenado (G). |
| |
| 3. | Incline la plancha y con la ayuda de una taza de medir, vierta agua a través del orificio (H). No exceda el llenado. |
|
|
| 4. | Coloque y presione la tapa nuevamente en su lugar. |
| 5. | Presione el botón del rociador. Si la emisión de rocío es débil, bombee el botón varias veces. |
H | | |
| VACIADO DEL AGUA |
|
| Tanque de agua |
| 1. | Desconecte la plancha y espere que se enfríe. |
J | 2. | Retire e invierta el tanque para vaciar el agua a través del orificio de llenado (J). |
3. | Instale el tanque nuevamente en su lugar. |
| Mango |
|
| 1. Abra la tapa |
| 2. Invierta la plancha para vaciar el agua a través del orificio de llenado (K). |
K | | |
| | |
Cuidado y limpieza
Nota: Este aparato no contiene piezas reparables por el consumidor. Acuda a personal calificado para cualquier servicio de mantenimiento.
1.Desconecte la plancha y espere que se enfríe bien.
2.Asegúrese que tanto el tanque como el mango estén vacíos.
3.Limpie la suela y las superficies exteriores con un paño humedecido.
4.Presione el botón de emisión del mango y empuje hasta retraer el mango por completo.
5.Enrolle el cable en bucles y sujete con una gasa.
6.Guarde la plancha en el bolso provisto.
Advertencia: Nunca guarde la plancha en la bolsa mientras esté caliente. Espere a que se enfrie completamente.
| | DETECCIÓN DE FALLAS |
| | | |
| Problema | Solución |
| | | |
| La plancha no calienta. | Asegúrese que la plancha esté enchufada. |
| | | |
| | Ajuste la guía de tejidos al nivel más elevado. |
| | | |
| La plancha no emite vapor. | Ajuste el vapor al nivel más elevado. |
| | | |
| | Revise el nivel del agua. |
| | | |
| | Espere que la plancha se caliente bien. |
| | | |
| La plancha gotea. | No llene el tanque excesivamente. |
| | | |
| | Para el planchado seco, asegúrese que el tanque esté vacío. |
| | | |
How to Use
This appliance is for household use only.
GETTING STARTED
1.Remove any labels, stickers or tags attached to the body or soleplate of the iron. Note: Use ordinary tap water for ironing. Do not use water processed through a home softening system.
2.Lift iron handle until it locks into position (A) and keep it in the upright position.
3.Check that dual voltage switch is set to the voltage you need.
A
4. To set the voltage, slide the switch to 120V or 220V (B). Important: Never switch voltage while using the iron.
B
STEAM IRONING
1.To fill water tank, unplug iron.
2.Grip water tank on the sides and pull out (C ).
| C | | |
| | 3. | Slide the steam selector to one side and keeping the water tank in a horizontal position, pour water through the opening until water reaches the MAX level |
| |
| | | mark on the tank (D). Do not overfill. |
| | 4. | Grasp the water tank on the sides and insert back into position. |
| D | Note: Make sure tank is securely in place. |
| 5. | Stand iron on its heel rest and plug in. The temperature-ready light glows until it reaches the appropriate temperature. It then cycles on and off during ironing. |
| |
| | 6. | Turn temperature setting dial to appropriate setting for your fabric (E). Read garment’s label to help you determine fabric type. |
| | Tip: If unsure of garment’s fabric, test a small area (on an inside seam or hem) before ironing. |
| | The temperature-ready light glows until it reaches the appropriate temperature. It then cycles on and off during ironing. |
•Synthetics •• Silk/Wool
••• Linen/Cotton
E
| | 7. | Move the selector to desired steam level (F). |
| | 8. | When finished ironing, stand iron on its heel rest. Steam will stop. |
| | DRY IRONING |
| | 1. | To use iron without steam, make sure water tank is empty. See Emptying Water After Ironing. |
| F | 2. Turn temperature settings dial to appropriate setting for your fabric. |
| | SPRAY |
| | You can use spray at any setting. |
| | 1. | With iron unplugged, fill handle with water. |
| G | 2. | Hold handle with one hand and with thumb nail of the other hand, push open water-fill cover and pull out. Be careful not to pull it too hard as it is attached |
| | to the inside of the water opening (G). |
| | |
| | 3. | Tilt iron and using a measuring cup, pour water into opening (H). Do not overfill. |
| |
| |
| | 4. | Press water-fill cover securely into place. |
| | 5. | Press spray button. If spray is weak, pump button a few times. |
| H | EMPYTING WATER FROM IRON |
| Water Tank |
| | 1. | Unplug iron and let it cool completely. |
| |
| | 2. | Remove water tank, turn upside down and let water pour out through opening (J). |
| | 3. | Insert water tank back in place. |
| J | | |
| | Handle |
| |
| | 1. | Open water-fill cover. |
| | 2. | Turn iron upside down and let water pour out of water-fill hole (K). |
| K | Care and Cleaning |
| |
| Note: This unit has no user-serviceable parts. Refer service to qualified service personnel. |
1.Unplug iron and let it cool completely.
2.Make sure the water tank and handle have no water.
3.Wipe soleplate and outer surfaces with a damp cloth.
4.Press the handle release button and push handle down to the flat position.
5.Fold cord in loops and fasten with a wire tie.
6.Store iron in bag provided.
Warning: Never store iron inside the bag while it is hot. Wait until it has cooled completely.
| | TROUBLESHOOTING |
| | | |
| Problem | Solution |
| | | |
| Iron won’t heat. | Check that iron is plugged in. |
| | | |
| | Set fabric-select guide to highest setting. |
| | | |
| Iron does not steam. | Set variable steam selector to highest setting. |
| | | |
| | Check the water level. |
| | | |
| | Wait until the iron has had enough time to preheat. |
| | | |
| Iron is leaking. | Do not overfill water tank. |
| | | |
| | If dry ironing, make sure water tank is empty. |
| | | |