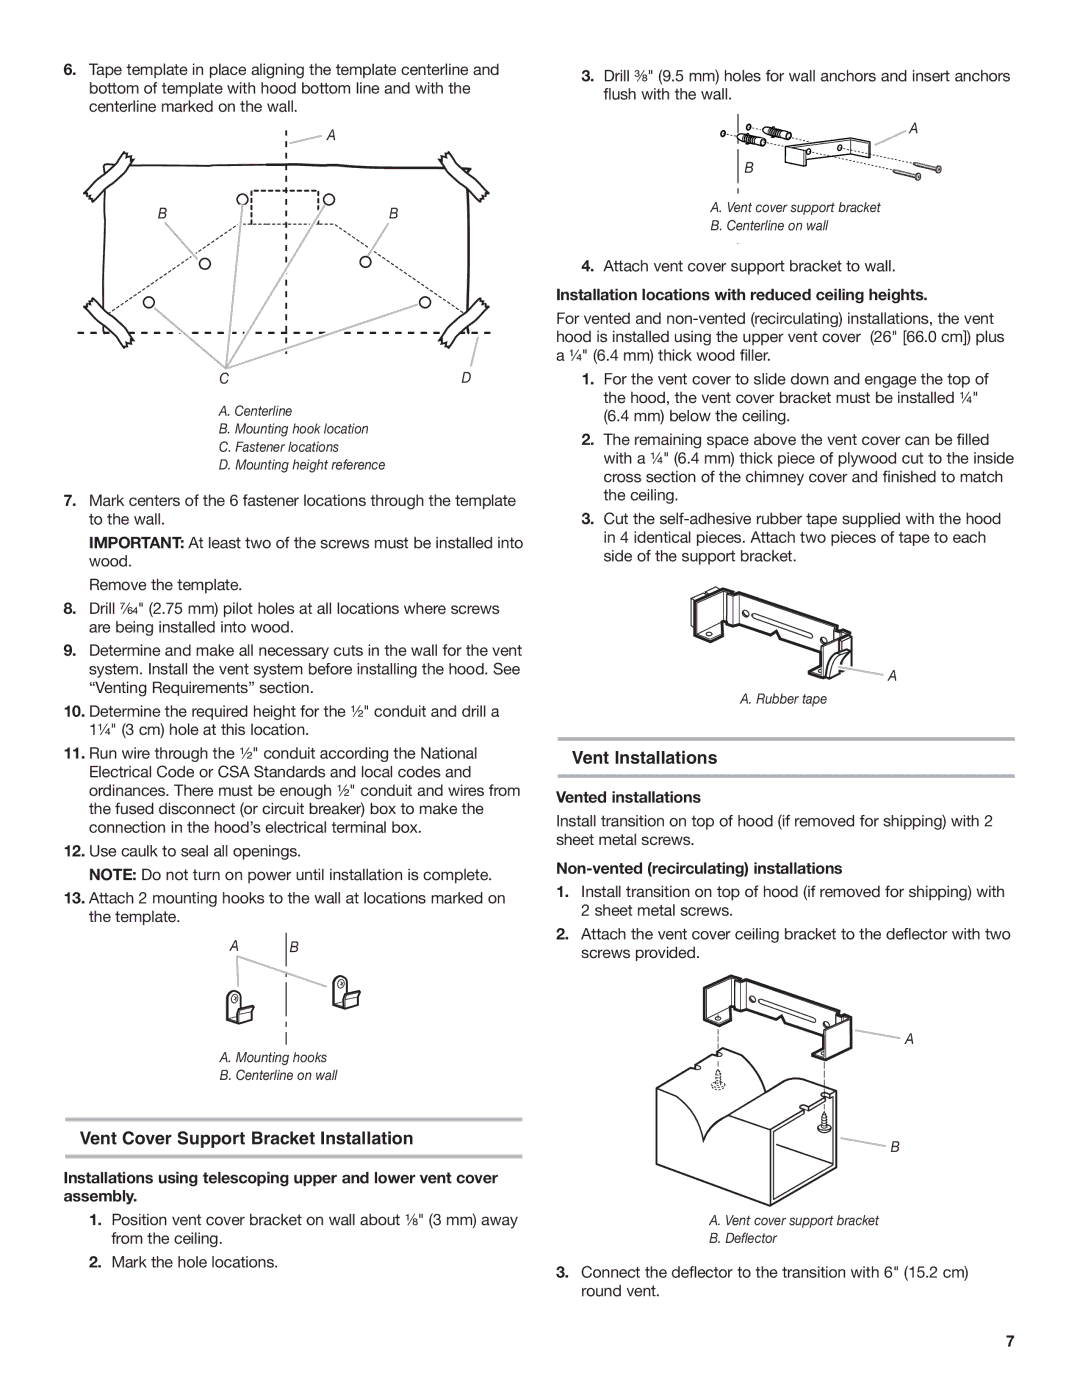
6.Tape template in place aligning the template centerline and bottom of template with hood bottom line and with the centerline marked on the wall.

A

BB

CD

A.Centerline

B.Mounting hook location

C.Fastener locations

D.Mounting height reference

7.Mark centers of the 6 fastener locations through the template to the wall.

IMPORTANT: At least two of the screws must be installed into wood.

Remove the template.

8.Drill ⁷⁄₆₄" (2.75 mm) pilot holes at all locations where screws are being installed into wood.

9.Determine and make all necessary cuts in the wall for the vent system. Install the vent system before installing the hood. See “Venting Requirements” section.

10.Determine the required height for the ¹⁄₂" conduit and drill a 1¹⁄₄" (3 cm) hole at this location.

11.Run wire through the ¹⁄₂" conduit according the National Electrical Code or CSA Standards and local codes and ordinances. There must be enough ¹⁄₂" conduit and wires from the fused disconnect (or circuit breaker) box to make the connection in the hood’s electrical terminal box.

12.Use caulk to seal all openings.

NOTE: Do not turn on power until installation is complete.

13.Attach 2 mounting hooks to the wall at locations marked on the template.

AB

A.Mounting hooks

B.Centerline on wall

Vent Cover Support Bracket Installation

Installations using telescoping upper and lower vent cover assembly.

1.Position vent cover bracket on wall about ¹⁄₈" (3 mm) away from the ceiling.

2.Mark the hole locations.

3.Drill ³⁄₈" (9.5 mm) holes for wall anchors and insert anchors flush with the wall.

A

B

A. Vent cover support bracket

B. Centerline on wall

4.Attach vent cover support bracket to wall.

Installation locations with reduced ceiling heights.

For vented and non-vented (recirculating) installations, the vent hood is installed using the upper vent cover (26" [66.0 cm]) plus a ¹⁄₄" (6.4 mm) thick wood filler.

1.For the vent cover to slide down and engage the top of the hood, the vent cover bracket must be installed ¹⁄₄"

(6.4 mm) below the ceiling.

2.The remaining space above the vent cover can be filled with a ¹⁄₄" (6.4 mm) thick piece of plywood cut to the inside cross section of the chimney cover and finished to match the ceiling.

3.Cut the self-adhesive rubber tape supplied with the hood in 4 identical pieces. Attach two pieces of tape to each side of the support bracket.

A

A. Rubber tape

Vent Installations

Vented installations

Install transition on top of hood (if removed for shipping) with 2 sheet metal screws.

Non-vented (recirculating) installations

1.Install transition on top of hood (if removed for shipping) with 2 sheet metal screws.

2.Attach the vent cover ceiling bracket to the deflector with two screws provided.

A

B

A. Vent cover support bracket

B.Deflector

3.Connect the deflector to the transition with 6" (15.2 cm) round vent.

7

Page 7
Image 7
Whirlpool 9763375 Vent Cover Support Bracket Installation, Vent Installations, Vented installations

9763375 specifications

The Whirlpool 9763375 is a high-performance appliance that exemplifies quality and innovation in everyday kitchen tasks. Designed to meet the needs of modern consumers, this multifunctional kitchen tool combines superior engineering with user-friendly features, making it a staple in any household.

One of the most notable features of the Whirlpool 9763375 is its convenience and versatility. Designed with a sleek and compact profile, it seamlessly fits into various kitchen layouts. The appliance comes equipped with multiple cooking functions, including boiling, steaming, and warming, which makes meal preparation a breeze. This flexibility allows users to experiment with various cooking styles, accommodating the diverse needs of families and food enthusiasts.

The Whirlpool 9763375 incorporates advanced technologies that enhance performance and efficiency. One key feature is the rapid heat-up technology, which significantly reduces cooking time by providing consistent and efficient heating. This technology not only saves time but also energy, making it an eco-friendly choice for those looking to minimize their carbon footprint.

Another hallmark of the Whirlpool 9763375 is its commitment to safety. The appliance is designed with an automatic shut-off feature that ensures safe operation. This is particularly beneficial for busy households where multiple tasks are underway at once, as it provides peace of mind and reduces the risks of accidents in the kitchen.

In terms of ease of use, the Whirlpool 9763375 boasts an intuitive control panel and easy-to-read digital display. This functionality allows users to set timers and adjust cooking settings with minimal effort. Additionally, the appliance is constructed from high-quality materials, ensuring durability and longevity. The easy-to-clean surfaces are designed to resist stains and spills, simplifying maintenance and upkeep.

Overall, the Whirlpool 9763375 represents a perfect blend of functionality, technology, and safety. With its diverse cooking capabilities, energy-efficient features, and user-friendly design, it is an invaluable asset for any kitchen. Whether you are a seasoned chef or a novice cook, this appliance ensures that you can elevate your culinary experience with ease and confidence.