Handlebar console instructions
(800)
Phone: (208)
Congratulations on your purchase of the BOB Handlebar Console. It is designed to provide beverage holders and additional storage. Proper installation and care will provide years of reliable service.
Before attempting to install your new Handlebar Console, read and understand these instructions completely to insure proper installation. If you are unclear on any point, contact your dealer or BOB before use.
![]() WARNINGS
WARNINGS ![]()
. This product is not designed to hold hot beverages. Placing hot beverages in the cup holders can result in spills and injury to you or your child, including burns.
. When placing containers in the cup holders, it is critical that
D)Repeat with the above steps with the forward strap on the opposite side.
3.Next attach the back right strap, “B” in figure 1. The strap attaches as follows:
A)Align the strap so the Handlebar Console is pulled tight fore and aft. Route the strap underneath the handlebar and between the brake cable housing and handlebar.
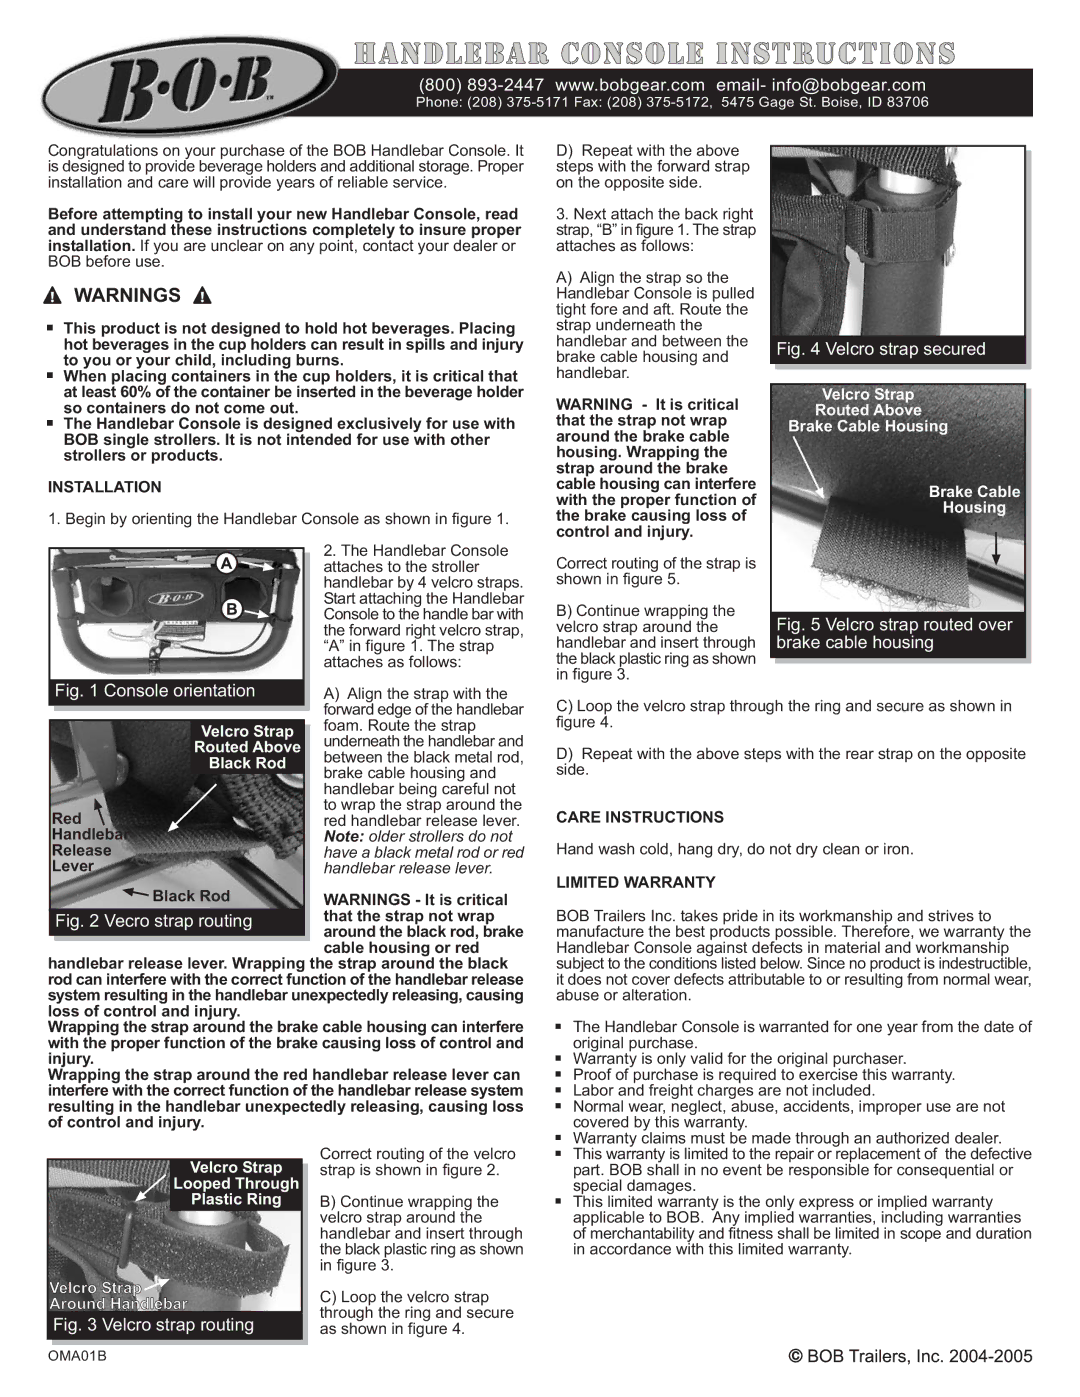
Fig. 4 Velcro strap secured
at least 60% of the container be inserted in the beverage holder so containers do not come out.
. The Handlebar Console is designed exclusively for use with BOB single strollers. It is not intended for use with other strollers or products.
INSTALLATION
1. Begin by orienting the Handlebar Console as shown in figure 1.
|
|
|
| 2. The Handlebar Console |
|
|
|
| attaches to the stroller |
|
|
|
| handlebar by 4 velcro straps. |
|
|
|
| Start attaching the Handlebar |
|
|
|
| Console to the handle bar with |
|
|
|
| the forward right velcro strap, |
|
|
|
| “A” in figure 1. The strap |
|
|
|
| attaches as follows: |
|
|
|
|
|
| Fig. 1 Console orientation |
| A) Align the strap with the | |
|
|
|
| forward edge of the handlebar |
|
|
| ||
|
|
| ||
|
|
|
| foam. Route the strap |
|
| Velcro Strap |
| |
|
|
| underneath the handlebar and | |
|
| Routed Above |
| |
|
|
| between the black metal rod, | |
|
| Black Rod |
| |
|
|
| brake cable housing and | |
|
|
|
| handlebar being careful not |
| Red |
| to wrap the strap around the | |
|
| red handlebar release lever. | ||
| Handlebar |
| Note: older strollers do not | |
| Release |
| have a black metal rod or red | |
| Lever |
| handlebar release lever. | |
| Black Rod |
| WARNINGS - It is critical | |
| Fig. 2 Vecro strap routing |
| that the strap not wrap | |
|
|
|
| around the black rod, brake |
|
|
|
| cable housing or red |
handlebar release lever. Wrapping the strap around the black rod can interfere with the correct function of the handlebar release system resulting in the handlebar unexpectedly releasing, causing loss of control and injury.
Wrapping the strap around the brake cable housing can interfere with the proper function of the brake causing loss of control and injury.
Wrapping the strap around the red handlebar release lever can interfere with the correct function of the handlebar release system resulting in the handlebar unexpectedly releasing, causing loss of control and injury.
WARNING - It is critical | Velcro Strap |
| |
| |||
Routed Above |
| ||
that the strap not wrap |
| ||
Brake Cable Housing |
| ||
around the brake cable |
| ||
|
|
| |
housing. Wrapping the |
|
|
|
strap around the brake |
|
|
|
cable housing can interfere | Brake Cable |
| |
with the proper function of |
| ||
Housing |
| ||
the brake causing loss of |
| ||
|
|
| |
control and injury. |
|
|
|
|
|
| |
Correct routing of the strap is |
|
|
|
|
|
| |
shown in figure 5. |
|
|
|
B) Continue wrapping the |
|
|
|
velcro strap around the | Fig. 5 Velcro strap routed over |
| |
handlebar and insert through | brake cable housing |
| |
the black plastic ring as shown |
|
|
|
in figure 3. |
|
|
|
C)Loop the velcro strap through the ring and secure as shown in figure 4.
D)Repeat with the above steps with the rear strap on the opposite side.
CARE INSTRUCTIONS
Hand wash cold, hang dry, do not dry clean or iron.
LIMITED WARRANTY
BOB Trailers Inc. takes pride in its workmanship and strives to manufacture the best products possible. Therefore, we warranty the Handlebar Console against defects in material and workmanship subject to the conditions listed below. Since no product is indestructible, it does not cover defects attributable to or resulting from normal wear, abuse or alteration.
. The Handlebar Console is warranted for one year from the date of original purchase.
. Warranty is only valid for the original purchaser.
. Proof of purchase is required to exercise this warranty.
. Labor and freight charges are not included.
. Normal wear, neglect, abuse, accidents, improper use are not covered by this warranty.
. Warranty claims must be made through an authorized dealer.
Velcro Strap |
Looped Through |
Plastic Ring |
Velcro Strap 
Around Handlebar
Fig. 3 Velcro strap routing
Correct routing of the velcro strap is shown in figure 2.
B)Continue wrapping the velcro strap around the handlebar and insert through the black plastic ring as shown in figure 3.
C)Loop the velcro strap through the ring and secure as shown in figure 4.
. This warranty is limited to the repair or replacement of the defective part. BOB shall in no event be responsible for consequential or special damages.
. This limited warranty is the only express or implied warranty applicable to BOB. Any implied warranties, including warranties of merchantability and fitness shall be limited in scope and duration in accordance with this limited warranty.
OMA01B