Bosch Appliances 125B NG Water Connections, For Your Safety Read Before Lighting the Pilot

Models: 125B NG 125B LP

1 24
Download 24 pages 50.67 Kb
Page 12
Image 12

WATER CONNECTIONS

Install the heater centrally in the building if possible and make hot water piping runs as short as possible When facing the heater, the cold water inlet will be on the right and the hot water outlet on the left..

Although water piping throughout the building may be other than copper, copper or galvanized piping should be used when connecting to the heaters ½” male NPT flex connectors (follow local codes if more stringent). Plastics or other PEX type plumbing line materials are not suitable for connecting directly to the water heater. Keep water inlet pipe to no less than ½” (19.05mm) diameter to allow the full flow capacity. If the cold and hot connections to the heater are reversed, the heater will not function.

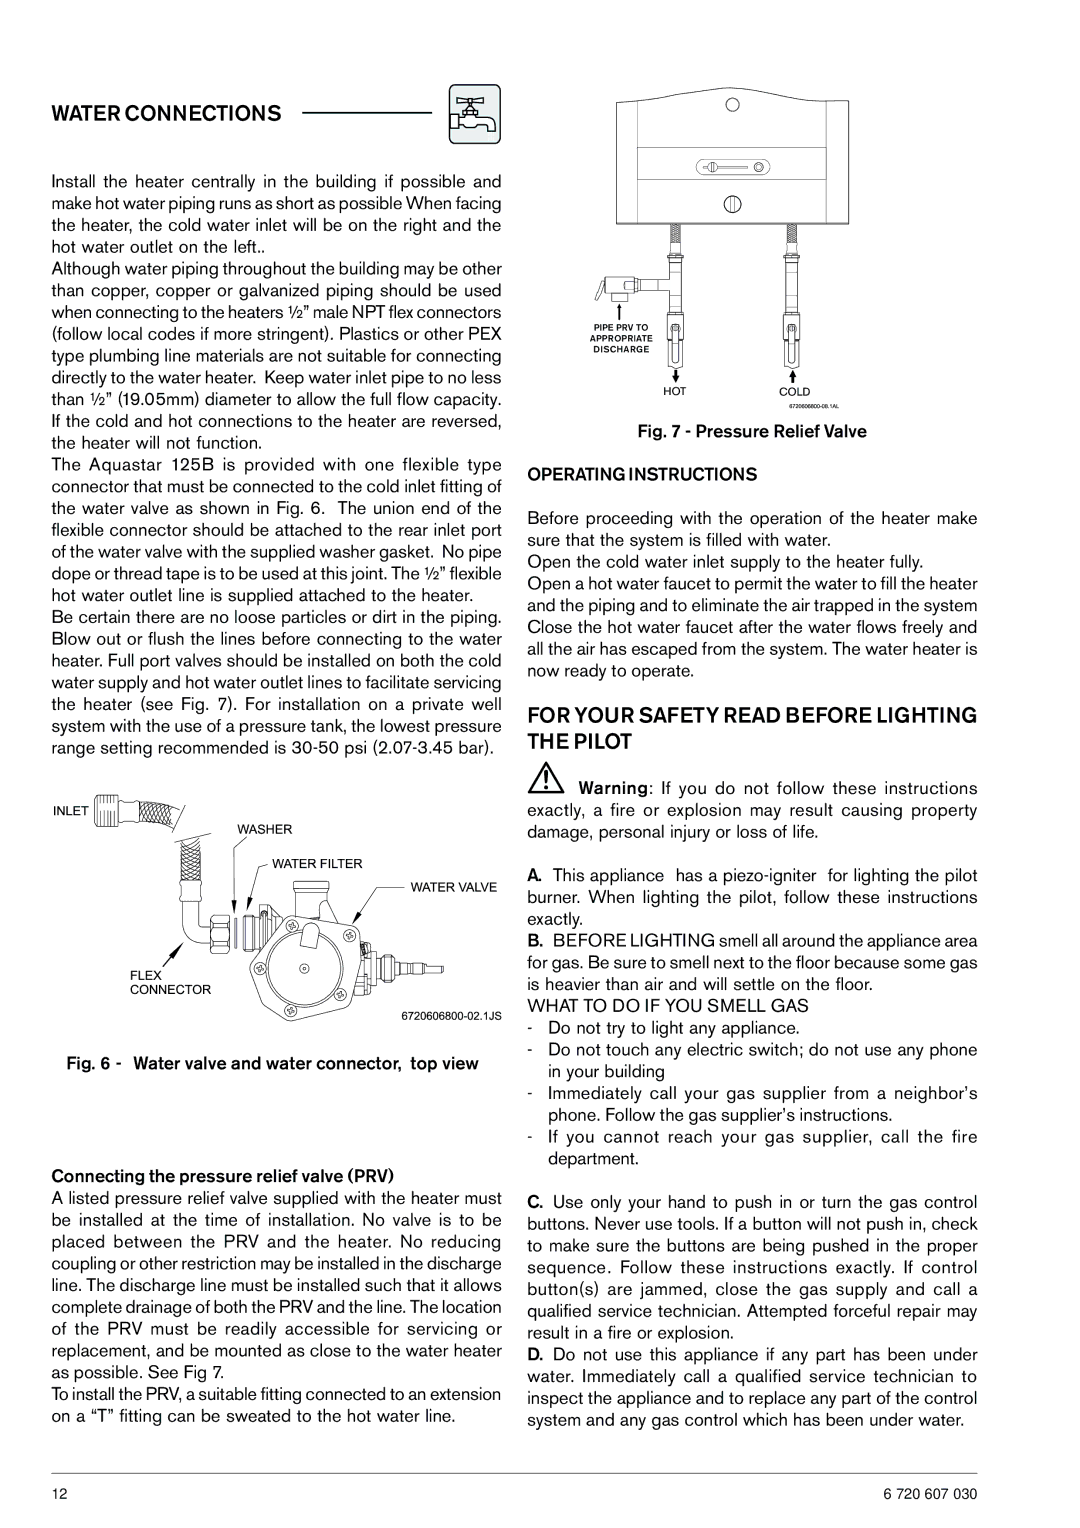
The Aquastar 125B is provided with one flexible type connector that must be connected to the cold inlet fitting of the water valve as shown in Fig. 6. The union end of the flexible connector should be attached to the rear inlet port of the water valve with the supplied washer gasket. No pipe dope or thread tape is to be used at this joint. The ½” flexible hot water outlet line is supplied attached to the heater.

Be certain there are no loose particles or dirt in the piping. Blow out or flush the lines before connecting to the water heater. Full port valves should be installed on both the cold water supply and hot water outlet lines to facilitate servicing the heater (see Fig. 7). For installation on a private well system with the use of a pressure tank, the lowest pressure range setting recommended is 30-50 psi (2.07-3.45 bar).

Fig. 6 - Water valve and water connector, top view

Connecting the pressure relief valve (PRV)

A listed pressure relief valve supplied with the heater must be installed at the time of installation. No valve is to be placed between the PRV and the heater. No reducing coupling or other restriction may be installed in the discharge line. The discharge line must be installed such that it allows complete drainage of both the PRV and the line. The location of the PRV must be readily accessible for servicing or replacement, and be mounted as close to the water heater as possible. See Fig 7.

To install the PRV, a suitable fitting connected to an extension on a “T” fitting can be sweated to the hot water line.

PIPE PRV TO

APPROPRIATE

DISCHARGE

Fig. 7 - Pressure Relief Valve

OPERATING INSTRUCTIONS

Before proceeding with the operation of the heater make sure that the system is filled with water.

Open the cold water inlet supply to the heater fully.

Open a hot water faucet to permit the water to fill the heater and the piping and to eliminate the air trapped in the system Close the hot water faucet after the water flows freely and all the air has escaped from the system. The water heater is now ready to operate.

FOR YOUR SAFETY READ BEFORE LIGHTING THE PILOT

Warning: If you do not follow these instructions exactly, a fire or explosion may result causing property damage, personal injury or loss of life.

A.This appliance has a piezo-igniter for lighting the pilot burner. When lighting the pilot, follow these instructions exactly.

B.BEFORE LIGHTING smell all around the appliance area for gas. Be sure to smell next to the floor because some gas is heavier than air and will settle on the floor.

WHAT TO DO IF YOU SMELL GAS - Do not try to light any appliance.

- Do not touch any electric switch; do not use any phone in your building

- Immediately call your gas supplier from a neighbor’s phone. Follow the gas supplier’s instructions.

- If you cannot reach your gas supplier, call the fire department.

C.Use only your hand to push in or turn the gas control buttons. Never use tools. If a button will not push in, check to make sure the buttons are being pushed in the proper sequence. Follow these instructions exactly. If control button(s) are jammed, close the gas supply and call a qualified service technician. Attempted forceful repair may result in a fire or explosion.

D.Do not use this appliance if any part has been under water. Immediately call a qualified service technician to inspect the appliance and to replace any part of the control system and any gas control which has been under water.

12

6 720 607 030

Page 12
Image 12
Bosch Appliances 125B NG Water Connections, For Your Safety Read Before Lighting the Pilot, Operating Instructions

125B NG, 125B LP specifications

Bosch Appliances has long been a trusted name in kitchen technology, and their 125B LP and 125B NG models are no exception. These gas appliances combine advanced features with top-notch engineering, ensuring excellent performance and reliability in the kitchen. Designed for both professionals and home cooks, the 125B series caters to diverse culinary needs.

One of the main features of the Bosch 125B model is its dual fuel capability. The LP (liquefied petroleum) and NG (natural gas) options make it flexible for various installations and preferences. This versatility ensures that users can easily find the right setup for their kitchens, whether they're using propane or natural gas.

The burners in the 125B series are designed with precision in mind. Each model features high-efficiency burners that deliver a maximum output of 15,000 BTUs. This level of power enables rapid heating for boiling, frying, or searing, while the low-simmer setting allows for gentle cooking tasks such as sauces and delicate soups. The continuous cast iron grates offer both durability and stability, allowing for easy movement of pots and pans across the cooking surface.

An additional technological highlight of the Bosch 125B series is the flame failure safety device. This essential safety feature automatically cuts off the gas supply if the flame goes out, providing peace of mind for users. The inclusion of electronic ignition also enhances convenience, making it easy to start the burners with just a turn of the knob.

The sleek design of the Bosch 125B appliances blends seamlessly into any kitchen decor. With a professional stainless steel finish, they add an element of sophistication while being easy to clean and maintain. The intuitive control knobs are ergonomically designed, ensuring smooth and precise adjustments to the flame.

In terms of installation, both the 125B LP and NG models are designed for straightforward setup, making them suitable for renovation projects or new builds. Bosch Appliances also offers a range of accessories to further enhance the functionality and aesthetic of the kitchen setup.

Overall, the Bosch 125B LP and 125B NG appliances represent a perfect combination of efficiency, safety, and style. With their robust features and advanced technology, they promise to elevate the cooking experience for anyone who values quality and performance in the kitchen. Whether you're a novice home cook or a seasoned chef, these models are sure to meet and exceed your culinary expectations.