MODELOS QP142SS • QP142WW • QP142BL

Página 19

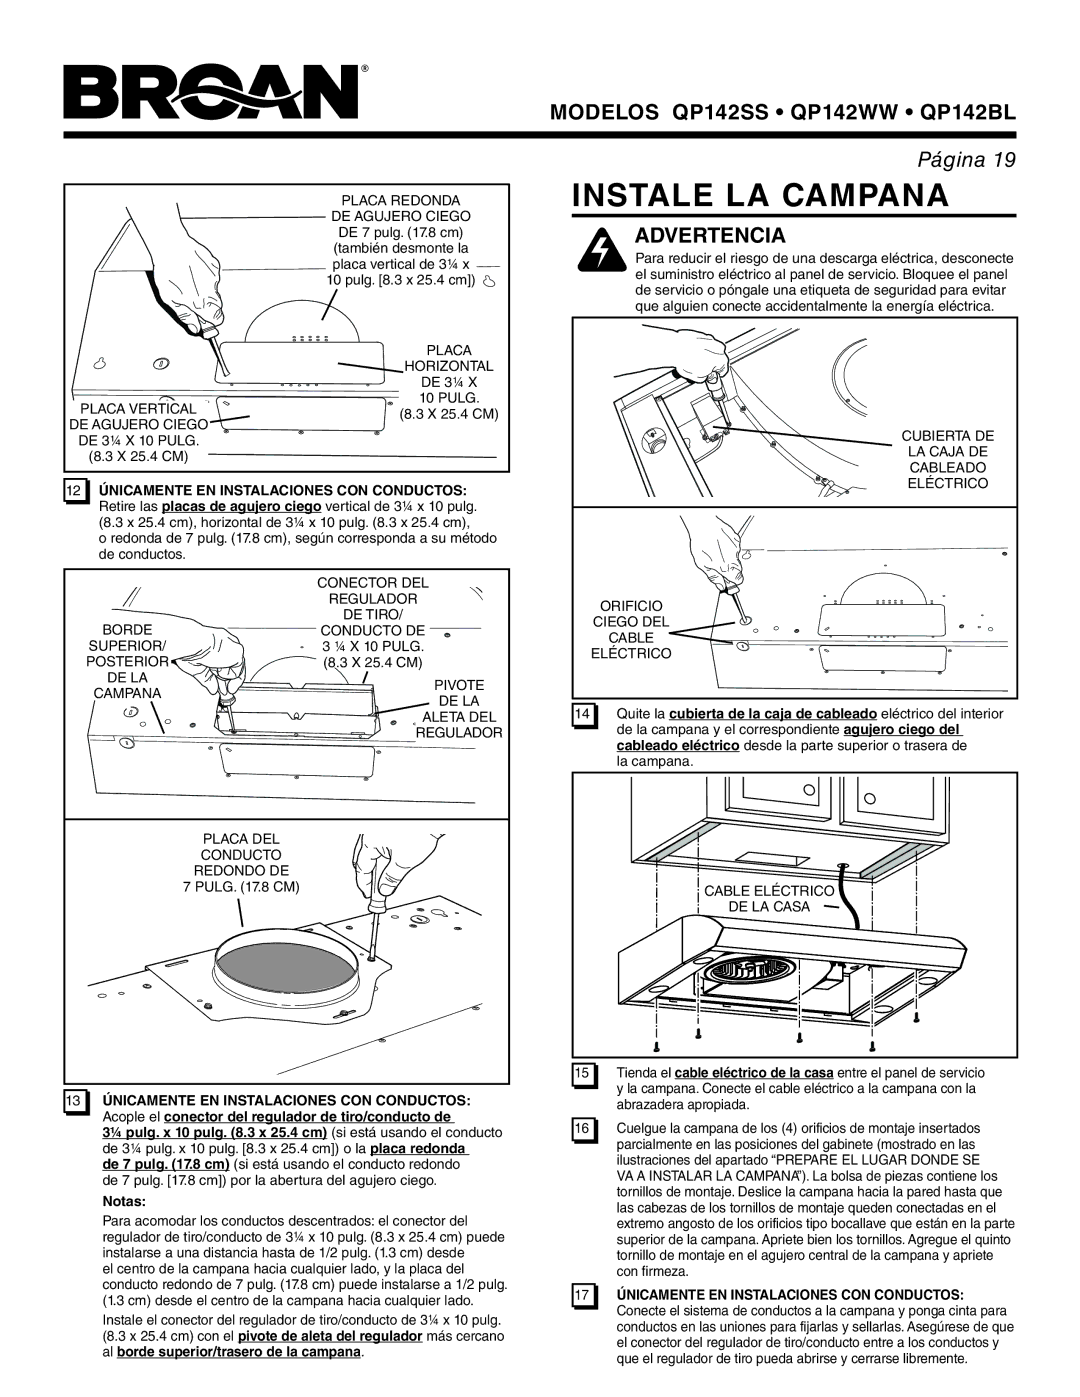
PLACA VERTICAL

DE AGUJERO CIEGO DE 3¼ X 10 PULG.

(8.3 X 25.4 CM)

PLACA REDONDA

DE AGUJERO CIEGO

DE 7 pulg. (17.8 cm) (también desmonte la placa vertical de 3¼ x 10 pulg. [8.3 x 25.4 cm])

PLACA

HORIZONTAL DE 3¼ X

10 PULG.

(8.3 X 25.4 CM)

INSTALE LA CAMPANA

ADVERTENCIA

Para reducir el riesgo de una descarga eléctrica, desconecte el suministro eléctrico al panel de servicio. Bloquee el panel de servicio o póngale una etiqueta de seguridad para evitar que alguien conecte accidentalmente la energía eléctrica.

CUBIERTA DE

LA CAJA DE

CABLEADO

12ÚNICAMENTE EN INSTALACIONES CON CONDUCTOS: Retire las placas de agujero ciego vertical de 3¼ x 10 pulg.

(8.3 x 25.4 cm), horizontal de 3¼ x 10 pulg. (8.3 x 25.4 cm),

o redonda de 7 pulg. (17.8 cm), según corresponda a su método de conductos.


CONECTOR DEL


REGULADOR

BORDE

DE TIRO/

CONDUCTO DE

SUPERIOR/

3 ¼ X 10 PULG.

POSTERIOR

(8.3 X 25.4 CM)

DE LA

PIVOTE

CAMPANA

DE LA


ALETA DEL


REGULADOR


PLACA DEL


CONDUCTO


REDONDO DE


7 PULG. (17.8 CM)

13ÚNICAMENTE EN INSTALACIONES CON CONDUCTOS: Acople el conector del regulador de tiro/conducto de

3¼ pulg. x 10 pulg. (8.3 x 25.4 cm) (si está usando el conducto de 3¼ pulg. x 10 pulg. [8.3 x 25.4 cm]) o la placa redonda

de 7 pulg. (17.8 cm) (si está usando el conducto redondo de 7 pulg. [17.8 cm]) por la abertura del agujero ciego.

Notas:

Para acomodar los conductos descentrados: el conector del regulador de tiro/conducto de 3¼ x 10 pulg. (8.3 x 25.4 cm) puede instalarse a una distancia hasta de 1/2 pulg. (1.3 cm) desde

el centro de la campana hacia cualquier lado, y la placa del conducto redondo de 7 pulg. (17.8 cm) puede instalarse a 1/2 pulg. (1.3 cm) desde el centro de la campana hacia cualquier lado.

Instale el conector del regulador de tiro/conducto de 3¼ x 10 pulg. (8.3 x 25.4 cm) con el pivote de aleta del regulador más cercano al borde superior/trasero de la campana.

ELÉCTRICO

ORIFICIO

CIEGO DEL

CABLE

ELÉCTRICO

14 Quite la cubierta de la caja de cableado eléctrico del interior

de la campana y el correspondiente agujero ciego del cableado eléctrico desde la parte superior o trasera de la campana.

CABLE ELÉCTRICO

DE LA CASA

15 Tienda el cable eléctrico de la casa entre el panel de servicio y la campana. Conecte el cable eléctrico a la campana con la abrazadera apropiada.

16 Cuelgue la campana de los (4) orificios de montaje insertados parcialmente en las posiciones del gabinete (mostrado en las ilustraciones del apartado “PREPARE EL LUGAR DONDE SE VA A INSTALAR LA CAMPANA”). La bolsa de piezas contiene los tornillos de montaje. Deslice la campana hacia la pared hasta que las cabezas de los tornillos de montaje queden conectadas en el extremo angosto de los orificios tipo bocallave que están en la parte superior de la campana. Apriete bien los tornillos. Agregue el quinto tornillo de montaje en el agujero central de la campana y apriete con firmeza.

17ÚNICAMENTE EN INSTALACIONES CON CONDUCTOS:

Conecte el sistema de conductos a la campana y ponga cinta para conductos en las uniones para fijarlas y sellarlas. Asegúrese de que el conector del regulador de tiro/conducto entre a los conductos y que el regulador de tiro pueda abrirse y cerrarse libremente.

Page 19
Image 19
Broan QP142SS, QP142WW, QP142BL manual Instale LA Campana, 17 Únicamente EN Instalaciones CON Conductos

QP142BL, QP142SS, QP142WW specifications

The Broan QP142 Series comprises three stylish under-cabinet range hoods: QP142SS (stainless steel), QP142WW (white), and QP142BL (black). These hoods are designed to enhance any kitchen decor while providing exceptional ventilation performance essential for maintaining air quality during cooking.

One of the main features of the Broan QP142 Series is its powerful motor that offers a maximum air movement of 250 CFM, ensuring that smoke, odors, and grease are effectively removed from the kitchen environment. This efficiency is critical, especially in kitchens where heavy cooking occurs, as it helps to maintain clean air and a pleasant cooking experience.

The QP142 models incorporate a sleek design with soft edges, making them not only functional but also visually appealing. Their under-cabinet installation allows for an unobtrusive fit in any kitchen, ensuring that they seamlessly blend into existing cabinetry. The range hoods are also available in three distinct colors: stainless steel, white, and black, catering to various kitchen aesthetics and personal preferences.

In terms of technology, the Broan QP142 Series is equipped with a multi-speed motor. This feature allows the user to adjust the speed according to their cooking needs, whether it is a light simmer or a full-scale sauté. The user-friendly controls make it easy to switch between speeds, offering convenience during busy cooking times.

Additionally, the QP142 models have integrated dishwasher-safe aluminum grease filters that capture harmful particulates, ensuring optimal performance and easy maintenance. Regular cleaning of these filters not only enhances efficiency but also prolongs the lifespan of the range hood.

Another notable characteristic of the Broan QP142 Series is its built-in lighting. The hood features a two-level lighting system, providing both task and ambient lighting. This feature significantly enhances visibility over the cooking surface, making it easier to prepare meals while creating an inviting kitchen atmosphere.

In conclusion, the Broan QP142SS, QP142WW, and QP142BL are ideal choices for anyone looking for a combination of style, performance, and convenience in a kitchen range hood. With powerful ventilation, user-friendly features, and a sleek design, these models exemplify what modern kitchen appliances should deliver. Whether you are a casual cook or a culinary enthusiast, the Broan QP142 Series is designed to elevate your cooking experience while keeping your kitchen air fresh and clean.