
PQ-1500 specifications
The Brother PQ-1500 is a widely appreciated quilting and sewing machine known for its versatile features, modern technology, and user-friendly design. It caters to both novice sewers and experienced quilters, making it a favorite in the crafting community.One of the standout features of the PQ-1500 is its impressive sewing speed. With a maximum speed of 1,500 stitches per minute, it allows users to complete projects efficiently without compromising on quality. This high-speed capability is particularly beneficial for quilters who need to tackle large quilts in a timely manner.
The PQ-1500 boasts a spacious work area, accommodating a wide variety of projects. Its generous throat space enables users to maneuver large fabrics and quilts easily. This is a significant advantage when working with bulky materials or intricate designs.
The machine is equipped with a built-in walking foot, which is essential for maintaining even fabric feeding during quilting. This feature minimizes fabric shifting and puckering, ensuring flawless stitching on multiple layers. Coupled with an adjustable presser foot pressure, it provides the flexibility needed for various fabric types.
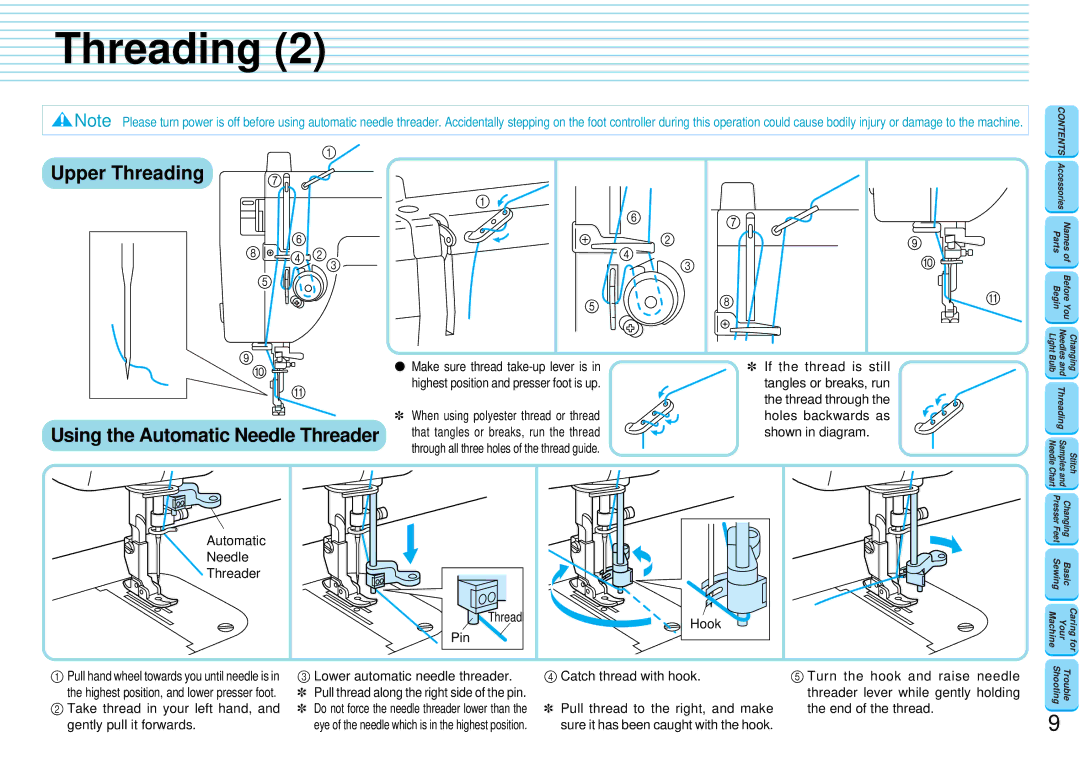
In terms of technology, the Brother PQ-1500 comes with an automatic needle threading system, simplifying the threading process and saving time. Additionally, it offers a touch of modern convenience with a quick-set bobbin feature that allows for easy bobbin insertion and removal.
One of the appealing characteristics of the PQ-1500 is its adjustable stitch length and width settings, enabling users to customize their projects. The machine can produce straight stitches from 1mm to 7mm in length, making it suitable for both delicate and heavy-duty fabrics.
Another noteworthy feature is the machine's pivot function, which allows the needle to remain in the fabric when the presser foot lifts. This facilitates precise cornering and maneuvering, particularly useful in quilting and patchwork projects.
The Brother PQ-1500 is designed with user comfort in mind. It features an ergonomic sewing table and a foot pedal that can be controlled easily, allowing for a seamless sewing experience. Its lightweight design makes it portable, so it can be easily transported to sewing classes or quilting retreats.
In summary, the Brother PQ-1500 combines high-speed performance, advanced features, and user-oriented design, making it an ideal choice for quilting enthusiasts. With its blend of technology and ease of use, it stands out as a reliable companion for all sewing projects.