PRINTING LABELS
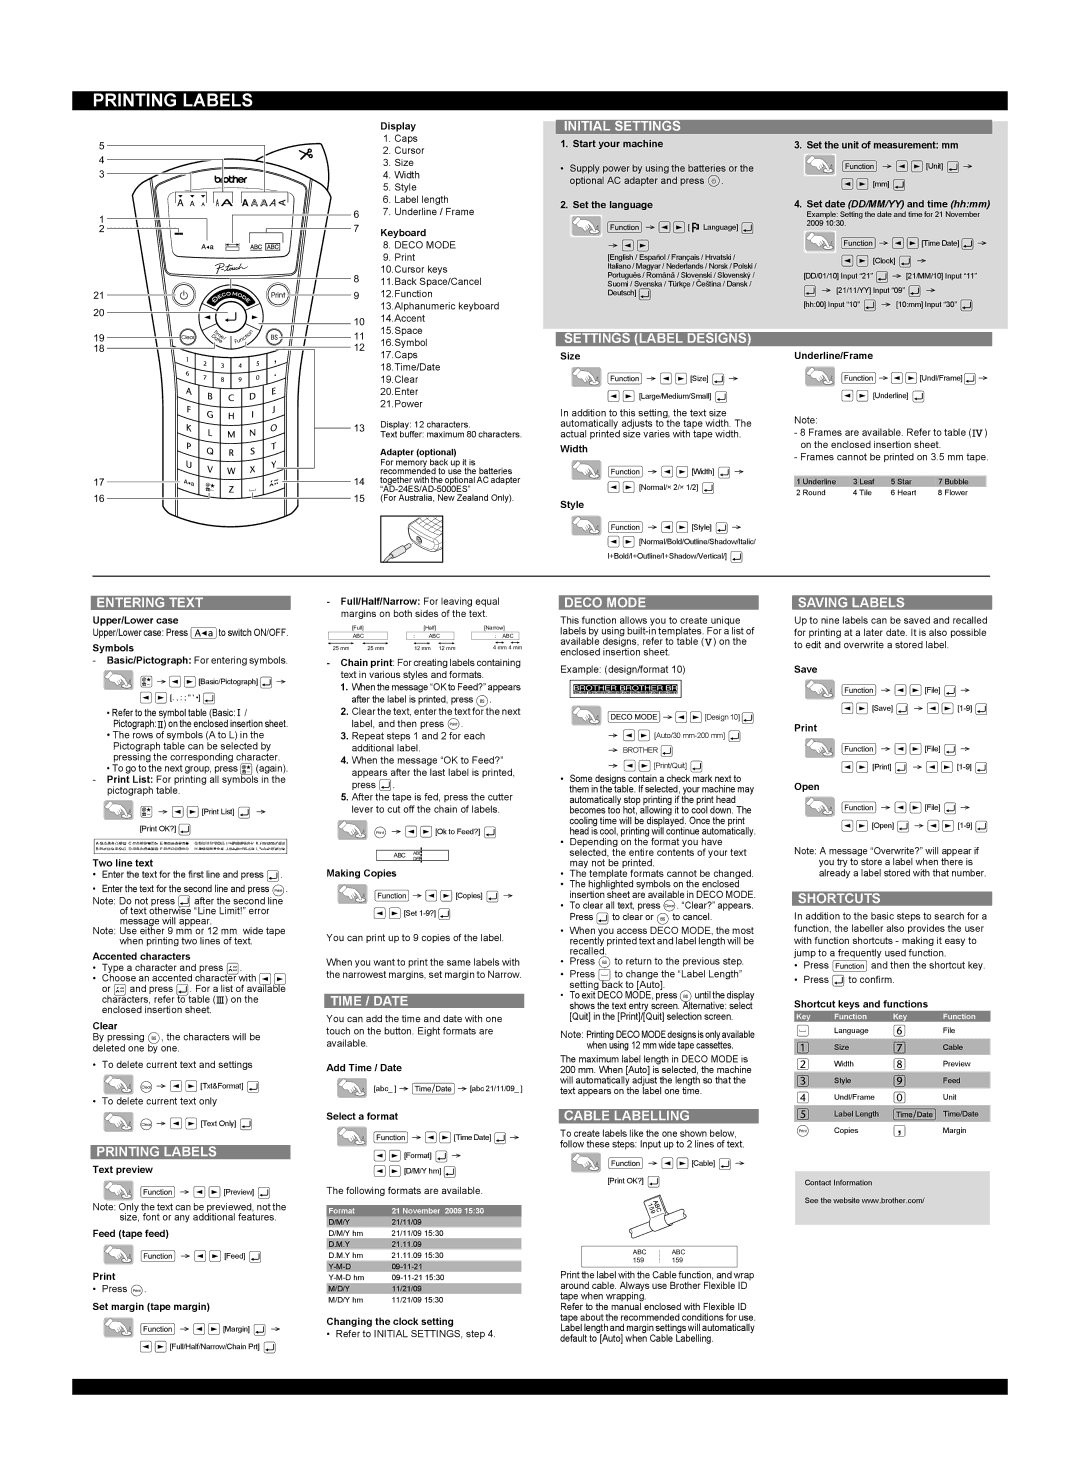
| | | | | | | | | | | | | | | | | | | Display |
5 | | | | | | | | | | | | | | | | | | | 1. | Caps |
| | | | | | | | | | | | | | | | | | 2. | Cursor |
4 | | | | | | | | | | | | | | | | | | |
| | | | | | | | | | | | | | | | | | 3. | Size |
| | | | | | | | | | | | | | | | | |
3 | | | | | | | | | | | | | | | | | | | 4. | Width |
| | | | | | | | | | | | | | | | | | | 5. | Style |
| | | | | | | | | | | | | | | | | | | 6. | Label length |
1 | | | | | | | | | | | | | 6 | 7. | Underline / Frame |
| | | | | | | | | | | | 7 | | | | |
2 | | | | | | | | | | | | | Keyboard |
| | | | | | | | | | |
| | | | | | | | | | | | | | | | | | |
| | | | | | | | | | | | | | | | | | | | 8. DECO MODE |
| | | | | | | | | | | | | | | | | | |
| | | | | | | | | | | | | | | | | | |
| | | | | | | | | | | | | | | | | | | 9. | Print |
| | | | | | | | | | | | | 8 | 10.Cursor keys |
| | | | | | | | | | | | | 11.Back Space/Cancel |
21 | | | | | | | | | | | | | 9 | 12.Function |
| | | | | | | | |
| | | | | | | | |
20 | | | | | | | | | | | | | | | | | | | 13.Alphanumeric keyboard |
| | | | | | | | | | | | | | | | | 10 | 14.Accent |
| | | | | | | | | | | | | | | | | |
| | | | | | | | | | | | | | | | | 15.Space |
19 | | | | | | | | | | | | | 11 |
| | | | | | | | | | | | 16.Symbol |
| | | | | | | |
18 | | | | | | | | | | | | | 12 |
| | | | | | | | | | | | 17.Caps |
| | | | | | | | | | | | | | | | | | |
| | | | | | | | | | | | | | | | | | | 18.Time/Date |
| | | | | | | | | | | | | | | | | | | 19.Clear |
| | | | | | | | | | | | | | | | | | | 20.Enter |
| | | | | | | | | | | | | | | | | | | 21.Power |
| | | | | | | | | | | | | 13 | Display: 12 characters. |
| | | | | | | | | | | | | Text buffer: maximum 80 characters. |
| | | | | | | | | | | | | | | | | | |
| | | | | | | | | | | | | | | | | | | Adapter (optional) |
| | | | | | | | | | | | | | | | | | | For memory back up it is |
17 | | | | | | | | | | | | | 14 | recommended to use the batteries |
| | | | | | | | | | | | together with the optional AC adapter |
16 | | | | | | | | | | | | | 15 | “AD-24ES/AD-5000ES” |
| | | | | | | | | | | | (For Australia, New Zealand Only). |
| | | | | | | | | | |
| | | | | | | | | | | | | | | | | | | | | | |
| | | | | | | | | | | | | | | | | | | | | | |
3. Set the unit of measurement: mm


 [Unit]
  [mm]
[mm]
4.Set date (DD/MM/YY) and time (hh:mm)
Example: Setting the date and time for 21 November 2009 10:30.


 [Time Date]
 [Clock]
[DD/01/10] Input “21” 
 [21/MM/10] Input “11”
[21/11/YY] Input “09” 
[hh:00] Input “10” 
 [10:mm] Input “30”
Underline/Frame


 [Undl/Frame]
 [Underline]
Note:
-8 Frames are available. Refer to table ( ) on the enclosed insertion sheet.
-Frames cannot be printed on 3.5 mm tape.
1 | Underline | 3 | Leaf | 5 | Star | 7 | Bubble |
2 | Round | 4 | Tile | 6 | Heart | 8 | Flower |
-Full/Half/Narrow: For leaving equal margins on both sides of the text.
| [Full] | | [Half] | [Narrow] |
| ABC | : | ABC | : ABC |
25 mm | 25 mm | 12 mm 12 mm | 4 mm 4 mm |
-Chain print: For creating labels containing text in various styles and formats.
1.When the message “OK to Feed?” appears after the label is printed, press  .
.
2.Clear the text, enter the text for the next label, and then press  .
.
3.Repeat steps 1 and 2 for each additional label.
4.When the message “OK to Feed?” appears after the last label is printed, press  .
.
5.After the tape is fed, press the cutter lever to cut off the chain of labels.

 [Ok to Feed?]
ABC ABC
DEF
Making Copies


 [Copies]

 [Set 1-9?]
You can print up to 9 copies of the label.
When you want to print the same labels with the narrowest margins, set margin to Narrow.
TIME / DATE
You can add the time and date with one touch on the button. Eight formats are available.
Add Time / Date
[abc_ ] 

 [abc 21/11/09_ ]
Select a format


 [Time Date]


 [Format]


 [D/M/Y hm]
The following formats are available.
Format | 21 November 2009 15:30 |
D/M/Y | 21/11/09 |
D/M/Y hm | 21/11/09 15:30 |
D.M.Y | 21.11.09 |
D.M.Y hm | 21.11.09 15:30 |
Y-M-D | 09-11-21 |
Y-M-D hm | 09-11-21 15:30 |
M/D/Y | 11/21/09 |
M/D/Y hm | 11/21/09 15:30 |
Changing the clock setting
• Refer to INITIAL SETTINGS, step 4.
DECO MODE
This function allows you to create unique labels by using built-in templates. For a list of available designs, refer to table ( ) on the enclosed insertion sheet.
Example: (design/format 10)


 [Design 10]
[Auto/30 mm-200 mm] 
BROTHER 

 [Print/Quit]
•Some designs contain a check mark next to them in the table. If selected, your machine may automatically stop printing if the print head becomes too hot, allowing it to cool down. The cooling time will be displayed. Once the print head is cool, printing will continue automatically.
•Depending on the format you have selected, the entire contents of your text may not be printed.
•The template formats cannot be changed.
•The highlighted symbols on the enclosed insertion sheet are available in DECO MODE.
•To clear all text, press  . “Clear?” appears. Press
  to clear or
  to cancel.
•When you access DECO MODE, the most recently printed text and label length will be recalled.
•Press  to return to the previous step.
•Press  to change the “Label Length” setting back to [Auto].
•To exit DECO MODE, press  until the display shows the text entry screen. Alternative: select [Quit] in the [Print]/[Quit] selection screen.
Note: Printing DECO MODE designs is only available when using 12 mm wide tape cassettes.
The maximum label length in DECO MODE is 200 mm. When [Auto] is selected, the machine will automatically adjust the length so that the text appears on the label one time.
CABLE LABELLING
To create labels like the one shown below, follow these steps: Input up to 2 lines of text.


 [Cable]
  [Print OK?]
ABC ABC
159 159
Print the label with the Cable function, and wrap around cable. Always use Brother Flexible ID tape when wrapping.
Refer to the manual enclosed with Flexible ID tape about the recommended conditions for use. Label length and margin settings will automatically default to [Auto] when Cable Labelling.
SAVING LABELS
Up to nine labels can be saved and recalled for printing at a later date. It is also possible to edit and overwrite a stored label.
Save

 [File]

 [Save]


 [1-9]
[1-9] 
Print

 [File]
[Print] 


 [1-9]
[1-9] 
Open

 [File]

 [Open]


 [1-9]
[1-9] 
Note: A message “Overwrite?” will appear if you try to store a label when there is already a label stored with that number.
SHORTCUTS
In addition to the basic steps to search for a function, the labeller also provides the user with function shortcuts - making it easy to jump to a frequently used function.
•Press  and then the shortcut key.
•Press  to confirm.
Shortcut keys and functions
Key | Function | Key | Function |
| Language | | File |
| Size | | Cable |
| Width | | Preview |
| Style | | Feed |
| Undl/Frame | | Unit |
| Label Length | | Time/Date |
| Copies | | Margin |
Contact Information
See the website www.brother.com/