SERVICE (cont.)


4.

Remove sprayhead and the hex nut securing the

TANK HEATER


sprayhead tube to the hood. Set aside for reas-


sembly.


5.

Remove the eight #8-32 nuts securing the tank lid


to the tank.


6.

Remove the tank lid with sprayhead tube and tank


heater.


7

Remove the two hex nuts securing the tank heater


to the tank lid. Remove tank heater with gaskets


and discard.


8.

Install new tank heater with gaskets on the tank lid


and secure with two hex nuts.


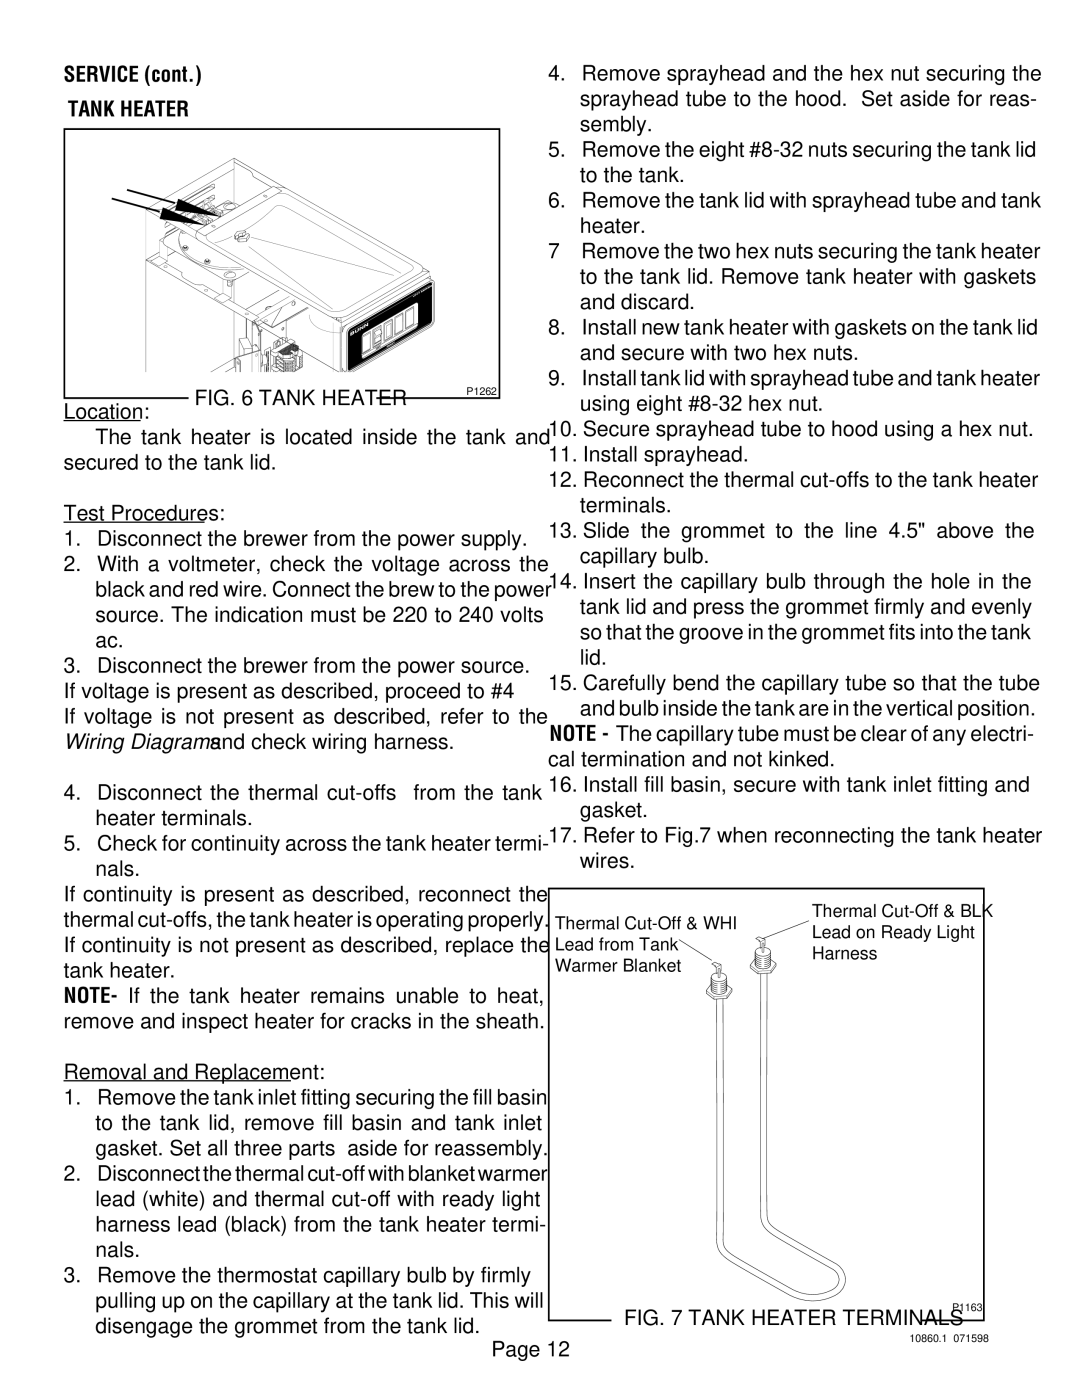
FIG. 6 TANK HEATER

P1262

9.

Install tank lid with sprayhead tube and tank heater


using eight #8-32 hex nut.


Location:


10.

Secure sprayhead tube to hood using a hex nut.

The tank heater is located inside the tank and

11.

Install sprayhead.


secured to the tank lid.


12.

Reconnect the thermal cut-offs to the tank heater


Test Procedures:


terminals.


13.

Slide the grommet to the line 4.5" above the

1. Disconnect the brewer from the power supply.


capillary bulb.


2. With a voltmeter, check the voltage across the


14.

Insert the capillary bulb through the hole in the

black and red wire. Connect the brew to the power


tank lid and press the grommet firmly and evenly

source. The indication must be 220 to 240 volts


so that the groove in the grommet fits into the tank

ac.


lid.


3. Disconnect the brewer from the power source.


15.

Carefully bend the capillary tube so that the tube

If voltage is present as described, proceed to #4


and bulb inside the tank are in the vertical position.

If voltage is not present as described, refer to the


NOTE - The capillary tube must be clear of any electri-

Wiring Diagrams and check wiring harness.


cal termination and not kinked.


4. Disconnect the thermal cut-offs from the tank

16.

Install fill basin, secure with tank inlet fitting and


gasket.


heater terminals.


17.

Refer to Fig.7 when reconnecting the tank heater

5. Check for continuity across the tank heater termi-


wires.


nals.


If continuity is present as described, reconnect the


Thermal Cut-Off & BLK

thermal cut-offs, the tank heater is operating properly.

Thermal Cut-Off & WHI

Lead on Ready Light

If continuity is not present as described, replace the

Lead from Tank

Harness

tank heater.


Warmer Blanket


NOTE- If the tank heater remains unable to heat,


remove and inspect heater for cracks in the sheath.


Removal and Replacement:

1.Remove the tank inlet fitting securing the fill basin to the tank lid, remove fill basin and tank inlet gasket. Set all three parts aside for reassembly.

2.Disconnect the thermal cut-off with blanket warmer lead (white) and thermal cut-off with ready light harness lead (black) from the tank heater termi- nals.

3.Remove the thermostat capillary bulb by firmly

pulling up on the capillary at the tank lid. This will


P1163

FIG. 7 TANK HEATER TERMINALS


disengage the grommet from the tank lid.


10860.1

071598

Page 12


Page 12
Image 12
Bunn VP17A Sembly, To the tank, Heater, Discard, Secure with two hex nuts, Tank heater is located inside the tank

VP17A specifications

The Bunn VP17A is a commercial-grade coffee brewer designed to meet the demands of high-volume environments, such as cafes, restaurants, and convenience stores. Renowned for its reliability and performance, the VP17A is engineered to deliver consistent quality coffee with every brew, ensuring that customers enjoy a fresh cup each time.

One of the standout features of the Bunn VP17A is its dual voltage capability, accommodating both 120V and 240V electrical systems. This flexibility allows the brewer to be used in various settings without the need for extensive electrical modifications. Its stainless-steel construction not only enhances durability but also provides an elegant appearance that fits seamlessly into any commercial kitchen environment.

The machine is equipped with a large-capacity water tank that can brew multiple batches of coffee back-to-back. With a brewing capacity of up to 3.8 gallons per hour, the VP17A is ideal for busy establishments where speed is crucial. Its unique spray head design ensures uniform extraction of coffee grounds, resulting in a rich flavor profile and optimal strength in each brew.

Another significant characteristic of the Bunn VP17A is its simplicity of operation. The intuitive control panel allows baristas to easily select brew sizes and manage water flow, making it accessible even for beginners. The brewer features an automatic fill system, which maintains the proper water level for efficient brewing without requiring manual input.

For added convenience, the VP17A also includes a built-in pourover feature, enabling users to brew coffee even in the absence of a direct water line connection. This versatility makes the machine an excellent choice for temporary setups or events where traditional plumbing may not be available.

In terms of technology, the VP17A employs an advanced thermal coffee brewer design that optimizes extraction temperatures, resulting in a balanced flavor profile. The machine is also designed for easy cleaning and maintenance, which is essential for ensuring longevity and sustained performance in a commercial setting.

Ultimately, the Bunn VP17A stands out in the coffee brewing market for its powerful performance, durable construction, and user-friendly design. Its combination of speed, capacity, and innovative features makes it an ideal choice for businesses aiming to serve high-quality coffee quickly and efficiently. With the Bunn VP17A, operators can achieve a consistently excellent brew that keeps customers coming back for more.