HOW TO FOLD AND MOVE THE TREADMILL
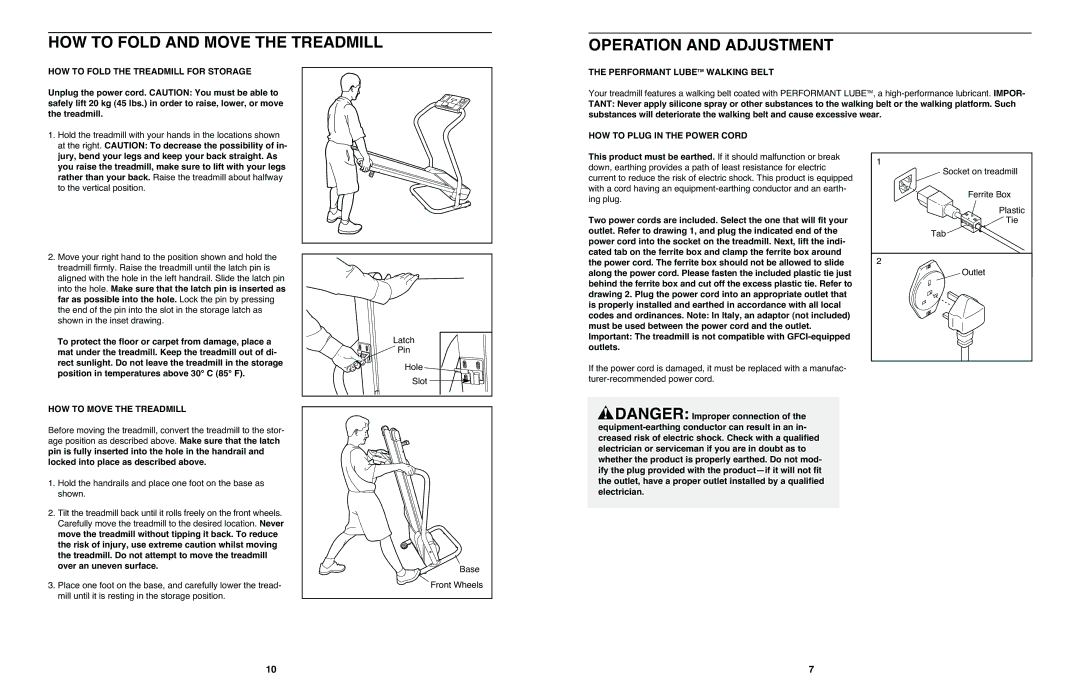
HOW TO FOLD THE TREADMILL FOR STORAGE
Unplug the power cord. CAUTION: You must be able to safely lift 20 kg (45 lbs.) in order to raise, lower, or move the treadmill.
OPERATION AND ADJUSTMENT
THE PERFORMANT LUBETM WALKING BELT
Your treadmill features a walking belt coated with PERFORMANT LUBETM, a
TANT: Never apply silicone spray or other substances to the walking belt or the walking platform. Such substances will deteriorate the walking belt and cause excessive wear.
1. Hold the treadmill with your hands in the locations shown at the right. CAUTION: To decrease the possibility of in- jury, bend your legs and keep your back straight. As you raise the treadmill, make sure to lift with your legs rather than your back. Raise the treadmill about halfway to the vertical position.
HOW TO PLUG IN THE POWER CORD
This product must be earthed. If it should malfunction or break down, earthing provides a path of least resistance for electric current to reduce the risk of electric shock. This product is equipped with a cord having an
1 |
Socket on treadmill |
Ferrite Box |
Plastic |
2.Move your right hand to the position shown and hold the treadmill firmly. Raise the treadmill until the latch pin is aligned with the hole in the left handrail. Slide the latch pin into the hole. Make sure that the latch pin is inserted as far as possible into the hole. Lock the pin by pressing the end of the pin into the slot in the storage latch as shown in the inset drawing.
To protect the floor or carpet from damage, place a mat under the treadmill. Keep the treadmill out of di- rect sunlight. Do not leave the treadmill in the storage position in temperatures above 30° C (85° F).
Latch |
Pin |
Hole |
Slot |
Two power cords are included. Select the one that will fit your outlet. Refer to drawing 1, and plug the indicated end of the power cord into the socket on the treadmill. Next, lift the indi- cated tab on the ferrite box and clamp the ferrite box around the power cord. The ferrite box should not be allowed to slide along the power cord. Please fasten the included plastic tie just behind the ferrite box and cut off the excess plastic tie. Refer to drawing 2. Plug the power cord into an appropriate outlet that is properly installed and earthed in accordance with all local codes and ordinances. Note: In Italy, an adaptor (not included) must be used between the power cord and the outlet. Important: The treadmill is not compatible with
If the power cord is damaged, it must be replaced with a manufac-
Tie |
Tab |
2 |
Outlet |
HOW TO MOVE THE TREADMILL
Before moving the treadmill, convert the treadmill to the stor- age position as described above. Make sure that the latch pin is fully inserted into the hole in the handrail and locked into place as described above.
1.Hold the handrails and place one foot on the base as shown.
2.Tilt the treadmill back until it rolls freely on the front wheels. Carefully move the treadmill to the desired location. Never move the treadmill without tipping it back. To reduce the risk of injury, use extreme caution whilst moving the treadmill. Do not attempt to move the treadmill over an uneven surface.
3.Place one foot on the base, and carefully lower the tread- mill until it is resting in the storage position.
Base
Front Wheels
![]() DANGER: Improper connection of the
DANGER: Improper connection of the
10 | 7 |