DIAGRAM OF THE CONSOLE
Monitor Display
2Reset the console and start the walking belt.
Turn the speed control to the RESET position. Note: Each time the walking belt is stopped, the speed control must be turned to the RESET position be- fore the walking belt can be restarted.
Next, slowly turn the speed control until the walk- ing belt begins to move at slow speed. Carefully step onto the walking belt and begin walking.
4When you are finished exercising, stop the walking belt and remove the key.
Step onto the foot pads, stop the walking belt, and remove the key from the console. The displays will turn off a few minutes after the key is removed.
Note: The display will automatically turn off in order to conserve the batteries any time that the walking belt is stopped and the ON/RESET button is not pressed for a few minutes.
HOW TO CHANGE THE INCLINE OF THE TREADMILL
To vary the intensity of your exercise, the incline of the treadmill can be changed. There are three incline lev- els. Before changing the incline, remove the key
Water Bottle Holder
(Water bottle is
not included)
Key
Note: If there is a thin sheet of clear plastic on the console, remove it.
Speed Control
Clip
Change the speed of the walking belt as desired by turning the speed control.
To stop the walking belt, step onto the foot pads and turn the speed control to the RESET position.
3Follow your progress with the monitor modes
When the power is turned on, a mode in- dicator will point to the word SCAN and the console will auto-
and unplug the power cord. Next, fold the treadmill to the storage position (see HOW TO FOLD THE TREADMILL FOR STORAGE on page 10).
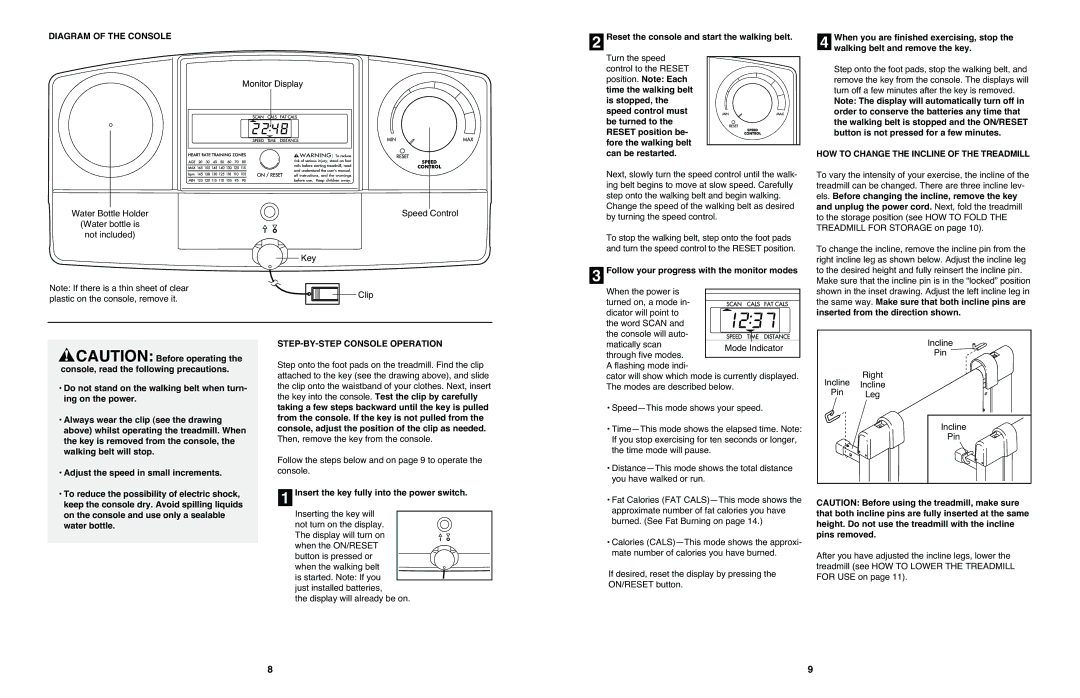
To change the incline, remove the incline pin from the right incline leg as shown below. Adjust the incline leg to the desired height and fully reinsert the incline pin.
Make sure that the incline pin is in the “locked” position shown in the inset drawing. Adjust the left incline leg in the same way. Make sure that both incline pins are inserted from the direction shown.
![]() CAUTION: Before operating the console, read the following precautions.
CAUTION: Before operating the console, read the following precautions.
•Do not stand on the walking belt when turn- ing on the power.
•Always wear the clip (see the drawing above) whilst operating the treadmill. When the key is removed from the console, the walking belt will stop.
•Adjust the speed in small increments.
•To reduce the possibility of electric shock, keep the console dry. Avoid spilling liquids on the console and use only a sealable water bottle.
STEP-BY-STEP CONSOLE OPERATION
Step onto the foot pads on the treadmill. Find the clip attached to the key (see the drawing above), and slide the clip onto the waistband of your clothes. Next, insert the key into the console. Test the clip by carefully taking a few steps backward until the key is pulled from the console. If the key is not pulled from the console, adjust the position of the clip as needed. Then, remove the key from the console.
Follow the steps below and on page 9 to operate the console.
1Insert the key fully into the power switch.
Inserting the key will not turn on the display. The display will turn on when the ON/RESET button is pressed or when the walking belt is started. Note: If you just installed batteries,
the display will already be on.
matically scan through five modes. A flashing mode indi-
cator will show which mode is currently displayed. The modes are described below.
•
•
•
•Fat Calories (FAT
•Calories
If desired, reset the display by pressing the ON/RESET button.
Incline
Pin
Right
Incline Incline
Pin Leg
Incline |
Pin |
CAUTION: Before using the treadmill, make sure that both incline pins are fully inserted at the same height. Do not use the treadmill with the incline pins removed.
After you have adjusted the incline legs, lower the treadmill (see HOW TO LOWER THE TREADMILL FOR USE on page 11).
8 | 9 |