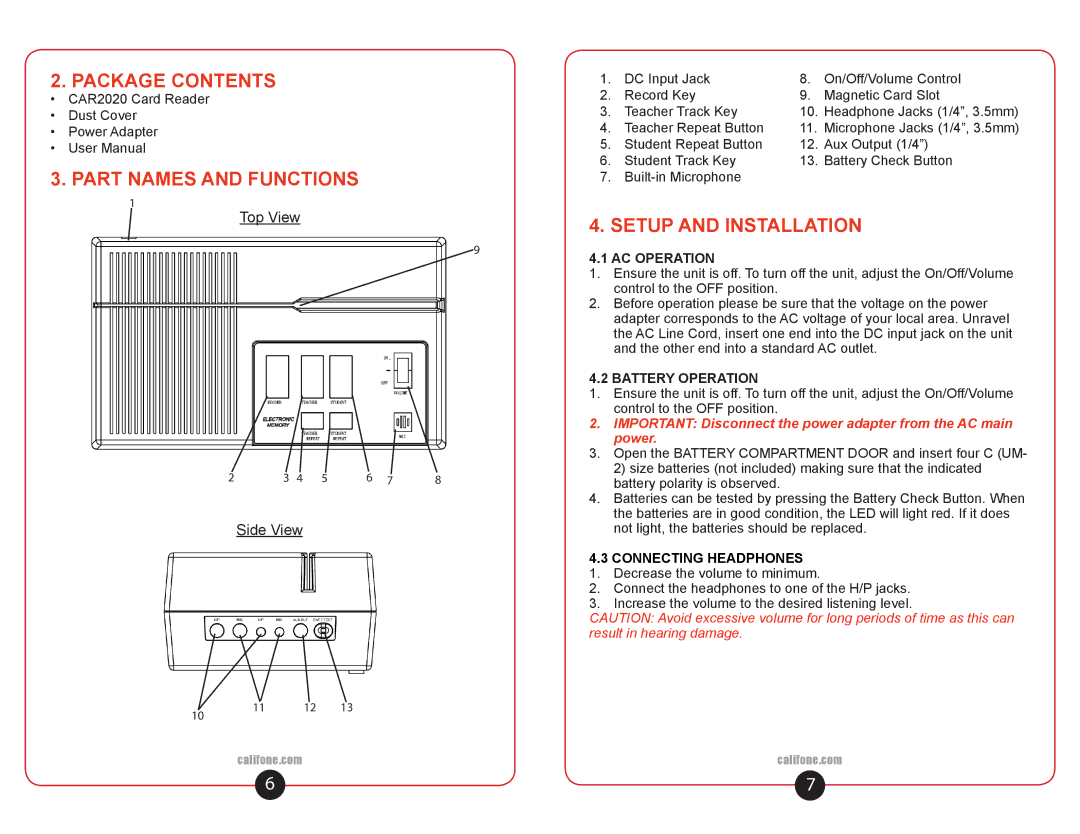
2. PACKAGE CONTENTS | 1. | DC Input Jack | 8. | On/Off/Volume Control | |
• | CAR2020 Card Reader | 2. | Record Key | 9. | Magnetic Card Slot |
• | Dust Cover | 3. | Teacher Track Key | 10. | Headphone Jacks (1/4”, 3.5mm) |
• | Power Adapter | 4. | Teacher Repeat Button | 11. | Microphone Jacks (1/4”, 3.5mm) |
• | User Manual | 5. | Student Repeat Button | 12. | Aux Output (1/4”) |
3. PART NAMES AND FUNCTIONS | 6. | Student Track Key | 13. | Battery Check Button | |
7. |
|
| |||
1
Top View
4. SETUP AND INSTALLATION
9 | 4.1 AC OPERATION | |
| ||
| 1. | Ensure the unit is off. To turn off the unit, adjust the On/Off/Volume |
|
| control to the OFF position. |
| 2. | Before operation please be sure that the voltage on the power |
|
| adapter corresponds to the AC voltage of your local area. Unravel |
|
| the AC Line Cord, insert one end into the DC input jack on the unit |
|
| and the other end into a standard AC outlet. |
4.2 BATTERY OPERATION
|
|
| 1. | Ensure the unit is off. To turn off the unit, adjust the On/Off/Volume |
|
|
|
| control to the OFF position. |
|
|
| 2. | IMPORTANT: Disconnect the power adapter from the AC main |
|
|
|
| power. |
|
|
| 3. | Open the BATTERY COMPARTMENT DOOR and insert four C (UM- |
2 | 3 4 5 | 6 7 | 8 | 2) size batteries (not included) making sure that the indicated |
battery polarity is observed. | ||||
|
|
| 4. | Batteries can be tested by pressing the Battery Check Button. When |
|
|
|
| the batteries are in good condition, the LED will light red. If it does |
| Side View |
|
| not light, the batteries should be replaced. |
4.3 CONNECTING HEADPHONES
1.Decrease the volume to minimum.
2.Connect the headphones to one of the H/P jacks.
3.Increase the volume to the desired listening level.
CAUTION: Avoid excessive volume for long periods of time as this can result in hearing damage.
10 | 11 | 12 | 13 |
|
|
| |
| califone.com |
| califone.com |
6 | 7 |
