HM7000 and HU2000
Assembly
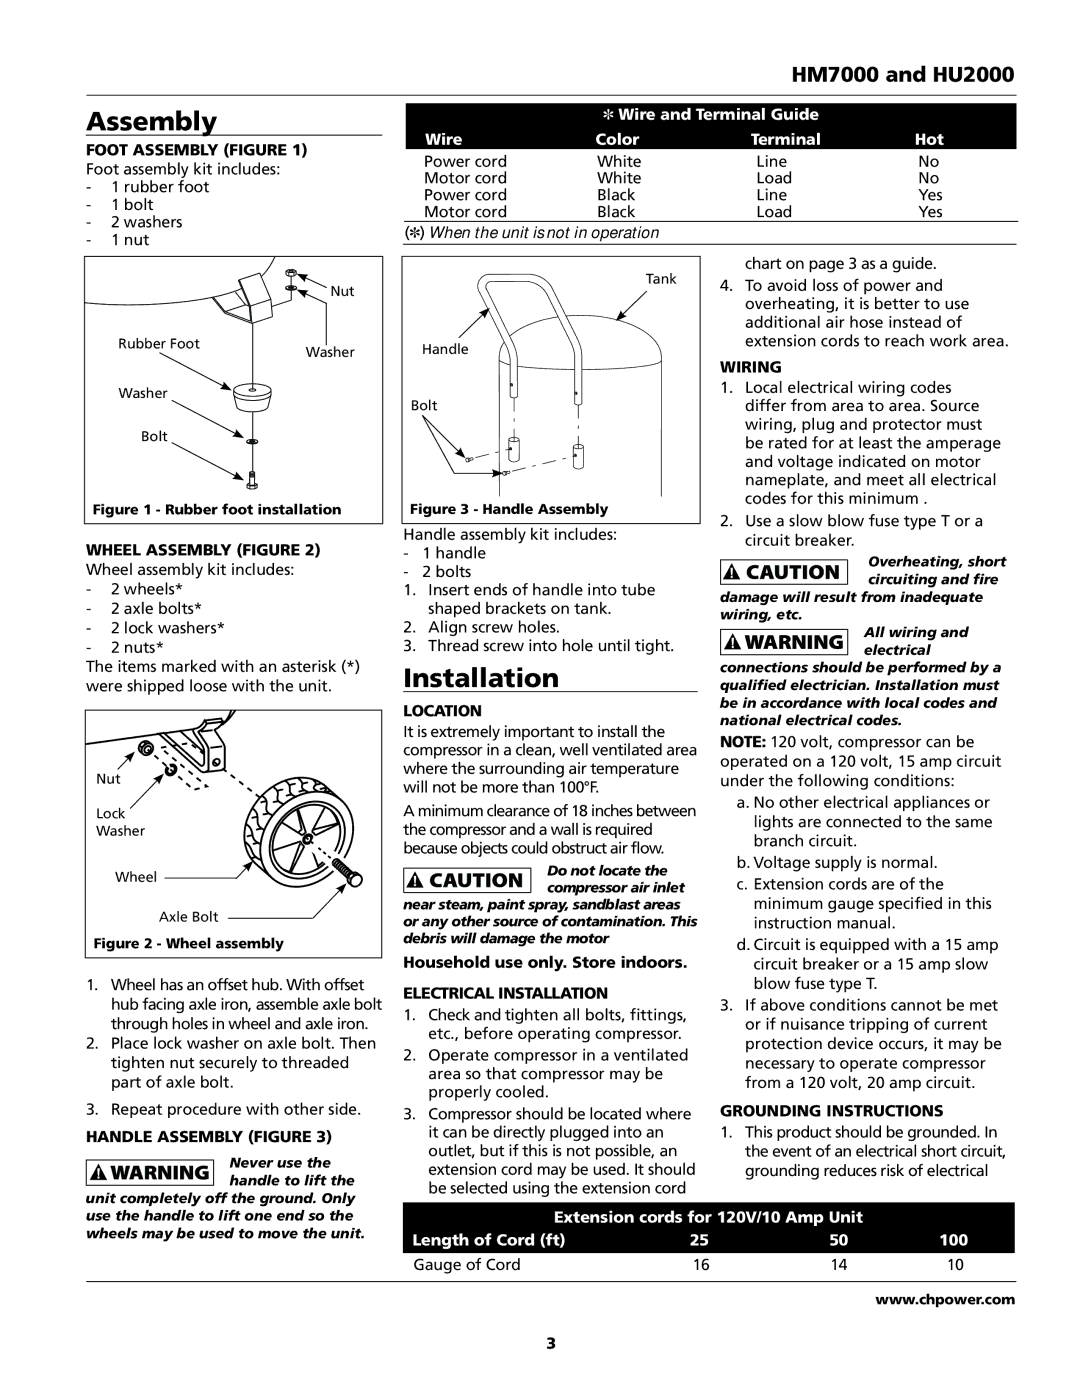
Foot Assembly (Figure 1)
Foot assembly kit includes:
-1 rubber foot
-1 bolt
-2 washers
-1 nut
✽Wire and Terminal Guide
Wire | Color | Terminal | Hot |
Power cord | White | Line | No |
Motor cord | White | Load | No |
Power cord | Black | Line | Yes |
Motor cord | Black | Load | Yes |
(✽) When the unit is not in operation
| Nut |
Rubber Foot | Washer |
|
Washer
Bolt
Figure 1 - Rubber foot installation
Wheel Assembly (Figure 2) Wheel assembly kit includes:
-2 wheels*
-2 axle bolts*
-2 lock washers*
-2 nuts*
The items marked with an asterisk (*) were shipped loose with the unit.
Nut |
Lock |
Washer |
Wheel |
Axle Bolt |
Figure 2 - Wheel assembly |
1.Wheel has an offset hub. With offset hub facing axle iron, assemble axle bolt through holes in wheel and axle iron.
2.Place lock washer on axle bolt. Then tighten nut securely to threaded part of axle bolt.
3.Repeat procedure with other side.
Handle Assembly (Figure 3)
Never use the handle to lift the
unit completely off the ground. Only
Tank
Handle
Bolt
Figure 3 - Handle Assembly
Handle assembly kit includes:
-1 handle
-2 bolts
1.Insert ends of handle into tube shaped brackets on tank.
2.Align screw holes.
3.Thread screw into hole until tight.
Installation
LOcation
It is extremely important to install the compressor in a clean, well ventilated area where the surrounding air temperature will not be more than 100°F.
A minimum clearance of 18 inches between the compressor and a wall is required because objects could obstruct air flow.
Do not locate the compressor air inlet
near steam, paint spray, sandblast areas or any other source of contamination. This debris will damage the motor
Household use only. Store indoors.
Electrical installation
1.Check and tighten all bolts, fittings, etc., before operating compressor.
2.Operate compressor in a ventilated area so that compressor may be properly cooled.
3.Compressor should be located where it can be directly plugged into an outlet, but if this is not possible, an extension cord may be used. It should be selected using the extension cord
chart on page 3 as a guide.
4.To avoid loss of power and overheating, it is better to use additional air hose instead of extension cords to reach work area.
Wiring
1.Local electrical wiring codes differ from area to area. Source wiring, plug and protector must be rated for at least the amperage and voltage indicated on motor nameplate, and meet all electrical codes for this minimum .
2.Use a slow blow fuse type T or a circuit breaker.
Overheating, short circuiting and fire
damage will result from inadequate wiring, etc.
All wiring and electrical
connections should be performed by a qualified electrician. Installation must be in accordance with local codes and national electrical codes.
NOTE: 120 volt, compressor can be operated on a 120 volt, 15 amp circuit under the following conditions:
a. No other electrical appliances or lights are connected to the same branch circuit.
b. Voltage supply is normal.
c.Extension cords are of the minimum gauge specified in this instruction manual.
d.Circuit is equipped with a 15 amp circuit breaker or a 15 amp slow blow fuse type T.
3.If above conditions cannot be met or if nuisance tripping of current protection device occurs, it may be necessary to operate compressor from a 120 volt, 20 amp circuit.
Grounding instructions
1.This product should be grounded. In the event of an electrical short circuit, grounding reduces risk of electrical
use the handle to lift one end so the wheels may be used to move the unit.
Extension cords for 120V/10 Amp Unit |
| ||
Length of Cord (ft) | 25 | 50 | 100 |
Gauge of Cord | 16 | 14 | 10 |
www.chpower.com
