Canon® A20 Remanufacturing Instructions

Oasis Imaging Products Inc. Technical Support (800) 322 – 8992 ext 110

Reference Information:

OEM PN: F41-2302-120

OEM Yield: 3,000 @ 5.5%

Recommended Tools:

Tamperproof Torx®screw bit

Phillips head screwdriver

Pin puller

Flat head screwdriver

Approximate Remanufacturing Time:

20-25 min.

Instructions:

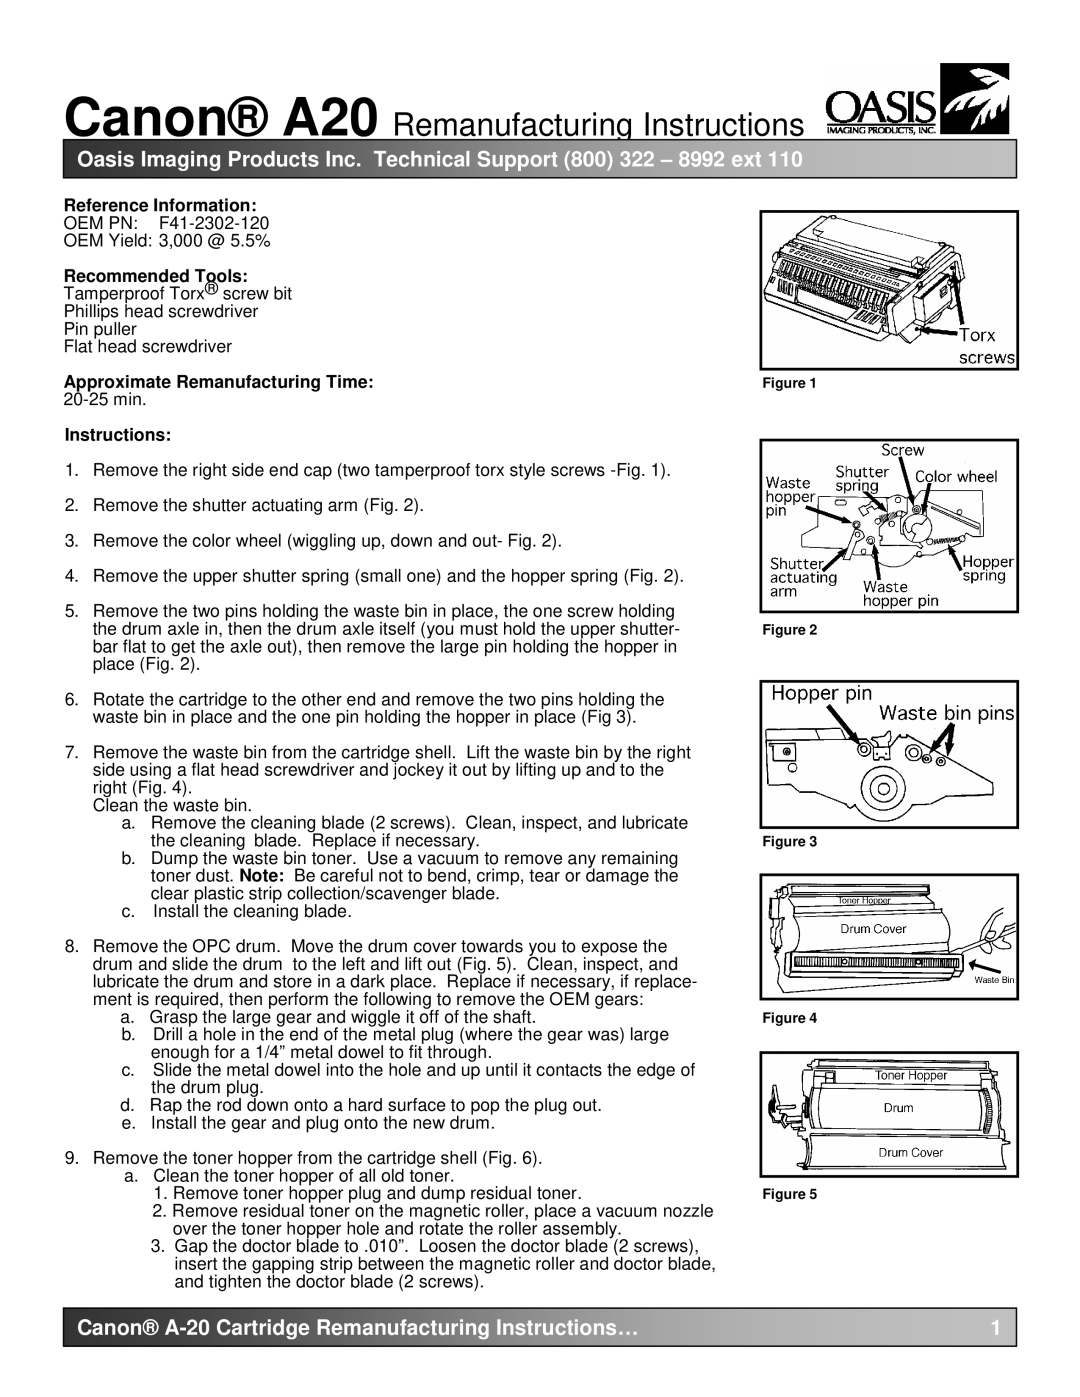
1.Remove the right side end cap (two tamperproof torx style screws -Fig. 1).

2.Remove the shutter actuating arm (Fig. 2).

3.Remove the color wheel (wiggling up, down and out- Fig. 2).

4.Remove the upper shutter spring (small one) and the hopper spring (Fig. 2).

5.Remove the two pins holding the waste bin in place, the one screw holding the drum axle in, then the drum axle itself (you must hold the upper shutter- bar flat to get the axle out), then remove the large pin holding the hopper in place (Fig. 2).

6.Rotate the cartridge to the other end and remove the two pins holding the waste bin in place and the one pin holding the hopper in place (Fig 3).

7.Remove the waste bin from the cartridge shell. Lift the waste bin by the right side using a flat head screwdriver and jockey it out by lifting up and to the right (Fig. 4).

Clean the waste bin.

a.Remove the cleaning blade (2 screws). Clean, inspect, and lubricate the cleaning blade. Replace if necessary.

b.Dump the waste bin toner. Use a vacuum to remove any remaining toner dust. Note: Be careful not to bend, crimp, tear or damage the clear plastic strip collection/scavenger blade.

c.Install the cleaning blade.

8.Remove the OPC drum. Move the drum cover towards you to expose the drum and slide the drum to the left and lift out (Fig. 5). Clean, inspect, and lubricate the drum and store in a dark place. Replace if necessary, if replace- ment is required, then perform the following to remove the OEM gears:

a.Grasp the large gear and wiggle it off of the shaft.

b.Drill a hole in the end of the metal plug (where the gear was) large enough for a 1/4” metal dowel to fit through.

c.Slide the metal dowel into the hole and up until it contacts the edge of the drum plug.

d.Rap the rod down onto a hard surface to pop the plug out.

e.Install the gear and plug onto the new drum.

9.Remove the toner hopper from the cartridge shell (Fig. 6). a. Clean the toner hopper of all old toner.

1.Remove toner hopper plug and dump residual toner.

2.Remove residual toner on the magnetic roller, place a vacuum nozzle over the toner hopper hole and rotate the roller assembly.

3.Gap the doctor blade to .010”. Loosen the doctor blade (2 screws), insert the gapping strip between the magnetic roller and doctor blade, and tighten the doctor blade (2 screws).

Figure 1

Figure 2

Figure 3

Figure 4

Figure 5

4. Recheck the gap to make sure nothing shifted during tightening.

1

Canon® A -20 Cartridge Remanufacturing Instructions…

Page 1
Image 1
Canon manual Canon A20 Remanufacturing Instructions, Canon a -20 Cartridge Remanufacturing Instructions…

A20 specifications

The Canon A20 and A10 digital cameras, released in the early 2000s, stand as prime examples of Canon's commitment to innovation and quality in the consumer digital photography market. These compact cameras were designed for both novice and experienced photographers, offering a blend of user-friendly features and impressive performance.

One of the standout characteristics of the Canon A20 and A10 is their versatile imaging capabilities. Both models boast a 2.0-megapixel CCD sensor, which was quite proficient for their time, allowing users to capture clear and vibrant images with a resolution suitable for prints and digital sharing. The lenses featured in these models provided decent zoom capabilities, with the A20 offering a 3x optical zoom lens, which enabled users to get closer to their subjects without losing image quality.

User-friendliness was a priority in the design of these cameras. The intuitive button layout and easy-to-navigate menus made it simple for consumers to adjust settings and capture photos quickly. The cameras also came equipped with a variety of shooting modes, including Auto, Portrait, Landscape, and Night, allowing users to select the mode that best suited their shooting scenario.

The Canon A20 and A10 also included technologies that enhanced overall user experience. Both cameras offered a built-in flash for low-light conditions, ensuring that users could capture quality images regardless of the lighting environment. Additionally, the 1.5-inch LCD screen provided a clear view for framing and reviewing shots, an essential feature for those looking to quickly assess their images.

Durability and design were also notable aspects of these models. With a compact body that fit easily in a pocket or purse, the A20 and A10 stood out for their lightweight construction while still maintaining a solid feel. Canon’s attention to build quality meant these cameras were able to withstand the rigors of everyday use.

In conclusion, the Canon A20 and A10 models represented a significant step in digital photography at the turn of the millennium. With their impressive features, user-friendly design, and robust build quality, they not only fulfilled the needs of their users but also helped to bridge the gap into the digital age for photographers, making them memorable entries in Canon’s extensive line-up of cameras.