☞Continued from front side
Connecting and Registering the
Scanner to Your PC
Perform the following steps to connect the scanner, turn it on, and register it to your PC.
![]() Warning
Warning
❏Use only the AC adapter included in the package.
❏Connect the
❏Be sure to log on with administrator privileges when logging on to Windows.
1.Connect the power cord to the AC adapter (1).
2.Plug the AC adapter into the connector located to the left of the connector (2).
3.Plug the power cord into the power outlet (3).
4.Connect the USB cable to the scanner and your PC (4).
5.Check the scanner and computer connections, and press the power button to turn the scanner ON (5).
DR-2050C DR-2050SP PC (USB Port)
Type B
Type A
Type B
6.Windows recognizes the
(Windows 98/Me/2000)
(Windows XP)
![]() Note
Note
●For Windows XP, a balloon help
●The installation finished message is not displayed in Windows 98/Me/2000.
●When the
Scanning
When you have finished installing the software and the scanner has been recognized, you can load and scan a document.
With this scanner, scanning can be performed with the job function by simply pressing the scan button. Follow the steps below to load a document, press the scan button, and test that your document is scanned properly.
1.Open the document feed tray.
2.Thoroughly fan the pages of your documents, and shift the pages so that the top edge of the first page is the bottommost page. (Place your documents on the scanner so that the top edge is facing down.)
1234 | 1234 |
| |
ABC |
|
| ABC |
3.Place your documents so that top edge is facing down and the rear side is facing towards you. Adjust the document guide adapter to fit the size of the documents.
If documents feed slantwise during scanning, attach the document guide adapters to the document guides on both sides of the scanner.
![]() Warning
Warning
To move the document guides while the document guide adapters are attached, always grasp the document guides. Grasping the ends of the document guide adapters may cause them to break.
4.Make sure that the feed selection lever on the side is set to the page separation mode ( ![]() ).
).
Be careful, because when the feed selection lever is set to ![]() (bypass mode), document pages feed as a stack. For details on the feed selection lever, refer to the
(bypass mode), document pages feed as a stack. For details on the feed selection lever, refer to the
Bypass Mode
Page Separation
Mode
Feed Selection Lever
5.Press the Scan button.
“Monitor for
Scan settings: Black & White, 300 dpi, simplex (default values)
Scan Button |
6.When “Sending complete” is displayed on the “Monitor for
Preparing Presentation Mode
(For the DR-2050SP only)
Perform the following steps to connect the
![]() Warning
Warning
❏Always use the supplied RGB cable. The quality of projected images cannot be guaranteed for other RGB cables.
![]() Note
Note
Presentation mode can be tested by connecting the
1.Disconnect the USB cable connecting the scanner to the PC.
Presentation mode cannot be initiated while the scanner and PC are connected. Make sure to disconnect the USB cable connecting the scanner to the PC.
2.Connect the scanner to the LCD projector (or monitor) with the supplied RGB cable.
Mini
To RGB Output Connector
Mini
To RGB Input Connector
3.Insert the two supplied AAA batteries into the remote control. Align the + and – battery terminals as indicated.
![]() Turn the remote control over, and detach the battery cover.
Turn the remote control over, and detach the battery cover.
![]() Insert the two batteries, aligning the + and – signs on the remote control with those on the batteries.
Insert the two batteries, aligning the + and – signs on the remote control with those on the batteries.
![]() Reattach the battery cover.
Reattach the battery cover.
4.Turn on the LCD projector (or monitor).
When connected to an LCD projector, turn on the projector and wait until it warms up and starts projecting.
5.Turn on the scanner.
When the scanner is turned on, the startup screen appears and initialization starts. Wait until the projector is warmed up and projecting before turning on the scanner.
Testing Presentation Mode
Perform the following steps to load and scan a document and confirm that it is projected properly.
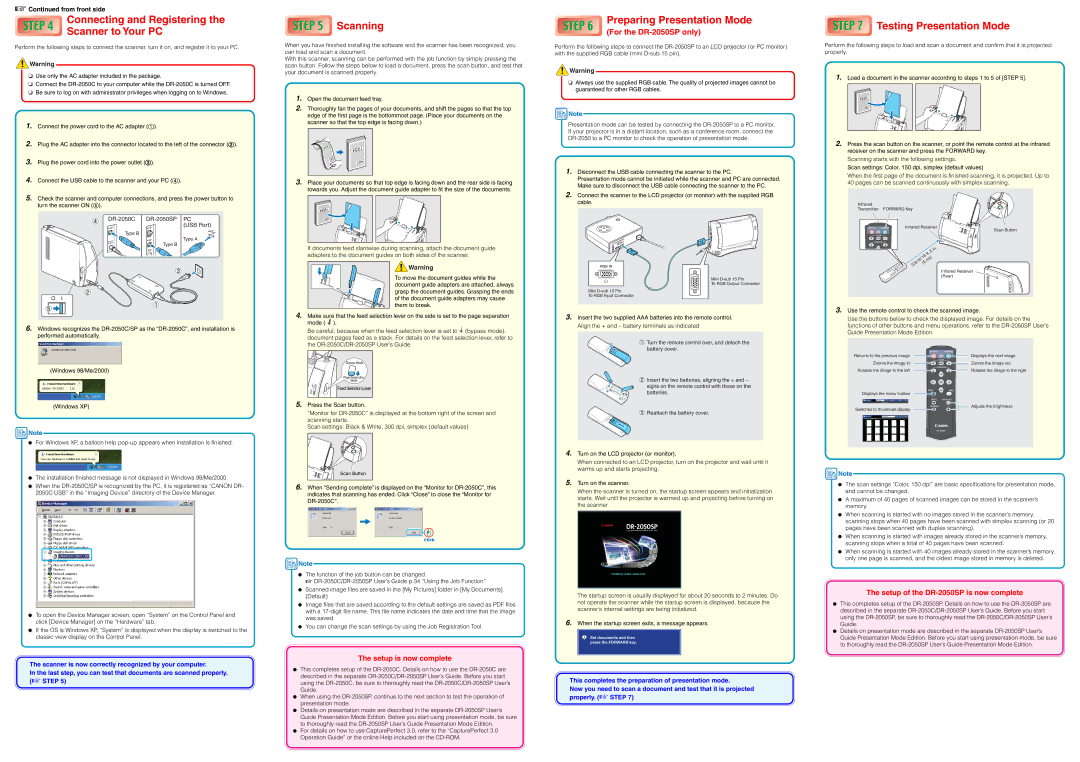
1.Load a document in the scanner according to steps 1 to 5 of [STEP 5].
2.Press the scan button on the scanner, or point the remote control at the infrared receiver on the scanner and press the FORWARD key.
Scanning starts with the following settings.
Scan settings: Color, 150 dpi, simplex (default values)
When the first page of the document is finished scanning, it is projected. Up to 40 pages can be scanned continuously with simplex scanning.
Infrared
Transmitter FORWARD Key
Infrared Receiver
Scan Button
|
|
| . | |
|
|
| in | |
|
|
| 5 | |
|
|
| . | |
|
| ft | ||
| to | 16 | m)) | |
(Up | (5 | |||
|
| |||
|
|
| ||
Infrared Receiver (Rear)
3.Use the remote control to check the scanned image.
Use the buttons below to check the displayed image. For details on the functions of other buttons and menu operations, refer to the
Returns to the previous image | Displays the next image |
Zooms the image in | Zooms the image out |
Rotates the image to the left | Rotates the image to the right |
Displays the menu toolbar
Adjusts the brightness
Switches to thumbnail display
![]() Note
Note
● The scan settings “Color, 150 dpi” are basic specifications for presentation mode, |
and cannot be changed. |
● A maximum of 40 pages of scanned images can be stored in the scanner’s |
memory. |
● When scanning is started with no images stored in the scanner’s memory, |
scanning stops when 40 pages have been scanned with simplex scanning (or 20 |
pages have been scanned with duplex scanning). |
● When scanning is started with images already stored in the scanner’s memory, |
scanning stops when a total of 40 pages have been scanned. |
● When scanning is started with 40 images already stored in the scanner’s memory, |
●To open the Device Manager screen, open “System” on the Control Panel and click [Device Manager] on the “Hardware” tab.
●If the OS is Windows XP, “System” is displayed when the display is switched to the classic view display on the Control Panel.
The scanner is now correctly recognized by your computer.
In the last step, you can test that documents are scanned properly. (☞ STEP 5)
![]() Note
Note
●The function of the job button can be changed.
☞
●Scanned image files are saved in the [My Pictures] folder in [My Documents]. (Default)
●Image files that are saved according to the default settings are saved as PDF files with a
●You can change the scan settings by using the Job Registration Tool.
The setup is now complete
●This completes setup of the
●When using the
●Details on presentation mode are described in the separate
●For details on how to use CapturePerfect 3.0, refer to the “CapturePerfect 3.0 Operation Guide” or the online Help included on the
The startup screen is usually displayed for about 20 seconds to 2 minutes. Do not operate the scanner while the startup screen is displayed, because the scanner’s internal settings are being initialized.
6.When the startup screen exits, a message appears.
This completes the preparation of presentation mode.
Now you need to scan a document and test that it is projected properly. (☞ STEP 7)
only one page is scanned, and the oldest image stored in memory is deleted. |
The setup of the DR-2050SP is now complete
●This completes setup of the
●Details on presentation mode are described in the separate
to thoroughly read the