CarAlarms.com P90-NG1 manual Horizontal Terminations, Below Grade Installation, Diagram

Models: P90-NG1

1 48
Download 48 pages 22.93 Kb
Page 21
Image 21

INSTALLATION

HORIZONTAL

TERMINATIONS

Install the vent system according to the manufacturer's instructions included with the components.

1)Set the unit in its desired location. Check to determine if wall studs or roof rafters are in the way when the venting system is attached. If this is the case, you may want to adjust the location of the unit. Rough in the gas preferably on the right side of the unit and the electrical (junction block is on the left side) on the left.

2)DirectVentpipeandfittingsaredesignedwith special twist-lock connections to connect the venting system to the appliance flue outlet.A twist-lock appliance adaptor is an available option that must be used in conjunction with the Simpson Dura-Vent Direct Vent GS system.

3)Put a bead of silicone inside the outer section of the adapter and a bead of Mill Pac on the inner collar. Slip the adapter over the existing inner and outer flue collar and fasten to the outer collar only with the 3 supplied screws (drilling pilot holes will make this easier). Level the fi replace and fasten it to the framing using nails or screws through the nailing strips.

4)Assemble the desired combination of pipe and elbows to the appliance adaptor and twist-lock for a solid connection.

Note:

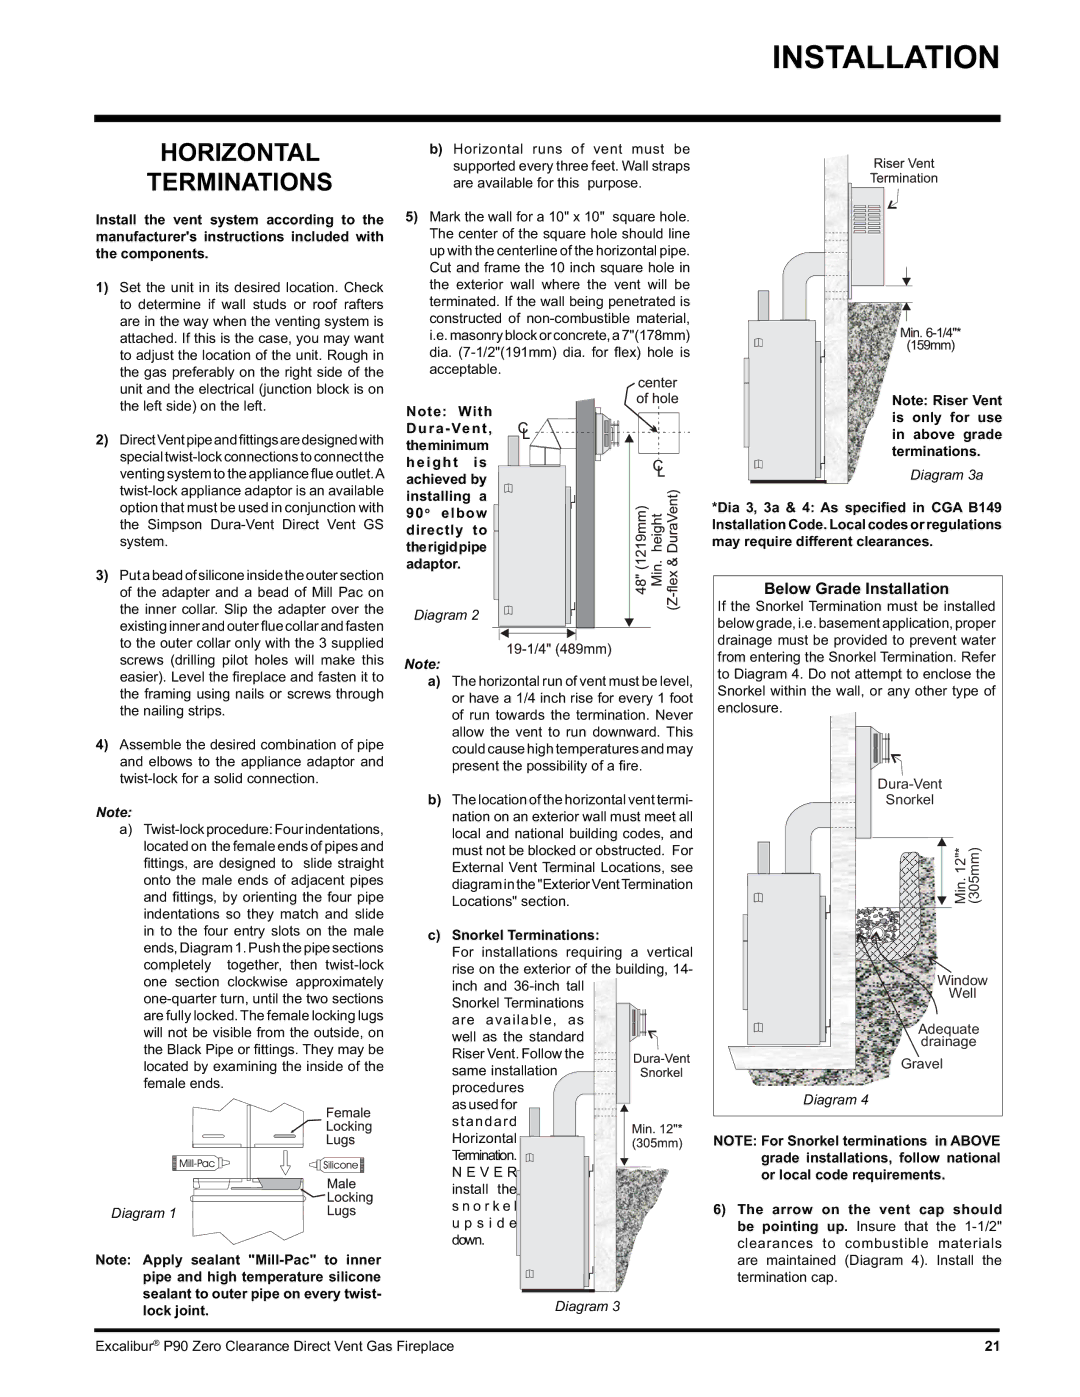
a)Twist-lock procedure: Four indentations, located on the female ends of pipes and fi ttings, are designed to slide straight onto the male ends of adjacent pipes and fi ttings, by orienting the four pipe indentations so they match and slide in to the four entry slots on the male ends, Diagram 1. Push the pipe sections completely together, then twist-lock one section clockwise approximately one-quarter turn, until the two sections are fully locked. The female locking lugs will not be visible from the outside, on the Black Pipe or fi ttings. They may be located by examining the inside of the female ends.

Diagram 1

Note: Apply sealant "Mill-Pac" to inner pipe and high temperature silicone sealant to outer pipe on every twist- lock joint.

b)Horizontal runs of vent must be supported every three feet. Wall straps are available for this purpose.

5)Mark the wall for a 10" x 10" square hole. The center of the square hole should line up with the centerline of the horizontal pipe. Cut and frame the 10 inch square hole in the exterior wall where the vent will be terminated. If the wall being penetrated is constructed of non-combustible material, i.e.masonryblockorconcrete,a7"(178mm) dia. (7-1/2"(191mm) dia. for fl ex) hole is acceptable.

Note: With

Dura-Vent,

theminimum

height

is

achieved by

installing

a

90o elbow

directly

to

therigidpipe

adaptor.


Diagram 2

Note:

a)The horizontal run of vent must be level, or have a 1/4 inch rise for every 1 foot of run towards the termination. Never allow the vent to run downward. This could cause high temperatures and may present the possibility of a fi re.

b)The location of the horizontal vent termi- nation on an exterior wall must meet all local and national building codes, and must not be blocked or obstructed. For External Vent Terminal Locations, see diagraminthe"ExteriorVentTermination Locations" section.

c)Snorkel Terminations:

For installations requiring a vertical rise on the exterior of the building, 14-

inch and 36-inch tall Snorkel Terminations are available, as well as the standard Riser Vent. Follow the same installation procedures

as used for standard Horizontal Termination.

N E V E R install the s n o r k e l u p s i d e down.

Diagram 3

Note: Riser Vent is only for use in above grade terminations.

Diagram 3a

*Dia 3, 3a & 4: As specified in CGA B149 Installation Code. Local codes or regulations may require different clearances.

Below Grade Installation

If the Snorkel Termination must be installed below grade, i.e. basement application, proper drainage must be provided to prevent water from entering the Snorkel Termination. Refer to Diagram 4. Do not attempt to enclose the Snorkel within the wall, or any other type of enclosure.

Dura-Vent

Snorkel

Min. 12"* (305mm)

Window

Well

Adequate drainage

Gravel

Diagram 4

NOTE: For Snorkel terminations in ABOVE grade installations, follow national or local code requirements.

6)The arrow on the vent cap should be pointing up. Insure that the 1-1/2" clearances to combustible materials are maintained (Diagram 4). Install the termination cap.

Excalibur® P90 Zero Clearance Direct Vent Gas Fireplace

21

Page 21
Image 21
CarAlarms.com P90-NG1 manual Horizontal Terminations, Below Grade Installation, Diagram

P90-NG1 specifications

CarAlarms.com P90-NG1 is a cutting-edge vehicle security system designed to provide maximum protection against theft and unauthorized access. This advanced system combines innovative technology with user-friendly features to ensure that car owners can safeguard their vehicles effectively.

One of the standout features of the P90-NG1 is its two-way communication system. This allows users to receive real-time alerts and notifications directly on their key fob whenever the system detects any suspicious activity. The LCD display on the key fob provides clear information, including the vehicle's status, which enhances the overall user experience. This feature ensures that users are always informed about their vehicle’s security status, whether they are close by or a significant distance away.

The P90-NG1 also employs a state-of-the-art shock sensor, which detects impacts on the vehicle's body. This allows the system to respond swiftly to attempted break-ins or vandalism, triggering an audible alarm to deter potential thieves. The adjustable sensitivity of the shock sensor can be customized to suit different environments, ensuring that users can find an optimal balance between security and everyday usability.

Another notable characteristic of the P90-NG1 is its remote start capability. This feature enables users to start their vehicle from afar, adding convenience, especially in harsh weather conditions. Paired with the optional smartphone app, users can control their vehicle’s security functions from their mobile devices, providing added flexibility and peace of mind.

The installation process of the P90-NG1 is designed to be straightforward and efficient, making it suitable for a wide range of vehicles. The system is compatible with various vehicle models and can be integrated seamlessly with existing systems, providing enhanced functionality without compromising factory features.

In conclusion, CarAlarms.com P90-NG1 stands out in the vehicle security market due to its robust features, advanced technology, and user-centric design. With its reliable two-way communication, effective shock sensor, and convenient remote start capability, it offers vehicle owners a comprehensive solution to protect their assets while ensuring ease of use. This makes the P90-NG1 an ideal choice for those looking to enhance the security of their vehicles.