500_setup.fm Page 1 Wednesday, September 29, 1999 2:05 PM
Preparing Your Scanner
Setting Up Your CardScan 500 Scanner
Scanning Cards
1. Install the CardScan software on your PC before connecting your scanner. If you do not install the CardScan software first, Windows will not recognize the scanner.
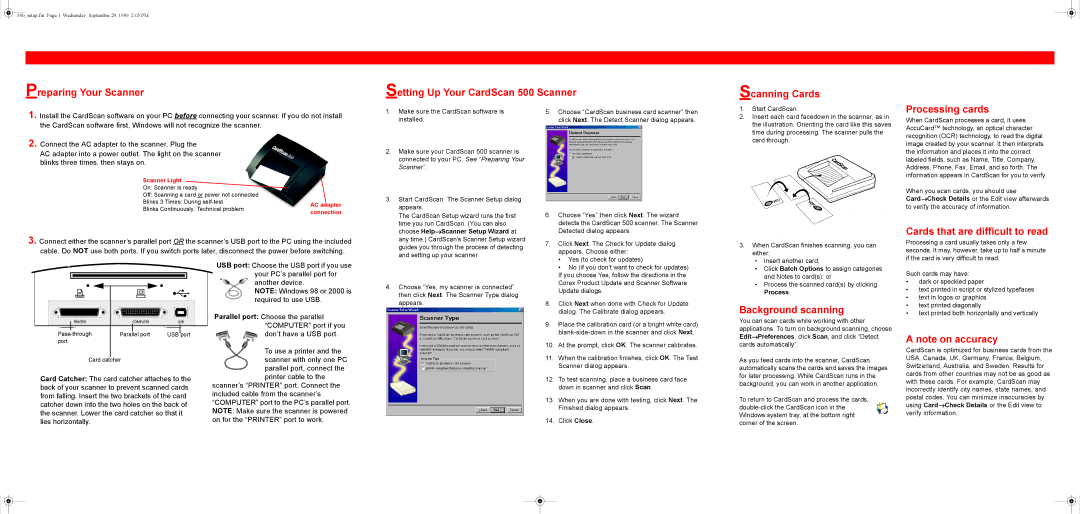
2. Connect the AC adapter to the scanner. Plug the
AC adapter into a power outlet. The light on the scanner blinks three times, then stays on.
Scanner Light |
| |
On: Scanner is ready |
| |
Off: Scanning a card or power not connected |
| |
Blinks 3 Times: During | AC adapter | |
Blinks Continuously: Technical problem | ||
connection | ||
|
3. Connect either the scanner’s parallel port OR the scanner’s USB port to the PC using the included cable. Do NOT use both ports. If you switch ports later, disconnect the power before switching.
1. | Make sure the CardScan software is |
| installed. |
2. | Make sure your CardScan 500 scanner is |
| connected to your PC. See “Preparing Your |
| Scanner”. |
3. | Start CardScan. The Scanner Setup dialog |
| appears. |
| The CardScan Setup wizard runs the first |
| time you run CardScan. (You can also |
| choose Help→Scanner Setup Wizard at |
| any time.) CardScan’s Scanner Setup wizard |
| guides you through the process of detecting |
| and setting up your scanner. |
5.Choose “CardScan business card scanner” then click Next. The Detect Scanner dialog appears.
6. | Choose “Yes” then click Next. The wizard |
| detects the CardScan 500 scanner. The Scanner |
| Detected dialog appears. |
7. | Click Next. The Check for Update dialog |
| appears. Choose either: |
| • Yes (to check for updates) |
1.Start CardScan.
2.Insert each card facedown in the scanner, as in the illustration. Orienting the card like this saves time during processing. The scanner pulls the card through.
3. When CardScan finishes scanning, you can |
either: |
• Insert another card; |
Processing cards
When CardScan processes a card, it uses AccuCard™ technology, an optical character recognition (OCR) technology, to read the digital image created by your scanner. It then interprets the information and places it into the correct labeled fields, such as Name, Title, Company, Address, Phone, Fax, Email, and so forth. The information appears in CardScan for you to verify.
When you scan cards, you should use
Card→Check Details or the Edit view afterwards to verify the accuracy of information.
Cards that are difficult to read
Processing a card usually takes only a few seconds. It may, however, take up to half a minute if the card is very difficult to read.
|
|
|
|
|
|
|
|
|
|
|
|
Parallel port | USB | port | |||
port |
|
|
|
| |
Card catcher
Card Catcher: The card catcher attaches to the back of your scanner to prevent scanned cards from falling. Insert the two brackets of the card catcher down into the two holes on the back of the scanner. Lower the card catcher so that it lies horizontally.
USB port: Choose the USB port if you use your PC’s parallel port for another device.
NOTE: Windows 98 or 2000 is required to use USB.
Parallel port: Choose the parallel “COMPUTER” port if you don’t have a USB port.
To use a printer and the scanner with only one PC parallel port, connect the printer cable to the
scanner’s “PRINTER” port. Connect the included cable from the scanner’s “COMPUTER” port to the PC’s parallel port. NOTE: Make sure the scanner is powered on for the “PRINTER” port to work.
4. Choose “Yes, my scanner is connected” |
then click Next. The Scanner Type dialog |
appears. |
• No (if you don’t want to check for updates) |
If you choose Yes, follow the directions in the Corex Product Update and Scanner Software Update dialogs.
8.Click Next when done with Check for Update dialog. The Calibrate dialog appears.
9.Place the calibration card (or a bright white card)
10.At the prompt, click OK. The scanner calibrates.
11.When the calibration finishes, click OK. The Test Scanner dialog appears.
12.To test scanning, place a business card face down in scanner and click Scan.
13.When you are done with testing, click Next. The Finished dialog appears.
14.Click Close.
• | Click Batch Options to assign categories |
| and Notes to card(s); or |
• | Process the scanned card(s) by clicking |
| Process. |
Background scanning
You can scan cards while working with other applications. To turn on background scanning, choose Edit→Preferences, click Scan, and click “Detect cards automatically”.
As you feed cards into the scanner, CardScan automatically scans the cards and saves the images for later processing. While CardScan runs in the background, you can work in another application.
To return to CardScan and process the cards,
Such cards may have:
•dark or speckled paper
•text printed in script or stylized typefaces
•text in logos or graphics
•text printed diagonally
•text printed both horizontally and vertically
A note on accuracy
CardScan is optimized for business cards from the USA, Canada, UK, Germany, France, Belgium, Switzerland, Australia, and Sweden. Results for cards from other countries may not be as good as with these cards. For example, CardScan may incorrectly identify city names, state names, and postal codes. You can minimize inaccuracies by using Card→Check Details or the Edit view to verify information.