D I E N U N G S a N L E I T U N G . . S
Inhaltsverzeichnis
Sicherheit und Umwelt
Beschreibung
Angeordnet
Nur im Preset-Menü
Rot In folgenden Fällen leuchtet die Kontroll-LED rot
Des Senders aus
516 ML, C 518 ML, C 519 ML
CK 55 L, C 417 L, C 520 L, C 555 L
Hinweis Wichtig
Setup-Schalter kurz drücken Setup-Schalter lang drücken
Setup-Schalter kurz nach rechts oder links drehen
Inbetriebnahme
Zu stören
Keit siehe Kapitel 3.8 einstellen
Inbetriebnahme
Schalter
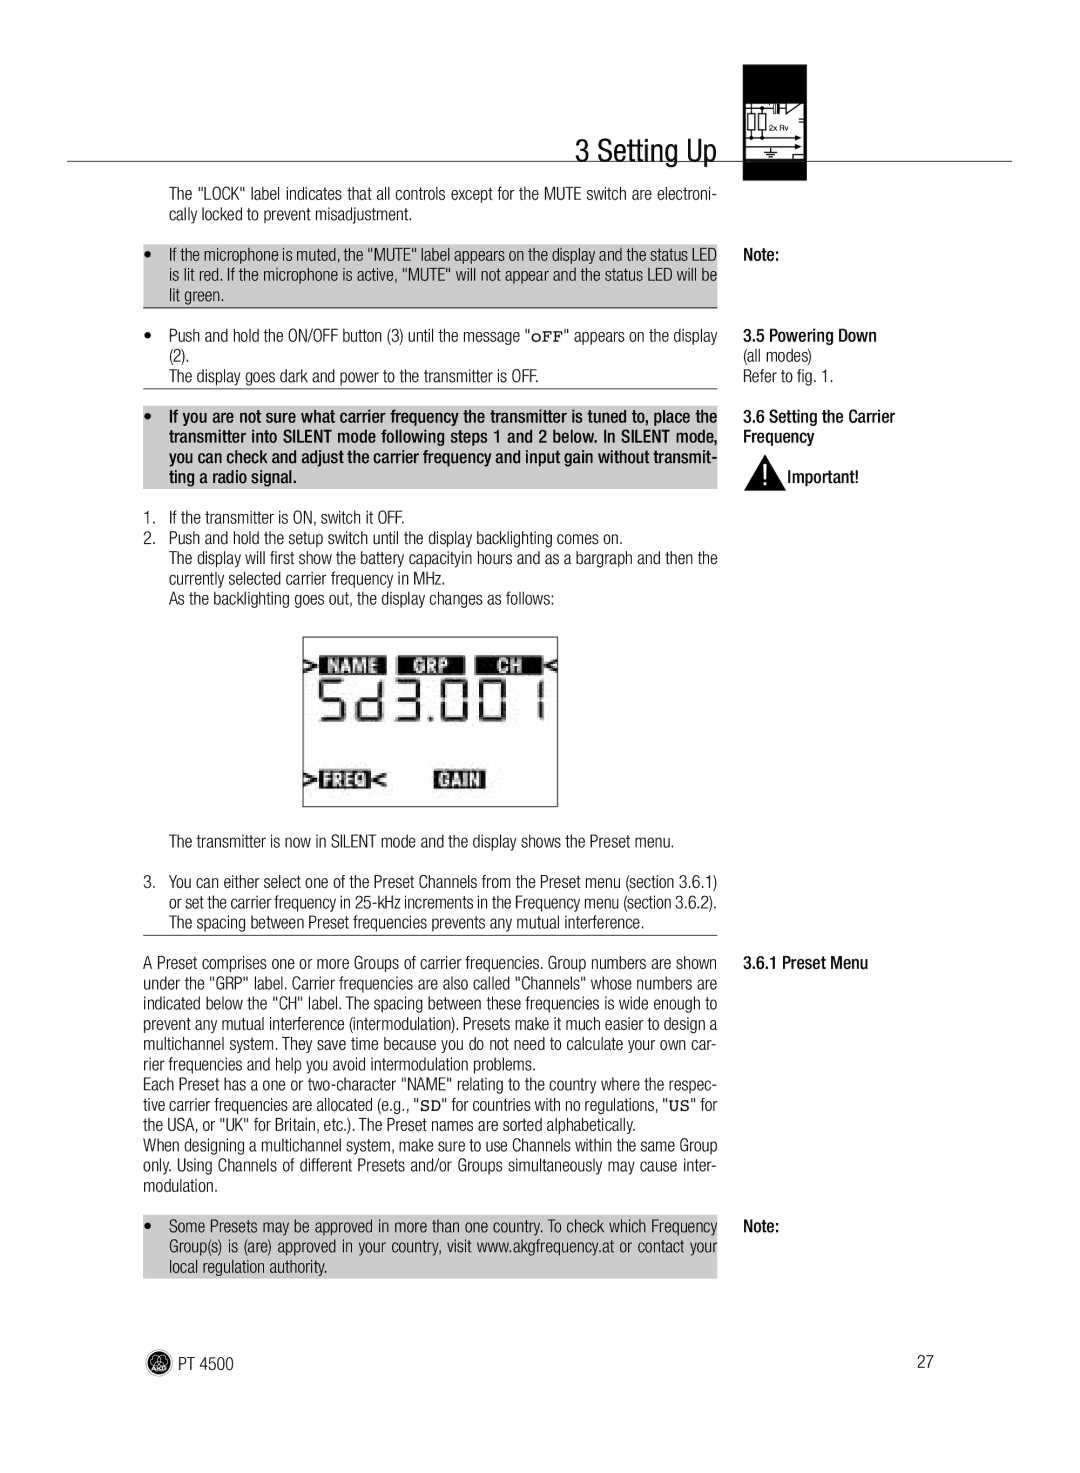
Tan eingestellten Presets beginnen zu blinken
Wenn kein Preset gespeichert ist, zeigt das Display
Bei Ihrer lokalen Regulierungsbehörde erfahren
Siehe Kapitel Frequenz-Menü
Selben Frequenzgruppe auszuwählen
Quenz abgestimmt
Mehrkanalanlagen
Quenz einzustellen
Manuelle Einstellung
Inbetriebnahme
Betriebshinweise
Freien Kanal der gewählten Frequenzgruppe
MUTE. Die Kontroll-LED 1 wechselt auf rot
Lung ON. Die Kontroll-LED 1 wechselt auf grün
Achten Sie darauf, das Mikrofon auf den Mund auszurichten
Reinigung
Fehlermeldungen
Technische Daten
Fehlermeldungen
Table of Contents
Environment
Safety and Environment
Safety
Chanical vibrations, or shock
Description
Operate after approx seconds
Mute switch is active in all modes
Active and Silent modes only
Turn the setup switch briefly to the left or right
Open the battery compartment door
Close the battery compartment door Symbols Connecting
Frequency refer to .6 and input gain refer to section
Setting Up
Setting Up
Setting Up
Lock mode, referring to section
Press Setup briefly. The display will change like this
Quency for each transmiter and receiver
Push the setup switch briefly
As follows
Using
Operating Notes
Head-worn microphones
Teries or BP 4000 battery pack from the transmitter
Below the frequency readout
Possible
Cleaning
Error Messages
Error Messages
Power to transmitter on
Est AKG Service Center
760 790, 790 820, 835 862 MHz
Carrier frequency ranges
Sommaire
Sécurité et environnement
Description
Émetteur de poche Piles 1,5 Dimension AA
De commande Teur Voir Fig
Introduction Fournitures d’origine
Tion de la touche ON/OFF. La LED témoin 1 passe au vert
Cepteur lorsque le signal audio est sur muet
Tension
ON/OFF est en retrait
En mode Lock
Câble guitare
Du câble guitare MKG L d’AKG
Mise en service
Appuyer brièvement sur la molette
Tourner la molette d’un geste bref à droite ou à gauche
Modes
Inadvertance des paramètres en cours d’émission
’entrée voir point
Voir Fig Sélection de la porteuse Menu Presets
Appuyez 0,6 seconde environ sur la touche ON/OFF
Si l’émetteur est sous tension, mettez-le hors tension
Nez la molette à gauche
Si aucun preset n’est mémorisé, l’écran affiche
Se mettent à clignoter
Nez la molette à droite
Voir point Menu Fréquences
Mise en service
Secondes environ. L’écran affiche
Du gain d’entrée
Mise en service
Menu Gain Gain d’entrée en dB
Modes Setup
Sélection du mode
Utilisation
Sie
520 L, C 555 L Modes d’emploi respectifs Installations
’emploi du microphone
Multicanaux
Nettoyage
Messages d’erreur
Caractéristiques techniques
Messages d’erreur
Indice
Sicurezza Ambiente
Sicurezza e ambiente
Descrizione
Dopo ca secondi il trasmettitore è pronto all’esercizio
Della batteria in ore
Parametro da regolare
Il display visualizza tutti i parametri del trasmettitore
Chitarra non in dotazione
Messa in esercizio
Frequenza portante attualmente prescelta in MHz
Splay 2 si attiva
Portante
Premete il tasto ON/OFF 3 per circa 0,6 secondi
Indicazione Vedi fig
Disattivazione
Di frequenze è sono ammessoi nel vostro paese
Setup a destra
Tore Setup a sinistra
Setup
Messa in esercizio
Nuovo una frequenza per ogni trasmettitore e ricevitore
Scelto
Sinistra o a destra. Sul display viene visualizzato Save -n
Messa in esercizio
Indicazioni per l’esercizio
Prossimo canale libero del gruppo di frequenze prescelto
Pulizia
Indicazioni errori
Gamme delle frequenze portanti
Errori visualizzati sul display Errore Rimedio Err.JoG
Sinserire il trasmettitore e
Reinserirlo dopo 10 secondi
Índice
Medio ambiente
Seguridad y medio ambiente
Seguridad
Braciones o a golpes
Descripción
Cio
De la pila en horas
Dad de medición
Parámetro a ajustar
Descripción
Puesta en funcionamiento
Sualizador 2 se encienda
Modos
Bilidad de entrada véase capítulo
Mentos de mando están activados
Aviso oFF Todos los modos
Puesta en funcionamiento
En verde
Desconectar
Quierda
Tador Setup hacia la derecha
Set seleccionado actualmente empiezan a parpadear
Recha
Véase capítulo 2 Menú de frecuencia
Cuencias seleccionado
Mente la frecuencia para cada transmisor y receptor
Ruidos de interferencia
Selección manual Selección automática
Puesta en funcionamiento
Instrucciones para el uso
Oriente el micrófono hacia la boca del usuario
MUTE. El LED de control 1 cambia a rojo
ON. El LED de control 1 cambia a verde
Tado el micrófono
Limpieza
Avisos de error
Datos técnicos
103
100
101
102
Segurança Meio ambiente
Segurança e meio ambiente
Descrição
Voluntário
Segundos
516 ML, C 518 ML, C 519 ML
Operação
Importante Ligar
Operação
Desligar
Pressione por ca ,6 segundos a tecla ON/OFF
Ligar no modo Lock Veja fig
Mute não aparece e o LED de controle 1 brilha verde
Setup para a esquerda
Se nenhum preset for armazenado o display mostra
Trole Setup
Setup para a direita
Veja capítulo Menu de freqüências 101
Cia novamente para cada emissor e receptor
Lecionado
Ajuste manual Ajuste automático 103
104
Comutar entre os
Instruções para o uso
De ajuste
Modos Active
Do grupo selecionado de freqüências
Cia entre o microfone e a boca
Dê atenção a orientar o microfone para a boca do usuário
520 L, C 555 L Do respectivo microfone
Limpeza
Indicações de falha
Especificações
Indicações de falha
Notizen Notes Notes Note Notas Notas
111
Page