500_setup.fm Page 3 Wednesday, September 29, 1999 2:05 PM
Troubleshooting
General
Several errors on one card
Card image is skewed
Skewed images may impair accuracy and, therefore, cause errors in the cards. For better results, place the card flush against the right edge of the scanner’s tray.
Scanner’s light is blinking continuously
Disconnect and reconnect the AC power.
Card jammed in the scanner
If a card jams in the scanner, you can eject the card:
1.Choose Preferences from the Edit menu.
2.Click Scan to display scanning preferences.
3.Click Setup to display the Scanner Setup dialog.
4.Click Eject Card to eject the card.
Two or more cards scanned as one
If you scan cards in rapid succession, several cards may appear as one continuous image, thereby
Parallel Port
Scanner seems too slow
The CardScan 500 scans faster if your PC’s parallel port is in ECP mode. Consult your PC documentation to determine your parallel port’s mode and change it to ECP. You may also try changing modes in the BIOS:
1.Access the BIOS when the system is booting. Many PCs show how to access the BIOS, usually by pressing a key or key combination. Some common keys are Esc, F1, F2, or Del.
2.In the BIOS, locate the settings for the parallel
port mode (they may be in the Advanced Settings section) and change the parallel port mode.
If you can’t change modes in the BIOS your PC’s documentation may show how to change a jumper setting on the parallel port card.
Error message: “Scanning: no images saved” when starting CardScan
This message may appear if CardScan’s Auto Detect option is enabled, but another device (not your Card- Scan scanner) is connected to your PC’s parallel port. If this device is
1. | Disconnect the device from the PC’s parallel port. |
2. | Connect your CardScan scanner to the PC’s |
Scanner Software Update
Corex makes updates to your CardScan 500 scanner’s software available on its Web site.
CardScan checks for available updates if you choose Help→CardScan Updates. If an update is available, it is downloaded. The Scanner Software Update wizard runs and installs it on your scanner. The wizard will give you complete instructions when it runs.
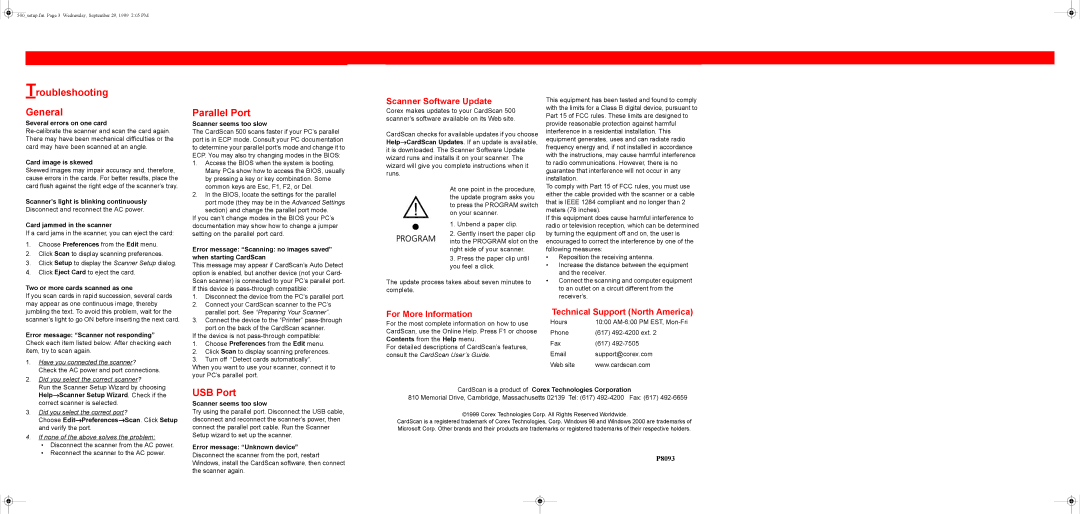
At one point in the procedure, the update program asks you to press the PROGRAM switch on your scanner.
1.Unbend a paper clip.
2.Gently insert the paper clip into the PROGRAM slot on the right side of your scanner.
3.Press the paper clip until you feel a click.
The update process takes about seven minutes to complete.
This equipment has been tested and found to comply with the limits for a Class B digital device, pursuant to Part 15 of FCC rules. These limits are designed to provide reasonable protection against harmful interference in a residential installation. This equipment generates, uses and can radiate radio frequency energy and, if not installed in accordance with the instructions, may cause harmful interference to radio communications. However, there is no guarantee that interference will not occur in any installation.
To comply with Part 15 of FCC rules, you must use either the cable provided with the scanner or a cable that is IEEE 1284 compliant and no longer than 2 meters (78 inches).
If this equipment does cause harmful interference to radio or television reception, which can be determined by turning the equipment off and on, the user is encouraged to correct the interference by one of the following measures:
•Reposition the receiving antenna.
•Increase the distance between the equipment and the receiver.
•Connect the scanning and computer equipment to an outlet on a circuit different from the receiver’s.
jumbling the text. To avoid this problem, wait for the scanner’s light to go ON before inserting the next card.
Error message: “Scanner not responding” Check each item listed below. After checking each item, try to scan again.
1. | Have you connected the scanner? |
| Check the AC power and port connections. |
2. | Did you select the correct scanner? |
parallel port. See “Preparing Your Scanner”. |
3. Connect the device to the “Printer” |
port on the back of the CardScan scanner. If the device is not
1.Choose Preferences from the Edit menu.
2.Click Scan to display scanning preferences.
3.Turn off “Detect cards automatically”.
When you want to use your scanner, connect it to your PC’s parallel port.
For More Information
For the most complete information on how to use CardScan, use the Online Help. Press F1 or choose Contents from the Help menu.
For detailed descriptions of CardScan’s features, consult the CardScan User’s Guide.
Technical Support (North America)
Hours | 10:00 | |
Phone | (617) | |
Fax | (617) | |
support@corex.com | ||
Web site | www.cardscan.com | |
| Run the Scanner Setup Wizard by choosing |
| Help→Scanner Setup Wizard. Check if the |
| correct scanner is selected. |
3. | Did you select the correct port? |
| Choose Edit→Preferences→Scan. Click Setup |
| and verify the port. |
4. | If none of the above solves the problem: |
| • Disconnect the scanner from the AC power. |
| • Reconnect the scanner to the AC power. |
USB Port
Scanner seems too slow
Try using the parallel port. Disconnect the USB cable, disconnect and reconnect the scanner’s power, then connect the parallel port cable. Run the Scanner Setup wizard to set up the scanner.
Error message: “Unknown device”
Disconnect the scanner from the port, restart Windows, install the CardScan software, then connect the scanner again.
CardScan is a product of Corex Technologies Corporation
810 Memorial Drive, Cambridge, Massachusetts 02139 Tel: (617)
©1999 Corex Technologies Corp. All Rights Reserved Worldwide.
CardScan is a registered trademark of Corex Technologies, Corp. Windows 98 and Windows 2000 are trademarks of Microsoft Corp. Other brands and their products are trademarks or registered trademarks of their respective holders.
P8093