RX1200L, RX1200R CONTROLS
QUICK START UP
If you’re like most new owners, you’re probably in a hurry to plug your mixer in and use it. Here are some brief instructions to get you going quickly. With the mixer unplugged and the unit turned off, complete the following procedures:
A. CONNECTING AC POWER TO YOUR MIXER
•Be sure to plug your mixer into the proper voltage, either 120V or 240V, 50Hz or 60Hz. The RX1200L and RX1200R accept both voltages listed.
•Use only a grounded (3 prong) power outlet to prevent a shock hazard. This gives the quietest grounding for your mixer.
B. CONNECTING INPUTS TO YOUR MIXER
•For balanced microphones, use a shielded cable and plug into the XLR MIC inputs.
•For high output devices like instruments & keyboards, plug into the LINE input jacks using a shielded cable. Be sure the LINE/INS switch is in the “OUT” position.
C. TURNING YOUR MIXER ON
• Set all channel and master LEVEL controls to their OFF |
positions |
• Set all HI, MID, and BASS controls and the graphic equal- |
izers to their center “flat - no boost or cut” position. |
• Adjust all channel “PAN” controls to their center position. |
• Connect your speakers and monitors at the rear panel. |
• Turn the mixer on by the rear POWER SWITCH and watch |
7. EFF 1 & EFF 2 CONTROLS
The EFF 1 and EFF 2 controls adjust the levels sent to the dual effects processors and to the EFF 1 and EFF 2 SND jacks. The effects controls are
8. MON 1 & MON 2 CONTROLS
The MON 1 and MON 2 level controls adjust the volume of the channel going to the monitor amps. The monitor level control is a
9. CHANNEL TONE CONTROLS
Each channel features active
12.MONITOR 1& MONITOR 2 LEVELS (AMPS 3&4)
The MONITOR 1 and MONITOR 2 levels are sent to the GRAPHIC EQs which feed the AMPS 3 & 4, and the MONI- TOR 1&2 output jacks.
13.MUSIC BREAK SWITCH
The MUSIC BREAK feature turns off all inputs except for the last channel (ch 12). This is useful during breaks. This allows
14. TAPE OUT LEVEL
The TAPE OUT level sends the MAIN L/R signal (pre graph- ic EQ) to the TAPE OUT RCA jacks for recording. If the TAPE OUT is being used to record, make sure the recorder’s out- puts are not connected to the CH12 TAPE IN jacks, or feed- back may occur.
19. SUB X-OVER SWITCH
The SUB XOVER (crossover) switch removes all frequencies above 120Hz for connecting the MONO(SUB) output to an amplified subwoofer. This is a 3rd order (18db/oct.) filter.
20.PHANTOM POWER SWITCH AND LED
The PHANTOM PWR switch turns on the microphone phan- tom power in the channel XLR jacks. This power is used for supplying a voltage to condenser microphones. The LED indicates the phantom power is turned on. The phantom power will not damage conventional dynamic microphones. Note: Make sure the phantom power is switched off before connecting or disconnecting microphones to the mixer.
21.MONITOR 1&2 OUTPUTS
The MONITOR 1 - 2 line outputs are the same signals that feed the internal MONITOR AMPS 3 & 4. Use these outputs for additional power amps or recording gear.
nals to the dual processors. Note: Reduce these levels if the red PEAK LEDs are flashing on the processors.
Turn up the MAIN controls to add effects to the MAIN L/R
OUTPUTS.
The MON
EFFECT PARAMETERS
Each of the four effects have variable parameters that are easily adjusted by the SELECT and the PARAMETER controls to get the desired effect. Each “SELECT” & “PARAMETER” is described below. Note: An audible noise will be heard while adjusting the effects.
A)ECHO: Use SELECT to change the amount of regeneration (number of repeats). The PARAMETER control adjusts the delay time between the original signal and the echo.
B)REVERB: Turn SELECT for the amount of presence (high frequencies) in the reverb. The PARAMETER control adjusts decay.
C)CHORUS: Turn SELECT for the amount of reverb with your chorus. The PARAMETER control adjusts the depth.
ered from this position, they boost or cut respectively a nar- row frequency band. To reduce feedback in the low fre- quency range, try lowering one of the 80 or 160 Hz sliders. High frequency feedback is usually reduced by lowering one of the 2k or 6k Hz sliders.
To help prevent feedback, the main speakers should be placed in front and away from the microphones.
For tone enhancement you may want to raise the 80, 160 slid- ers for deeper bass or the 6k, 12k sliders for crisper highs.
26. POWER LED
The blue POWER LED indicates when the mixer is powered on.
27. PROTECT LED
The mixer may go into “PROTECT” mode, engaging relays to mute the speakers if: a) impedance is below 4 ohms on any amplifier, b) shorted speaker cables, or c) ventilation problems. If this LED comes on, shut the mixer OFF and check for cable problems, proper impedance and obstruct- ed rear cooling vents. If you encounter an
28. AMP CLIP LED’s
The AMP CLIP LEDs indicate when the internal power amps are starting to distort (clip). Reduce the MAIN L/R, MONI- TOR 1 or MONITOR 2 master volumes to prevent distortion.
for the front POWER LED to come on. Your mixer is now |
ready to operate by turning the levels up. |
MIC CHANNEL FEATURES
1. LINE INPUT/INSERT JACKS
The LINE input is a 1/4” phone jack designed for balanced or unbalanced line or instruments. Examples of these inputs would be guitar, keyboard or CD player. The line input can be used at the same time the mic input is being used. For chan- nels
2. INSERT SWITCH
The LINE/INS switch changes the function of the channel’s 1/4” jack. The “OUT” position is for normal LINE level inputs. Pressing the switch “IN” changes the jack into an INSERT with SEND and RETURN. This allows you to place effects on the channel after the GAIN control for lowest noise. To insert effects (such as a compressor, etc.) use a 1/4” stereo splitter adapter (like Carvin AP1).
Connections are
3. XLR MICROPHONE INPUT
The XLR MIC input is designed for balanced low impedance microphone and DIRECT OUT signals. The high performance mic preamps do a superb job of noise reduction, but to get the lowest noise adjust the GAIN control properly (see #5). Note: Make sure the phantom power is switched off before connecting or disconnecting microphones to the mixer.
4. CHANNEL LEVEL CONTROL
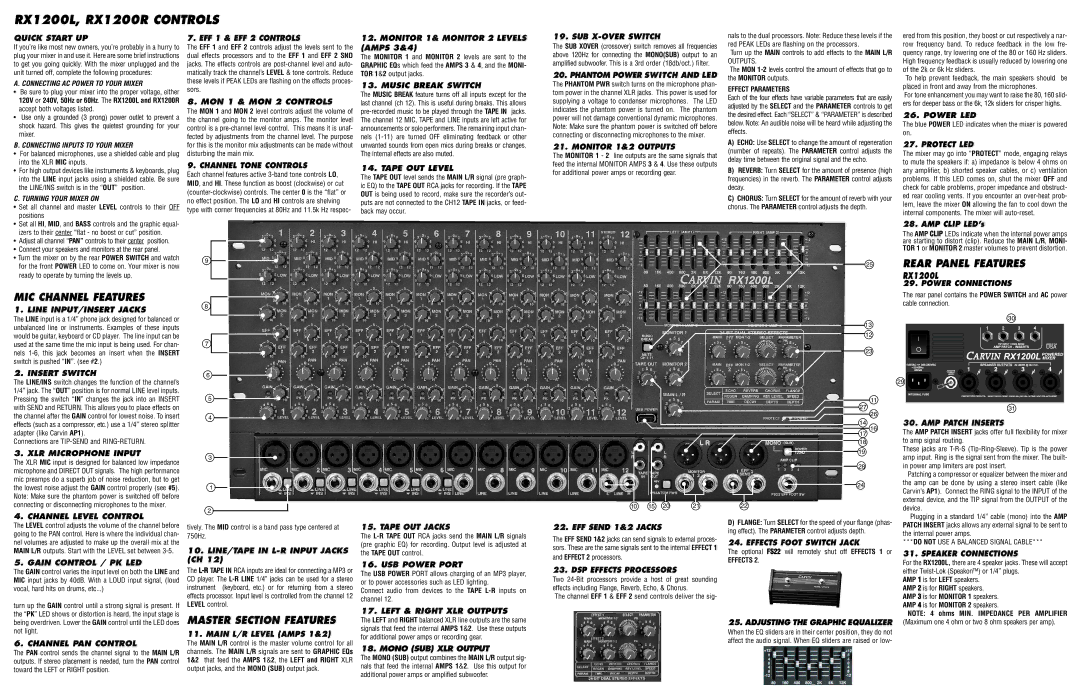
9
8
7
6
5
4
3
1
2
|
|
|
| 25 | REAR PANEL FEATURES |
|
|
|
|
| RX1200L |
|
|
|
|
| 29. POWER CONNECTIONS |
|
|
|
|
| The rear panel contains the POWER SWITCH and AC power |
|
|
|
|
| cable connection. |
|
|
|
| 13 | 30 |
|
|
|
|
| |
|
|
|
| 12 |
|
|
|
|
| 23 |
|
|
|
|
|
| 29 |
|
|
|
| 11 |
|
|
|
|
| 27 | 31 |
|
|
|
| 26 |
|
|
|
|
| 14 | 30. AMP PATCH INSERTS |
|
|
|
| 16 | The AMP PATCH INSERT jacks offer full flexibility for mixer |
|
|
|
| 17 | |
|
|
|
| 18 | to amp signal routing. |
|
|
|
| 19 | These jacks are |
|
|
|
| amp input. Ring is the signal sent from the mixer. The built- | |
|
|
|
|
| |
|
|
|
| 28 | in power amp limiters are post insert. |
|
|
|
|
| Patching a compressor or equalizer between the mixer and |
|
|
|
| 24 | the amp can be done by using a stereo insert cable (like |
|
|
|
| Carvin’s AP1). Connect the RING signal to the INPUT of the | |
|
|
|
|
| |
10 | 15 | 20 | 21 | 22 | external device, and the TIP signal from the OUTPUT of the |
device. | |||||
|
|
|
| D) FLANGE: Turn SELECT for the speed of your flange (phas- | Plugging in a standard 1/4” cable (mono) into the AMP |
|
|
|
|
|
The LEVEL control adjusts the volume of the channel before going to the PAN control. Here is where the individual chan- nel volumes are adjusted to make up the overall mix at the MAIN L/R outputs. Start with the LEVEL set between
5. GAIN CONTROL / PK LED
The GAIN control varies the input level on both the LINE and MIC input jacks by 40dB. With a LOUD input signal, (loud vocal, hard hits on drums, etc...)
turn up the GAIN control until a strong signal is present. If the “PK” LED shows or distortion is heard, the input stage is being overdriven. Lower the GAIN control until the LED does not light.
6. CHANNEL PAN CONTROL
The PAN control sends the channel signal to the MAIN L/R outputs. If stereo placement is needed, turn the PAN control toward the LEFT or RIGHT position.
tively. The MID control is a band pass type centered at 750Hz.
10.LINE/TAPE IN L-R INPUT JACKS (CH 12)
The
MASTER SECTION FEATURES
11. MAIN L/R LEVEL (AMPS 1&2)
The MAIN L/R control is the master volume control for all channels. The MAIN L/R signals are sent to GRAPHIC EQs 1&2 that feed the AMPS 1&2, the LEFT and RIGHT XLR output jacks, and the MONO (SUB) output jack.
15. TAPE OUT JACKS
The
16. USB POWER PORT
The USB POWER PORT allows charging of an MP3 player, or to power accessories such as LED lighting.
Connect audio from devices to the TAPE
17. LEFT & RIGHT XLR OUTPUTS
The LEFT and RIGHT balanced XLR line outputs are the same signals that feed the internal AMPS 1&2. Use these outputs for additional power amps or recording gear.
18. MONO (SUB) XLR OUTPUT
The MONO (SUB) output combines the MAIN L/R output sig- nals that feed the internal AMPS 1&2. Use this output for additional power amps or amplified subwoofer.
22. EFF SEND 1&2 JACKS | ing effect). The PARAMETER control adjusts depth. | PATCH INSERT jacks allows any external signal to be sent to | ||
The EFF SEND 1&2 jacks can send signals to external proces- | the internal power amps. | |||
|
| |||
24. EFFECTS FOOT SWITCH JACK | ***DO NOT USE A BALANCED SIGNAL CABLE*** | |||
sors. These are the same signals sent to the internal EFFECT 1 | ||||
The optional | FS22 will remotely shut off EFFECTS 1 or | 31. SPEAKER CONNECTIONS | ||
and EFFECT 2 processors. | ||||
EFFECTS 2. |
| For the RX1200L, there are 4 speaker jacks. These will accept | ||
|
| |||
23. DSP EFFECTS PROCESSORS |
|
| ||
|
| either | ||
Two |
|
| AMP 1 is for LEFT speakers. | |
effects including Flange, Reverb, Echo, & Chorus. |
|
| AMP 2 is for RIGHT speakers. | |
The channel EFF 1 & EFF 2 send controls deliver the sig- |
|
| AMP 3 is for MONITOR 1 speakers. | |
|
|
| AMP 4 is for MONITOR 2 speakers. | |
| 25. ADJUSTING THE GRAPHIC EQUALIZER | NOTE: 4 ohms MIN. IMPEDANCE PER AMPLIFIER | ||
| (Maximum one 4 ohm or two 8 ohm speakers per amp). | |||
When the EQ sliders are in their center position, they do not affect the audio signal. When EQ sliders are raised or low-