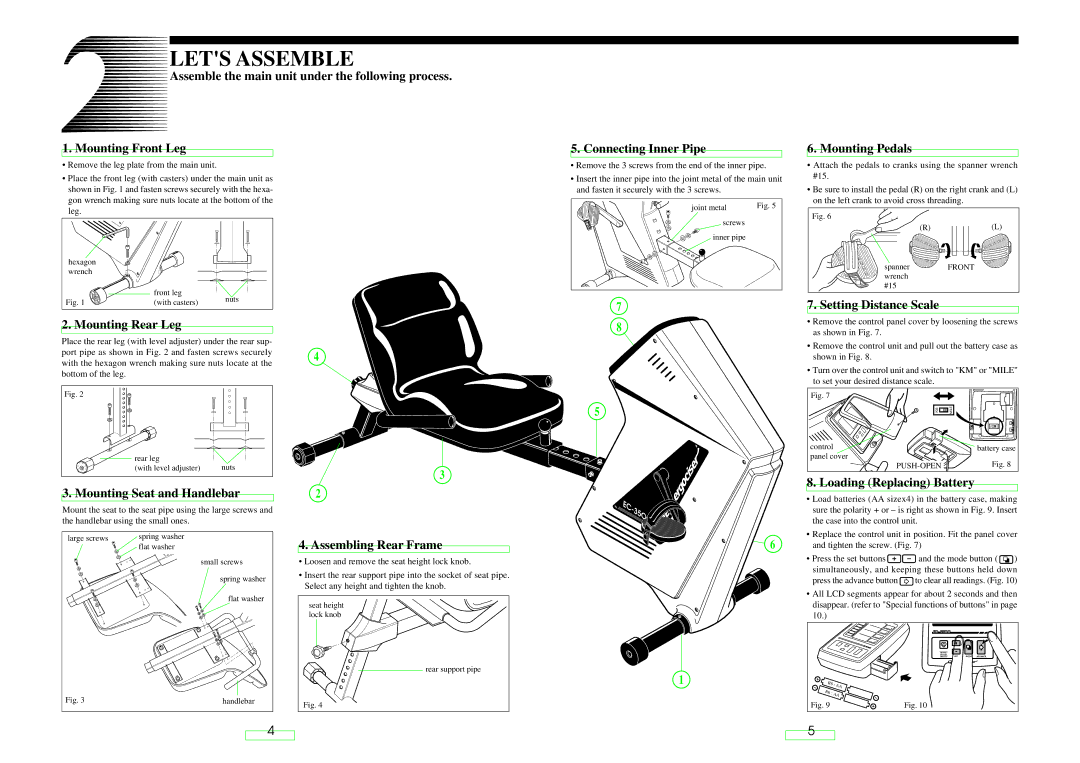
LET'S ASSEMBLE

Assemble the main unit under the following process.

1.Mounting Front Leg

Remove the leg plate from the main unit.

Place the front leg (with casters) under the main unit as shown in Fig. 1 and fasten screws securely with the hexa- gon wrench making sure nuts locate at the bottom of the leg.

5.Connecting Inner Pipe

Remove the 3 screws from the end of the inner pipe.

Insert the inner pipe into the joint metal of the main unit and fasten it securely with the 3 screws.

joint metal

Fig. 5

6.Mounting Pedals

Attach the pedals to cranks using the spanner wrench #15.

Be sure to install the pedal (R) on the right crank and (L) on the left crank to avoid cross threading.

Fig. 6

hexagon


wrench


front leg

nuts

Fig. 1

(with casters)


2. Mounting Rear Leg

Place the rear leg (with level adjuster) under the rear sup- port pipe as shown in Fig. 2 and fasten screws securely with the hexagon wrench making sure nuts locate at the bottom of the leg.

Fig. 2

rear leg

7

8


(with level adjuster)

nuts

5

6

1

2

4

3


3. Mounting Seat and Handlebar

4

3

2

screws

inner pipe

7

8

5

(R)

(L)

spanner

FRONT

wrench


#15


7.Setting Distance Scale

Remove the control panel cover by loosening the screws as shown in Fig. 7.

Remove the control unit and pull out the battery case as shown in Fig. 8.

Turn over the control unit and switch to "KM" or "MILE" to set your desired distance scale.

Fig. 7


KM

MILE


KM

MILE

control

battery case

panel cover


Fig. 8

PUSH-OPEN


8. Loading (Replacing) Battery

• Load batteries (AA sizex4) in the battery case, making

Mount the seat to the seat pipe using the large screws and the handlebar using the small ones.

large screws

spring washer


flat washer


small screws


spring washer


flat washer

Fig. 3

handlebar


4

4. Assembling Rear Frame

Loosen and remove the seat height lock knob.

Insert the rear support pipe into the socket of seat pipe. Select any height and tighten the knob.

seat height

lock knob

rear support pipe

Fig. 4

EC- 35OO

6

1

sure the polarity + or –

is right as shown in Fig. 9. Insert

the case into the control unit.


• Replace the control unit in position. Fit the panel cover

and tighten the screw. (Fig. 7)


• Press the set buttons


and the mode button (


)


simultaneously, and keeping these buttons held


down

press the advance button


to clear all readings. (Fig. 10)


• All LCD segments appear for about 2 seconds and then

disappear. (refer to "Special functions of buttons" in page

10.)


TARGET

PULSE

ON/OFF SET MODE ADVANCE

R6 :


R6 :

AA


AA


Fig. 9


Fig. 10

5

Page 4
Image 4
Cateye EC-35OO operating instructions Lets Assemble

EC-35OO specifications

The Cateye EC-3500 is a cutting-edge cycle computer designed for avid cyclists who seek to enhance their riding experience through advanced technology and features. This device stands out due to its robust functionality and user-friendly interface, making it an essential companion for cyclists of all levels.

One of the primary features of the EC-3500 is its large, easy-to-read LCD display, which is designed to provide clear visibility even in bright sunlight or low light conditions. The screen layout is customizable, allowing users to select the data they want to prioritize during their ride. This includes vital statistics such as current speed, average speed, maximum speed, total distance, and trip duration, giving cyclists comprehensive insights into their performance.

The EC-3500 incorporates a GPS module, offering precise location tracking and route mapping. This feature not only helps cyclists navigate unfamiliar routes but also enables them to review their rides afterwards through accompanying software. The integration of GPS technology enhances overall ride planning and performance analysis.

Another significant characteristic of the Cateye EC-3500 is its connectivity options. The cycle computer easily pairs with smartphones via Bluetooth, allowing riders to sync their ride data with popular fitness apps. This seamless connectivity enhances the overall training experience, enabling cyclists to track their progress over time and compare their performance with previous rides or other cyclists.

The EC-3500 is designed with durability in mind. It features weatherproof construction that ensures reliable performance regardless of the weather conditions. This durability is complemented by a long battery life, allowing cyclists to embark on extended rides without worrying about their device running out of power.

Additionally, the EC-3500 is equipped with an advanced heart rate monitor and cadence sensor, allowing users to monitor their physical exertion and pedaling efficiency. These features provide cyclists with a deeper understanding of their fitness levels and help them optimize their training routines.

In summary, the Cateye EC-3500 is an excellent choice for cyclists seeking a multifunctional, durable, and reliable cycle computer. With its GPS capabilities, user-friendly display, and advanced connectivity options, it empowers riders to achieve their cycling goals while enjoying the journey. Whether for casual rides or intense training sessions, the EC-3500 delivers the performance and insights that every cyclist needs.