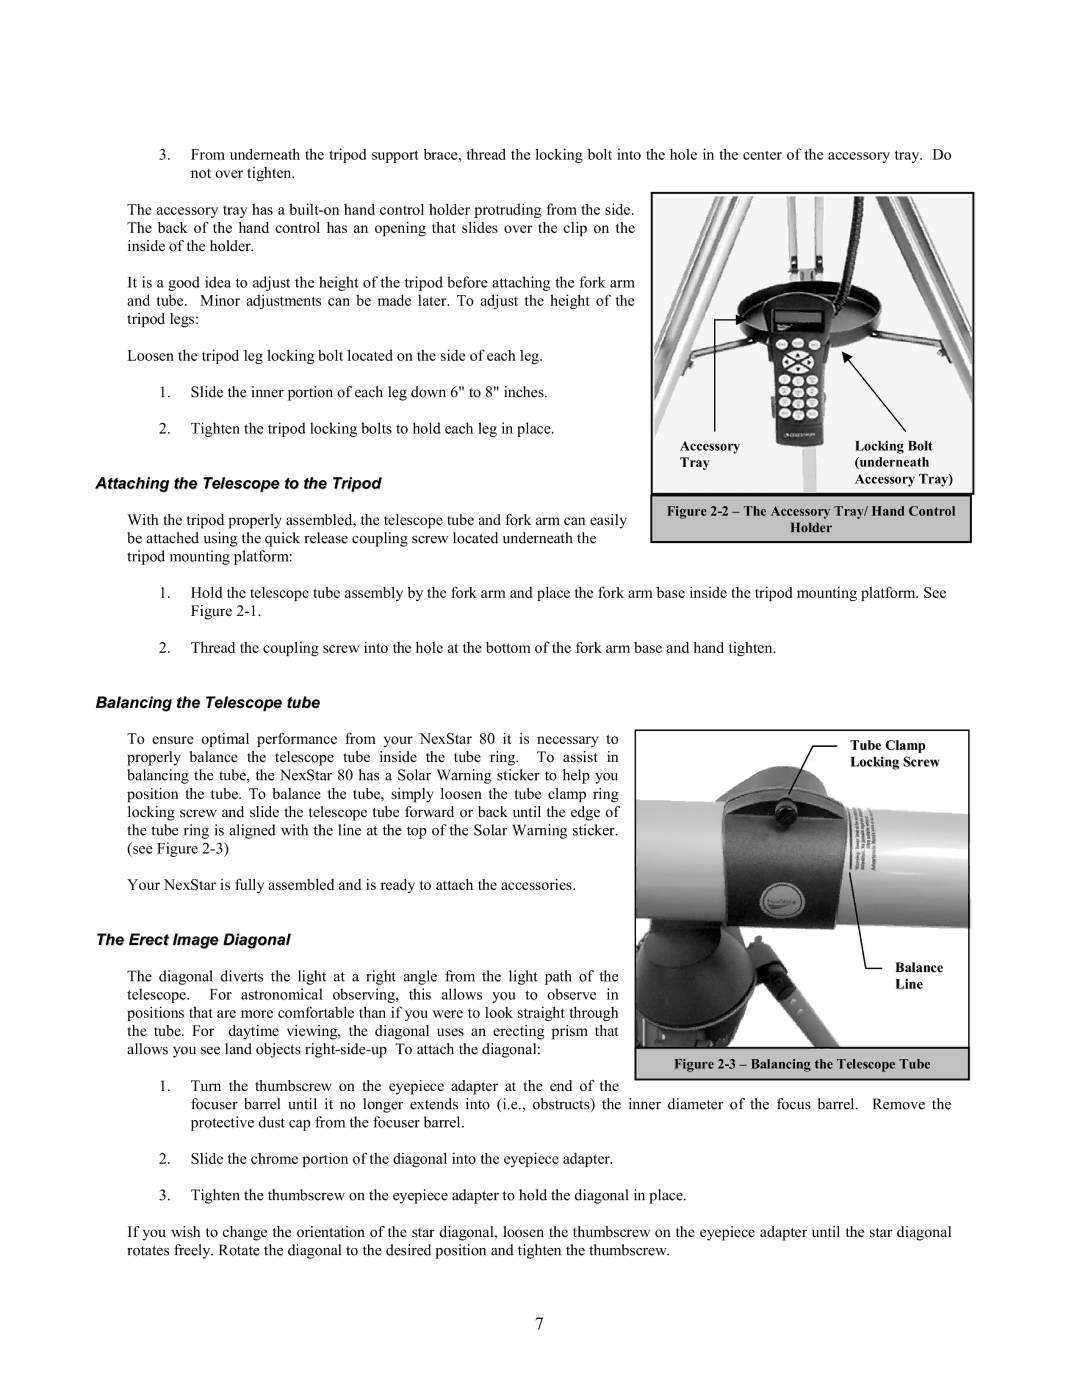
3.From underneath the tripod support brace, thread the locking bolt into the hole in the center of the accessory tray. Do not over tighten.

The accessory tray has a built-on hand control holder protruding from the side. The back of the hand control has an opening that slides over the clip on the inside of the holder.

It is a good idea to adjust the height of the tripod before attaching the fork arm and tube. Minor adjustments can be made later. To adjust the height of the tripod legs:

Loosen the tripod leg locking bolt located on the side of each leg.

1.Slide the inner portion of each leg down 6" to 8" inches.

2.Tighten the tripod locking bolts to hold each leg in place.

Attaching the Telescope to the Tripod

With the tripod properly assembled, the telescope tube and fork arm can easily be attached using the quick release coupling screw located underneath the tripod mounting platform:


Accessory

Locking Bolt

Tray

(underneath


Accessory Tray)


Figure 2-2 – The Accessory Tray/ Hand Control

Holder

1.Hold the telescope tube assembly by the fork arm and place the fork arm base inside the tripod mounting platform. See Figure 2-1.

2.Thread the coupling screw into the hole at the bottom of the fork arm base and hand tighten.

Balancing the Telescope tube

To ensure optimal performance from your NexStar 80 it is necessary to


Tube Clamp


properly balance the telescope tube inside the tube ring. To assist in


Locking Screw


balancing the tube, the NexStar 80 has a Solar Warning sticker to help you


position the tube. To balance the tube, simply loosen the tube clamp ring


locking screw and slide the telescope tube forward or back until the edge of


the tube ring is aligned with the line at the top of the Solar Warning sticker.


(see Figure 2-3)


Your NexStar is fully assembled and is ready to attach the accessories.


The Erect Image Diagonal


The diagonal diverts the light at a right angle from the light path of the


Balance


Line


telescope. For astronomical observing, this allows you to observe in


positions that are more comfortable than if you were to look straight through


the tube. For daytime viewing, the diagonal uses an erecting prism that


allows you see land objects right-side-up To attach the diagonal:


Figure 2-3 – Balancing the Telescope Tube


1.Turn the thumbscrew on the eyepiece adapter at the end of the

focuser barrel until it no longer extends into (i.e., obstructs) the inner diameter of the focus barrel. Remove the protective dust cap from the focuser barrel.

2.Slide the chrome portion of the diagonal into the eyepiece adapter.

3.Tighten the thumbscrew on the eyepiece adapter to hold the diagonal in place.

If you wish to change the orientation of the star diagonal, loosen the thumbscrew on the eyepiece adapter until the star diagonal rotates freely. Rotate the diagonal to the desired position and tighten the thumbscrew.

7

Page 7
Image 7
Celestron 80GTL manual Attaching the Telescope to the Tripod, Balancing the Telescope tube, Erect Image Diagonal

80GTL specifications

The Celestron 80GTL is a powerful and compact telescope designed for both amateur astronomers and experienced stargazers. It combines modern technology with user-friendly features, making it an excellent choice for those looking to explore the night sky. With its 80mm aperture, the 80GTL captures enough light to reveal a variety of celestial objects, from the moon’s craters to distant galaxies.

One of the standout characteristics of the Celestron 80GTL is its innovative Altazimuth mount. This mount provides smooth and precise movements in both horizontal and vertical directions, allowing users to easily track celestial objects as they move across the sky. The setup is quick and straightforward, making it ideal for beginners who may be intimidated by more complex mounts.

The telescope is equipped with Celestron’s StarScope system, which includes a computer-controlled GoTo mount. This feature allows users to automatically locate and track over 40,000 celestial objects with the push of a button. The included hand controller is intuitive and easy to navigate, giving users instant access to stars, planets, and deep-sky objects. This technology not only enhances the viewing experience but also helps novice astronomers learn about the universe with guided tours through the night sky.

Another notable feature of the Celestron 80GTL is its sturdy construction and lightweight design. Made from high-quality materials, it boasts durability while remaining portable for easy transport. Weighing just under 10 pounds, this telescope can be taken on camping trips or excursions, allowing users to enjoy astronomy in various locations.

Additionally, users will appreciate the 80GTL’s fully coated glass optics which provide excellent image quality and contrast. The included 25mm and 10mm eyepieces offer different magnifications, catering to diverse viewing preferences. Whether observing the rings of Saturn or the detail of lunar landscapes, the 80GTL promises clear and sharp images.

In summary, the Celestron 80GTL is a highly capable telescope, combining an accessible design with advanced technologies. Its user-friendly GoTo mount, quality optics, and lightweight build make it an exceptional option for anyone wishing to delve into the wonders of the cosmos, ensuring both enjoyment and education in the field of astronomy.