Finderscope

Finder Bracket

Rubber O-ring

Three Nylon Tipped Thumbscrews (10-24x1/2")

Two Phillips Head Screws (8-32x1/2")

To install the finderscope:

1.

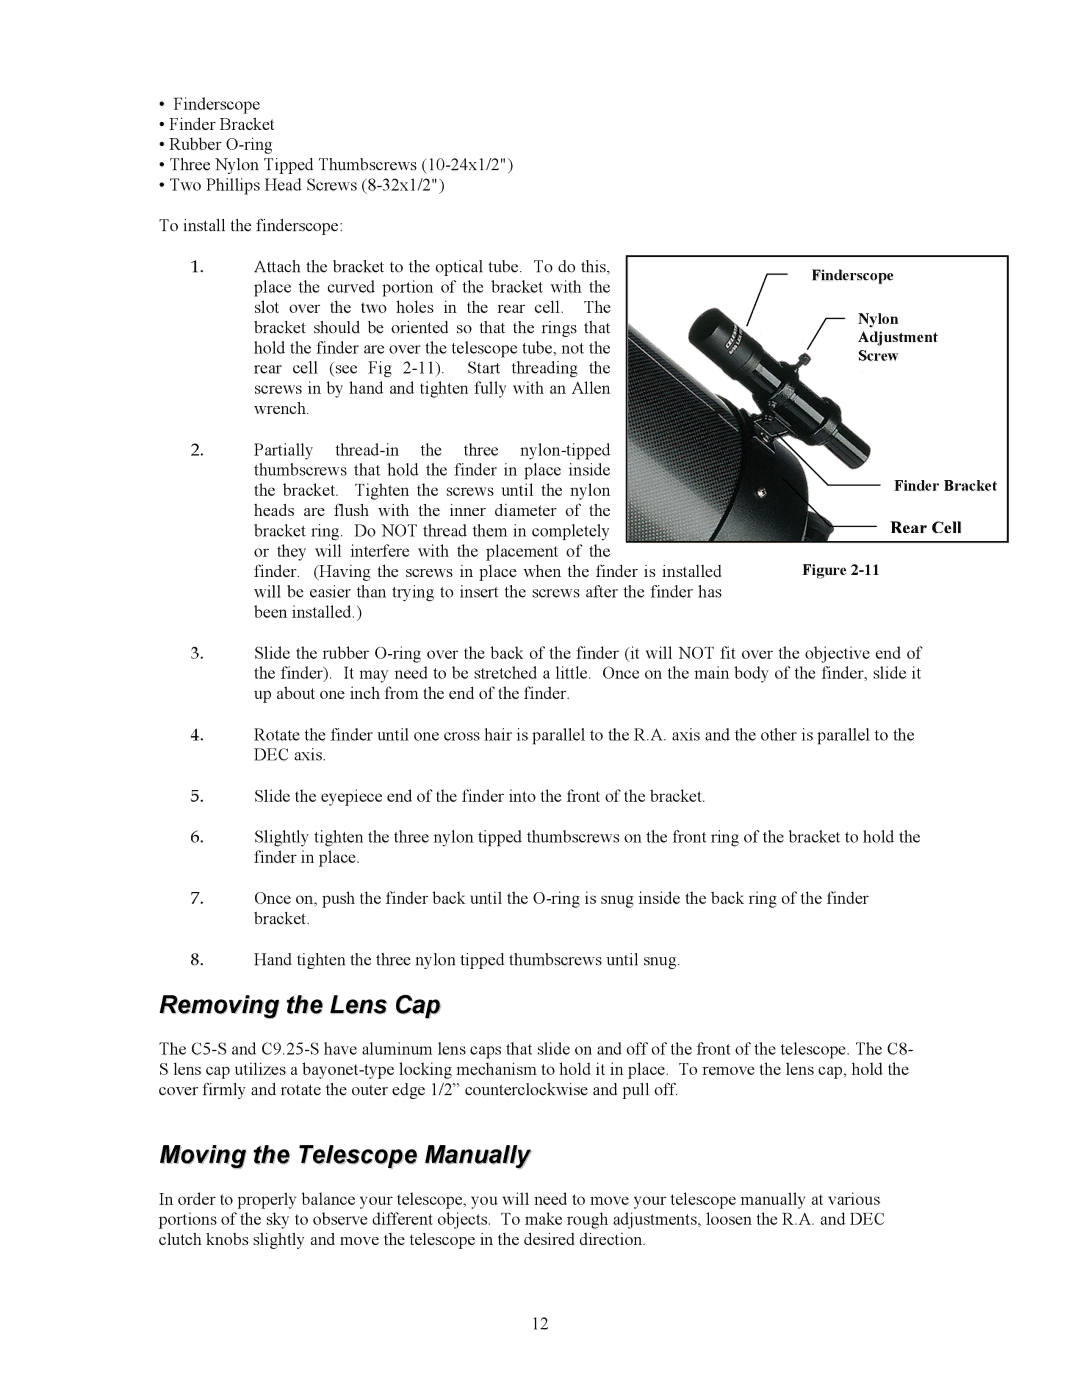
Attach the bracket to the optical tube. To do this,


Finderscope


place the curved portion of the bracket with the


slot over the

two holes in the rear cell. The


Nylon


bracket should be oriented so that the rings that


Adjustment


hold the finder are over the telescope tube, not the


Screw


rear cell (see Fig 2-11). Start threading the


screws in by hand and tighten fully with an Allen


wrench.


2.

Partially thread-in the three nylon-tipped


thumbscrews that hold the finder in place inside


Finder Bracket


the bracket.

Tighten the screws until the nylon


heads are flush with the inner diameter of the


Rear Cell


bracket ring. Do NOT thread them in completely


or they will interfere with the placement of the


Figure 2-11


finder. (Having the screws in place when the finder is installed


will be easier than trying to insert the screws after the finder has


been installed.)


3.Slide the rubber O-ring over the back of the finder (it will NOT fit over the objective end of the finder). It may need to be stretched a little. Once on the main body of the finder, slide it up about one inch from the end of the finder.

4.Rotate the finder until one cross hair is parallel to the R.A. axis and the other is parallel to the DEC axis.

5.Slide the eyepiece end of the finder into the front of the bracket.

6.Slightly tighten the three nylon tipped thumbscrews on the front ring of the bracket to hold the finder in place.

7.Once on, push the finder back until the O-ring is snug inside the back ring of the finder bracket.

8.Hand tighten the three nylon tipped thumbscrews until snug.

Removing the Lens Cap

The C5-S and C9.25-S have aluminum lens caps that slide on and off of the front of the telescope. The C8- S lens cap utilizes a bayonet-type locking mechanism to hold it in place. To remove the lens cap, hold the cover firmly and rotate the outer edge 1/2” counterclockwise and pull off.

Moving the Telescope Manually

In order to properly balance your telescope, you will need to move your telescope manually at various portions of the sky to observe different objects. To make rough adjustments, loosen the R.A. and DEC clutch knobs slightly and move the telescope in the desired direction.

12

Page 12
Image 12
Celestron C8-S, C5-S, C9.25-S instruction manual Removing the Lens Cap, Moving the Telescope Manually, Rear Cell

C9.25-S, C5-S, C8-S specifications

Celestron, a leader in the field of amateur and professional astronomy, offers a range of telescopes ideal for both novices and experienced stargazers. Among their most celebrated models are the C8-S, C5-S, and C9.25-S, each designed with unique features and technologies that enhance the observational experience.

The Celestron C8-S is an iconic telescope known for its 8-inch aperture. This Schmidt-Cassegrain design combines a compact form factor with a powerful light-gathering capability, making it perfect for deep-sky observing. Its optical tube has a focal length of 2032mm, providing an excellent balance of wide field viewing and high magnification. The C8-S features Celestron's StarBright XLT optical coating, enhancing light transmission and contrast, ensuring that even faint objects are visible. With compatibility for various accessories and a sturdy mount, the C8-S stands as a versatile option for different observing styles.

Moving to the C5-S, this model boasts a 5-inch aperture while maintains a compact and portable design. It is particularly popular among travelers and casual astronomers who value convenience without compromising on quality. The C5-S also employs the Schmidt-Cassegrain design, providing sharp images and improved color correction. With its shorter focal length of 1250mm, the C5-S excels in both planetary and deep-sky observation. The telescope's lightweight build makes it easy to transport, while the integrated optical systems ensure a clear view of celestial objects.

The C9.25-S represents a step up in performance, featuring a 9.25-inch aperture that captures more light than its smaller counterparts. This telescope offers a versatile focal length of 2350mm, allowing for impressive high-power planetary views, as well as detailed observations of deep-sky objects. The C9.25-S utilizes a unique StarBright XLT coating and features advanced optics that minimize optical distortion, resulting in sharp, high-contrast images. It is equipped with a sturdy mount that ensures stability during extended observation sessions.

All three models are compatible with Celestron's advanced computer-driven mount systems, allowing for effortless tracking and alignment. With built-in features such as GoTo technology, users can easily locate thousands of celestial objects with the touch of a button. This combination of advanced optics, portability, and user-friendly technology makes the Celestron C8-S, C5-S, and C9.25-S excellent choices for anyone looking to explore the cosmos more deeply. Whether for casual stargazing or serious astronomical study, these telescopes deliver exceptional performance to meet a variety of needs.