Model: FSR Series

Installation Instructions


INSTALLATION

The FSR may be installed on either a single wood stud, or drywall (1/2" minimum thickness).

INSTALL MOUNT TO SINGLE WOOD STUD

1.Determine approximate mounting location, keeping in mind the display size.

2.Use a stud sensor to locate applicable wood stud. Mark location with a pencil.

3.Level plate (10) at desired height and, using plate (10) as a template, mark the location of upper and lower pilot holes. Ensure marks are in the center of wood stud.

NOTE: Mount can provide ±1/2" of lateral shift by using mount holes on either side of vertical centerline.

WARNING: ELECTRICAL SHOCK HAZARD! Drilling into electrical wires or cables can cause DEATH or SERIOUS PERSONAL INJURY! ALWAYS make certain area behind mounting surfaces is free of electrical wires and cables before drilling or installing mount fasteners.

4.Drill pilot holes using a 1/8" drill bit. Ensure pilot holes are straight.

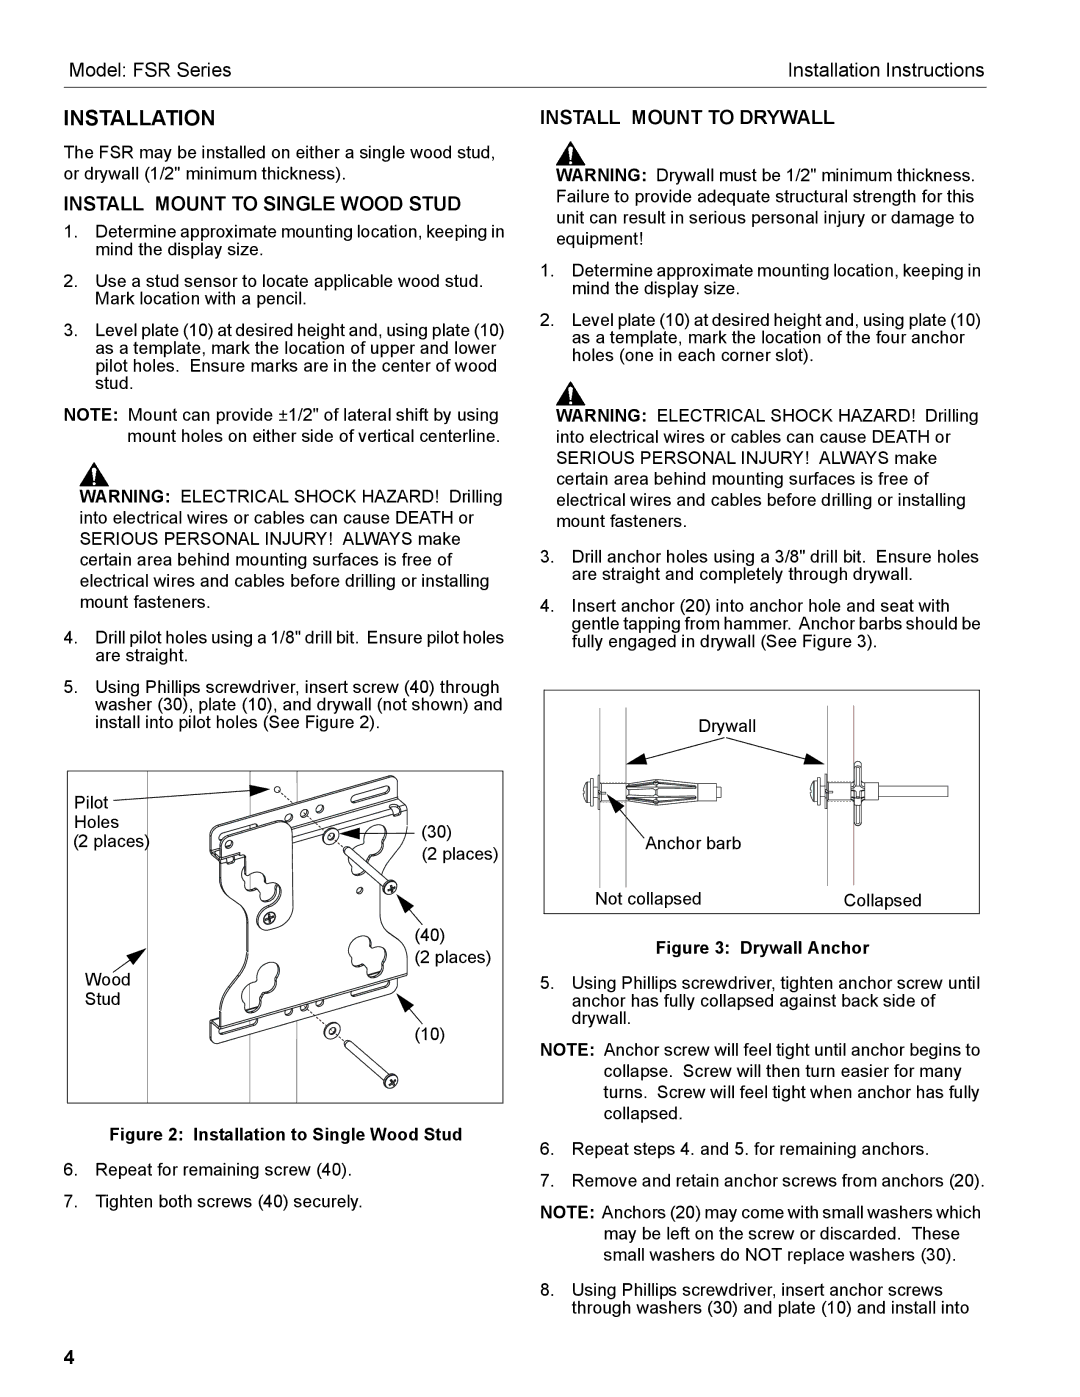
5.Using Phillips screwdriver, insert screw (40) through washer (30), plate (10), and drywall (not shown) and install into pilot holes (See Figure 2).

Pilot


Holes

(30)

(2 places)

(2 places)


(40)

Wood

(2 places)


Stud


(10)

Figure 2: Installation to Single Wood Stud

6.Repeat for remaining screw (40).

7.Tighten both screws (40) securely.

INSTALL MOUNT TO DRYWALL

WARNING: Drywall must be 1/2" minimum thickness. Failure to provide adequate structural strength for this unit can result in serious personal injury or damage to equipment!

1.Determine approximate mounting location, keeping in mind the display size.

2.Level plate (10) at desired height and, using plate (10) as a template, mark the location of the four anchor holes (one in each corner slot).

WARNING: ELECTRICAL SHOCK HAZARD! Drilling into electrical wires or cables can cause DEATH or SERIOUS PERSONAL INJURY! ALWAYS make certain area behind mounting surfaces is free of electrical wires and cables before drilling or installing mount fasteners.

3.Drill anchor holes using a 3/8" drill bit. Ensure holes are straight and completely through drywall.

4.Insert anchor (20) into anchor hole and seat with gentle tapping from hammer. Anchor barbs should be fully engaged in drywall (See Figure 3).

Drywall


Anchor barb


Not collapsed

Collapsed

Figure 3: Drywall Anchor

5.Using Phillips screwdriver, tighten anchor screw until anchor has fully collapsed against back side of drywall.

NOTE: Anchor screw will feel tight until anchor begins to collapse. Screw will then turn easier for many turns. Screw will feel tight when anchor has fully collapsed.

6.Repeat steps 4. and 5. for remaining anchors.

7.Remove and retain anchor screws from anchors (20).

NOTE: Anchors (20) may come with small washers which may be left on the screw or discarded. These small washers do NOT replace washers (30).

8.Using Phillips screwdriver, insert anchor screws through washers (30) and plate (10) and install into

4

Page 4
Image 4
Chief Manufacturing FSR Series Installation, Install Mount to Single Wood Stud, Install Mount to Drywall

FSR Series specifications

The Chief Manufacturing FSR Series is a remarkable line of mounting solutions specifically designed for the professional audio-visual market. Renowned for its robust construction and innovative designs, the FSR Series addresses the diverse needs of modern AV professionals, enhancing installation speed and adaptability while ensuring long-lasting performance.

One of the standout features of the FSR Series is its enhanced flexibility. The series includes various mounting options, allowing users to configure their installations according to specific requirements. Whether it’s a wall mount, ceiling mount, or an adjustable stand, the FSR Series has an option that caters to different environments. This versatility is crucial for integrators working in dynamic spaces, such as conference rooms or educational institutions.

The FSR Series also incorporates advanced tilt and swivel capabilities, which grant installers the freedom to position displays for optimal visibility. The intuitive adjustment features make it easy to accommodate various viewing angles while reducing installation time. This is particularly beneficial in settings where audience engagement is key, ensuring that everyone can enjoy a clear line of sight to the presentation.

In terms of technology, the FSR Series integrates seamlessly with other AV components, thanks to CEC (Consumer Electronics Control) pass-through functionality. This allows for easier control of multiple devices using just one remote, minimizing the complexity of operating AV systems. This feature simplifies user interaction, making it ideal for both corporate and educational applications.

Durability is another hallmark of the FSR Series. Constructed from high-quality materials, these mounts are built to withstand the rigors of daily use in busy environments. The powder-coated finish not only enhances aesthetics but also provides additional resistance to scratches, ensuring that the equipment remains visually appealing over time.

Another innovative characteristic of the FSR Series is its cable management system. With integrated cable channels, users can maintain a clean and organized look, which is essential for professional installations. This minimizes clutter while ensuring that cables are protected from wear and tear, thus extending the life of AV equipment.

Lastly, the FSR Series is backed by Chief's reputation for customer service and reliability. With robust warranties and comprehensive support, integrators can have peace of mind knowing they are investing in a mount that will serve their needs effectively.

Overall, the Chief Manufacturing FSR Series represents a perfect blend of functionality, technology, and durability, making it an excellent choice for any AV professional looking to streamline their installation processes while ensuring quality performance.