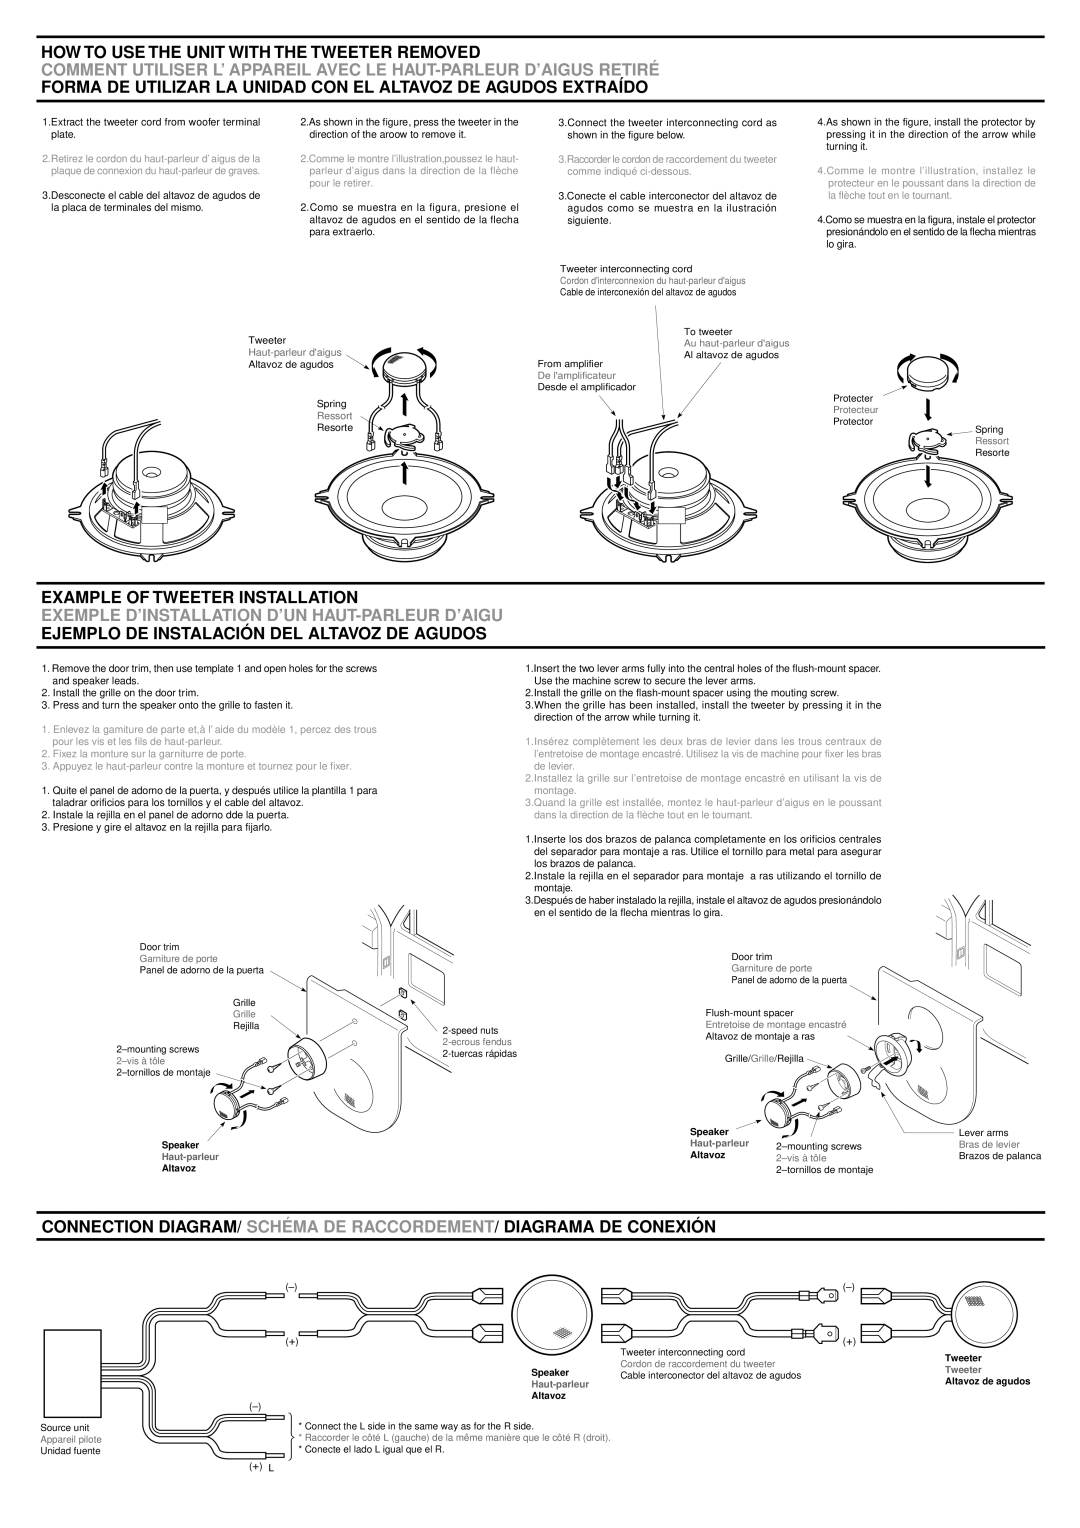
HOW TO USE THE UNIT WITH THE TWEETER REMOVED

COMMENT UTILISER L’ APPAREIL AVEC LE HAUT-PARLEUR D’AIGUS RETIRÉ FORMA DE UTILIZAR LA UNIDAD CON EL ALTAVOZ DE AGUDOS EXTRAÍDO

1.Extract the tweeter cord from woofer terminal plate.

2.Retirez le cordon du haut-parleur d’ aigus de la plaque de connexion du haut-parleur de graves.

3.Desconecte el cable del altavoz de agudos de la placa de terminales del mismo.

2.As shown in the figure, press the tweeter in the direction of the aroow to remove it.

2.Comme le montre l’illustration,poussez le haut- parleur d’aigus dans la direction de la flèche pour le retirer.

2.Como se muestra en la figura, presione el altavoz de agudos en el sentido de la flecha para extraerlo.

3.Connect the tweeter interconnecting cord as shown in the figure below.

3.Raccorder le cordon de raccordement du tweeter comme indiqué ci-dessous.

3.Conecte el cable interconector del altavoz de agudos como se muestra en la ilustración siguiente.

Tweeter interconnecting cord

Cordon d'interconnexion du haut-parleur d'aigus Cable de interconexión del altavoz de agudos

4.As shown in the figure, install the protector by pressing it in the direction of the arrow while turning it.

4.Comme le montre l’illustration, installez le protecteur en le poussant dans la direction de la flèche tout en le tournant.

4.Como se muestra en la figura, instale el protector presionándolo en el sentido de la flecha mientras lo gira.

Tweeter


Haut-parleur d'aigus


Altavoz de agudos

From amplifier


De l'amplificateur


Desde el amplificador

Spring

Ressort

Resorte

To tweeter

Au haut-parleur d'aigus Al altavoz de agudos

Protecter

Protecteur

Protector

Spring

Ressort

Resorte

EXAMPLE OF TWEETER INSTALLATION

EXEMPLE D’INSTALLATION D’UN HAUT-PARLEUR D’AIGU EJEMPLO DE INSTALACIÓ N DEL ALTAVOZ DE AGUDOS

1.Remove the door trim, then use template 1 and open holes for the screws and speaker leads.

2.Install the grille on the door trim.

3.Press and turn the speaker onto the grille to fasten it.

1.Enlevez la gamiture de parte et,à l’ aide du modèle 1, percez des trous pour les vis et les fils de haut-parleur.

2.Fixez la monture sur la garniturre de porte.

3.Appuyez le haut-parleur contre la monture et tournez pour le fixer.

1.Quite el panel de adorno de la puerta, y después utilice la plantilla 1 para taladrar orificios para los tornillos y el cable del altavoz.

2.Instale la rejilla en el panel de adorno dde la puerta.

3.Presione y gire el altavoz en la rejilla para fijarlo.

Door trim

Garniture de porte

Panel de adorno de la puerta

Grille

Grille

Rejilla

2–mounting screws 2–vis à tôle 2–tornillos de montaje

2-speed nuts

2-ecrous fendus

2-tuercas rápidas

1.Insert the two lever arms fully into the central holes of the flush-mount spacer. Use the machine screw to secure the lever arms.

2.Install the grille on the flash-mount spacer using the mouting screw.

3.When the grille has been installed, install the tweeter by pressing it in the direction of the arrow while turning it.

1.Insérez complètement les deux bras de levier dans les trous centraux de l’entretoise de montage encastré. Utilisez la vis de machine pour fixer les bras de levier.

2.Installez la grille sur l’entretoise de montage encastré en utilisant la vis de montage.

3.Quand la grille est installée, montez le haut-parleur d’aigus en le poussant dans la direction de la flèche tout en le tournant.

1.Inserte los dos brazos de palanca completamente en los orificios centrales del separador para montaje a ras. Utilice el tornillo para metal para asegurar los brazos de palanca.

2.Instale la rejilla en el separador para montaje a ras utilizando el tornillo de montaje.

3.Después de haber instalado la rejilla, instale el altavoz de agudos presionándolo en el sentido de la flecha mientras lo gira.

Door trim

Garniture de porte

Panel de adorno de la puerta

Flush-mount spacer

Entretoise de montage encastré

Altavoz de montaje a ras

Grille/Grille/Rejilla

Speaker

Haut-parleur

Altavoz

Speaker


Haut-parleur

2–mounting screws

Altavoz

2–vis à tôle


2–tornillos de montaje

Lever arms Bras de levier Brazos de palanca

CONNECTION DIAGRAM/ SCHÉ MA DE RACCORDEMENT/ DIAGRAMA DE CONEXIÓ N

(–)

(–)

(+)

(+)

Source unit Appareil pilote Unidad fuente

(–)

(+) L

Speaker

Haut-parleur

Altavoz

* Connect the L side in the same way as for the R side.

* Raccorder le côté L (gauche) de la même manière que le côté R (droit). * Conecte el lado L igual que el R.

Tweeter interconnecting cord Cordon de raccordement du tweeter Cable interconector del altavoz de agudos

Tweeter

Tweeter

Altavoz de agudos

Page 2
Image 2
Clarion SRX1383, SRX5783, SRX6983, SRX4683, SRX1683 installation manual Extract the tweeter cord from woofer terminal plate

SRX6983, SRX1383, SRX1683, SRX4683, SRX5783 specifications

The Clarion SRX series, comprised of models SRX5783, SRX4683, SRX1683, SRX1383, and SRX6983, represents a fusion of innovative audio technology, exceptional sound quality, and user-friendly features, aimed at enhancing the in-car listening experience.

The SRX5783 is a powerful speaker system designed for high-performance sound reproduction. This three-way speaker features a 5x7-inch woofer, complemented by specialized mid-range and high-frequency drivers. With a sensitivity rating of 91 dB and a peak power handling capacity of 250 watts, the SRX5783 provides deep bass response and clear highs, making it ideal for a variety of music genres. Its rugged construction and weather-resistant materials ensure durability, allowing it to perform reliably in different environmental conditions.

Moving to the SRX4683, this model also emphasizes versatility and performance. It comes with a 4x6-inch woofer and has a unique design that facilitates easy installation. Its robust 240-watt peak power handling ensures that users experience impactful bass levels without distortion at higher volumes. The SRX4683 also incorporates an advanced crossover network, which separates frequencies effectively, providing a balanced soundstage that enhances vocal clarity and instrument separation.

The SRX1683 is a compact and lightweight speaker, ideal for vehicles with restricted space. Despite its smaller size, the SRX1683 does not compromise on power or sound quality. Rated for 200 watts peak power handling, its innovative design allows for excellent bass response, making it suitable for drivers who enjoy a dynamic audio experience without needing to sacrifice much space within their vehicle.

Designed for budget-conscious consumers, the SRX1383 offers a great entry into the world of aftermarket audio. This two-way speaker system features a 3.5-inch woofer and a balanced dome tweeter, which provides solid performance at an affordable price. Its compact design allows for installation in various vehicle models, making it an excellent option for those who want to upgrade from factory-installed speakers.

Lastly, the SRX6983 stands out as a top-tier choice, featuring a larger 6x9-inch woofer for superior bass output and clarity. This model is designed to handle 300 watts of peak power, making it capable of delivering impactful sound. Additional features such as a high-quality cone design and a durable surround ensure longevity and consistent performance.

Together, the Clarion SRX series encapsulates a commitment to delivering high-quality audio solutions, catering to a diverse range of preferences and needs for car enthusiasts and everyday drivers alike. Whether seeking robust deep bass, clear trebles, or ease of installation, each model stands out in its own right, bringing immersive sound experiences to the forefront of automotive audio systems.