03Connecting your equipment

2 Connect an optical-type1digital audio output from your set-top box to the OPTICAL 2 (TV/SAT) input.2

Use an optical cable for the connection.

Connecting a DVD/HDD recorder, VCR and other video sources

This receiver has two sets of audio/video inputs and outputs suitable for connecting analog or digital video devices, including DVD/HDD recorders and VCRs.

VSX-81TXV


OPTICAL

MULTI-ROOM & SOURCE

ANTENNA


DIGITAL

ROOM 2(ZONE 2)

IN 1


OUT

IR

IN


OUT


COMPONENT VIDEO


AM LOOP

CENTER

PRE OUT


IN 1


Y


PB

PR

L

L

L

IN 2

(DVR/


Y

PB

PR


IN


OUT


VCR1)


1


)


IN


IN


2


3


OUT


3


Y

PB

PR

Y


PB

PR

R

SUB

R SUR-


ASSIGNABLE

1

3


(CD)


FRONT

WOOFER


ROUND


ASSIG-


RS-232C

SS-VIDEO-VIDEO


12V TR


(DC


NABLE


HDMI

1

3


CONTROL


iPod


IN

IN


OUT

IN

IN

MONITOR

MULT


OUT


MON


OUT


VIIDEO


OUT

XM


IN


IN


IN


AUDIO

IN

OUT

IN

IN

IN


OUT

IN


L


CENTER


IN 1

L


(DVD/LD)


IN 2

R


(DVR/VCR2)

CD

CD-R/TAPE/MD

DVD/LD

TV/SAT


DVR/VCR1


R


SUB

COAXIAL


FRONT


WOOFER

ASSIGNABLE


MULTI CH IN


2


OPTICAL

COAXIAL


R AUDIO L

VIDEO

S-VIDEO

R AUDIO L

VIDEO

S-VIDEO

DIGITAL OUT


AV IN


AV OUT


3


1

2

DVR, VCR, etc.

2If the device can record, connect the DVR/VCR1 AUDIO and VIDEO outputs to the recorder’s audio/ video inputs.

Use a stereo RCA/phono jack audio cable for the audio connection and a video or S-video cable for the video connection.

For a second recorder, use the DVR/VCR2 outputs.

3If the device can output digital audio, connect an

optical-type3digital audio output from the recorder to the OPTICAL 1 (DVR/VCR1) input.

Use an optical cable for the connection.4

For a second recorder, use the COAXIAL 2 (DVR/ VCR2) inputs.

Using the component video jacks

Component video should give superior picture quality when compared to composite or S-video. You can also take advantage of progressive scan video (if your source and TV are both compatible), which delivers a very stable, flicker-free picture. See the manuals that came with your TV and source component to check whether they are compatible with progressive-scan video.

1Connect the audio/video outputs of the video player/recorder to the DVR/VCR1 AUDIO and VIDEO inputs.

Use a stereo RCA/phono jack audio cable for the audio connection and a video or S-video cable for the video connection.

For a second recorder, use the DVR/VCR2 IN inputs.

Note

1If your set-top box only has a coaxial digital output, you can connect it to one of the coaxial inputs on this receiver using a coaxial digital audio cable. When you set up the receiver you’ll need to tell the receiver which input you connected the set-top box to (see The Input Setup menu on page 58).

2If your satellite/cable receiver doesn’t have a digital audio output, you can skip this step.

3• In order to record, you must connect the analog audio cables (the digital connection is for playback only).

If your video component doesn’t have a digital audio output, you can skip this step.

4If your recorder only has a coaxial digital output, you can connect it to one of the coaxial inputs on this receiver using a coaxial digital audio cable. When you set up the receiver you’ll need to tell the receiver which input you connected the recorder to (see also The Input Setup menu on page 58).

14

En

Page 14
Image 14
Classe Audio VSX-81TXV manual Connecting a DVD/HDD recorder, VCR and other video sources, Using the component video jacks

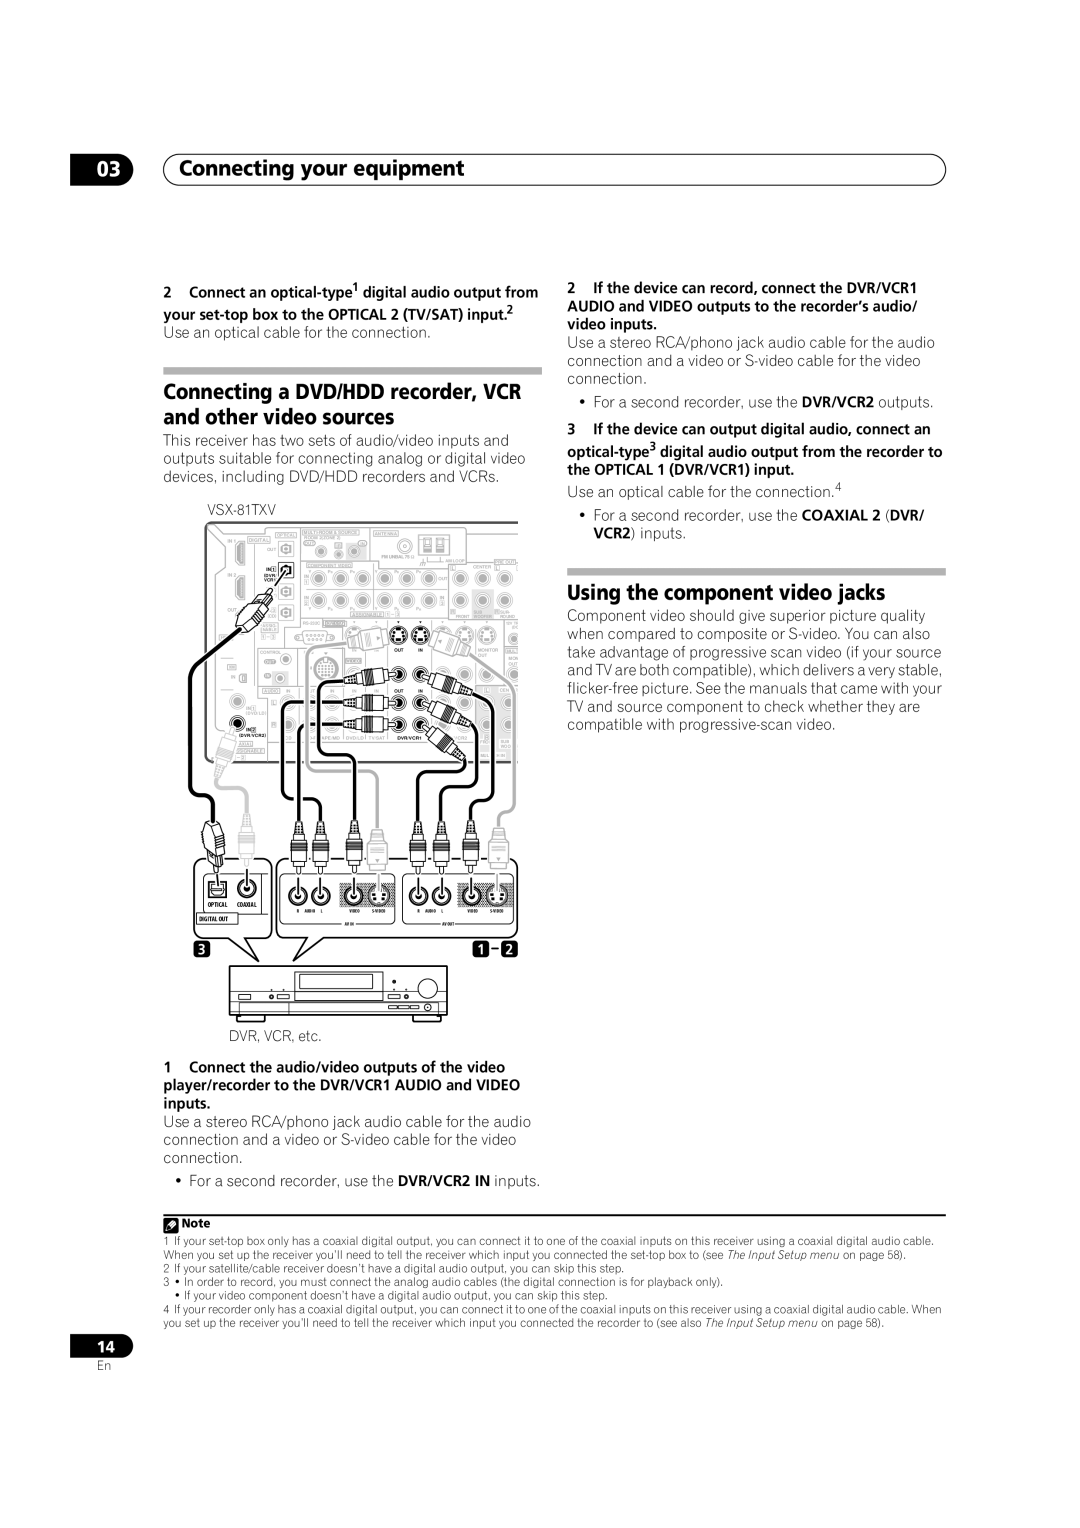
VSX-81TXV-S, VSX-81TXV specifications

The Classe Audio VSX-81TXV and VSX-81TXV-S are flagship home theater receivers that embody the brand’s commitment to delivering high-fidelity audio and immersive cinematic experiences. These models are tailored for audiophiles and home theater enthusiasts seeking uncompromising performance and versatility.

One of the standout features of the VSX-81TXV is its powerful amplification capabilities. With a robust multichannel amplifier, it offers high power output across all channels, ensuring clean and dynamic sound reproduction regardless of the volume level. This makes it ideal for powering a wide range of speakers, from efficient bookshelf models to demanding floor-standing designs.

Both models are equipped with advanced digital signal processing technology, delivering precise audio processing for various surround sound formats, including Dolby Atmos and DTS:X. This allows users to experience three-dimensional sound that wraps around them, creating a more engaging and lifelike audio environment. The ability to decode these formats highlights the receivers’ forward-thinking design and compatibility with modern home theater setups.

Connectivity is another highlight, with multiple HDMI inputs enabling seamless integration with various sources, including Blu-ray players, streaming devices, and gaming consoles. The HDMI 2.0 support ensures 4K video transmission for high-definition visuals, while HDCP 2.2 compliance future-proofs the system against upcoming content standards.

Another notable characteristic is the user-friendly setup and calibration features. The built-in room correction technology automatically adjusts the audio output based on the specific acoustics of the room, ensuring an optimized listening experience tailored to the user’s environment. This eliminates the guesswork typically involved in manual adjustments.

Aesthetically, both models showcase a sleek design with an emphasis on high-quality materials. The minimalist interface and intuitive controls provide ease of use, appealing to both seasoned audiophiles and casual listeners alike.

In conclusion, the Classe Audio VSX-81TXV and VSX-81TXV-S represent a blend of power, technology, and aesthetics, designed to elevate the home entertainment experience. Their robust amplification, advanced audio processing, extensive connectivity options, and user-friendly features make them formidable choices in the realm of high-performance home theater receivers. Whether for casual viewing or critical listening, these models promise to deliver exceptional quality and performance for a diverse audience.