Additional information

12

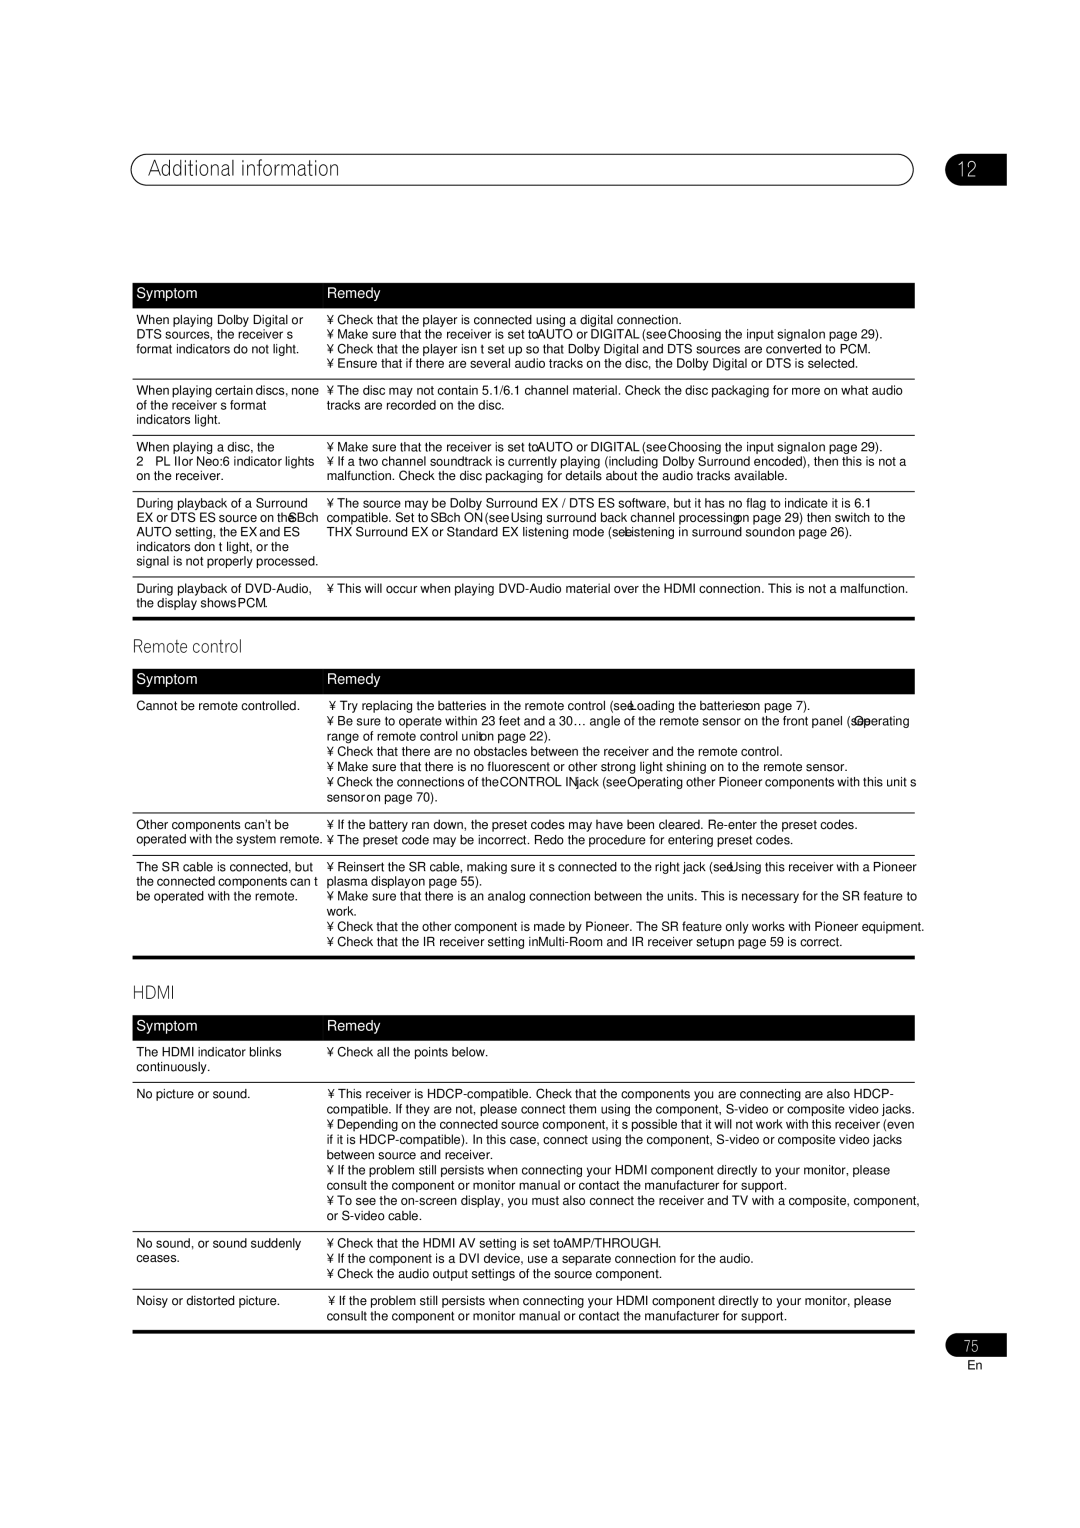
Symptom

Remedy

When playing Dolby Digital or

• Check that the player is connected using a digital connection.

DTS sources, the receiver’s

• Make sure that the receiver is set to AUTO or DIGITAL (see Choosing the input signal on page 29).

format indicators do not light.

• Check that the player isn’t set up so that Dolby Digital and DTS sources are converted to PCM.


• Ensure that if there are several audio tracks on the disc, the Dolby Digital or DTS is selected.


When playing certain discs, none

• The disc may not contain 5.1/6.1 channel material. Check the disc packaging for more on what audio

of the receiver’s format

tracks are recorded on the disc.

indicators light.


When playing a disc, the

• Make sure that the receiver is set to AUTO or DIGITAL (see Choosing the input signal on page 29).

2 PL II or Neo:6 indicator lights

• If a two channel soundtrack is currently playing (including Dolby Surround encoded), then this is not a

on the receiver.

malfunction. Check the disc packaging for details about the audio tracks available.


During playback of a Surround

• The source may be Dolby Surround EX / DTS ES software, but it has no flag to indicate it is 6.1

EX or DTS ES source on the SBch

compatible. Set to SBch ON (see Using surround back channel processing on page 29) then switch to the

AUTO setting, the EX and ES

THX Surround EX or Standard EX listening mode (see Listening in surround sound on page 26).

indicators don’t light, or the


signal is not properly processed.


During playback of DVD-Audio,

• This will occur when playing DVD-Audio material over the HDMI connection. This is not a malfunction.

the display shows PCM.


Remote control

Symptom

Remedy

Cannot be remote controlled.

• Try replacing the batteries in the remote control (see Loading the batteries on page 7).


• Be sure to operate within 23 feet and a 30º angle of the remote sensor on the front panel (see Operating


range of remote control unit on page 22).


• Check that there are no obstacles between the receiver and the remote control.


• Make sure that there is no fluorescent or other strong light shining on to the remote sensor.


• Check the connections of the CONTROL IN jack (see Operating other Pioneer components with this unit’s


sensor on page 70).


Other components can't be

• If the battery ran down, the preset codes may have been cleared. Re-enter the preset codes.

operated with the system remote.

• The preset code may be incorrect. Redo the procedure for entering preset codes.


The SR cable is connected, but

• Reinsert the SR cable, making sure it’s connected to the right jack (see Using this receiver with a Pioneer

the connected components can’t

plasma display on page 55).

be operated with the remote.

• Make sure that there is an analog connection between the units. This is necessary for the SR feature to


work.


• Check that the other component is made by Pioneer. The SR feature only works with Pioneer equipment.


• Check that the IR receiver setting in Multi-Room and IR receiver setup on page 59 is correct.


HDMI

Symptom

Remedy

The HDMI indicator blinks

• Check all the points below.

continuously.


No picture or sound.

• This receiver is HDCP-compatible. Check that the components you are connecting are also HDCP-


compatible. If they are not, please connect them using the component, S-video or composite video jacks.


• Depending on the connected source component, it’s possible that it will not work with this receiver (even


if it is HDCP-compatible). In this case, connect using the component, S-video or composite video jacks


between source and receiver.


• If the problem still persists when connecting your HDMI component directly to your monitor, please


consult the component or monitor manual or contact the manufacturer for support.


• To see the on-screen display, you must also connect the receiver and TV with a composite, component,


or S-video cable.


No sound, or sound suddenly

• Check that the HDMI AV setting is set to AMP/THROUGH.

ceases.

• If the component is a DVI device, use a separate connection for the audio.


• Check the audio output settings of the source component.


Noisy or distorted picture.

• If the problem still persists when connecting your HDMI component directly to your monitor, please


consult the component or monitor manual or contact the manufacturer for support.

75

En

Page 75
Image 75
Classe Audio VSX-81TXV-S manual Remote control, Range of remote control unit on

VSX-81TXV-S, VSX-81TXV specifications

The Classe Audio VSX-81TXV and VSX-81TXV-S are flagship home theater receivers that embody the brand’s commitment to delivering high-fidelity audio and immersive cinematic experiences. These models are tailored for audiophiles and home theater enthusiasts seeking uncompromising performance and versatility.

One of the standout features of the VSX-81TXV is its powerful amplification capabilities. With a robust multichannel amplifier, it offers high power output across all channels, ensuring clean and dynamic sound reproduction regardless of the volume level. This makes it ideal for powering a wide range of speakers, from efficient bookshelf models to demanding floor-standing designs.

Both models are equipped with advanced digital signal processing technology, delivering precise audio processing for various surround sound formats, including Dolby Atmos and DTS:X. This allows users to experience three-dimensional sound that wraps around them, creating a more engaging and lifelike audio environment. The ability to decode these formats highlights the receivers’ forward-thinking design and compatibility with modern home theater setups.

Connectivity is another highlight, with multiple HDMI inputs enabling seamless integration with various sources, including Blu-ray players, streaming devices, and gaming consoles. The HDMI 2.0 support ensures 4K video transmission for high-definition visuals, while HDCP 2.2 compliance future-proofs the system against upcoming content standards.

Another notable characteristic is the user-friendly setup and calibration features. The built-in room correction technology automatically adjusts the audio output based on the specific acoustics of the room, ensuring an optimized listening experience tailored to the user’s environment. This eliminates the guesswork typically involved in manual adjustments.

Aesthetically, both models showcase a sleek design with an emphasis on high-quality materials. The minimalist interface and intuitive controls provide ease of use, appealing to both seasoned audiophiles and casual listeners alike.

In conclusion, the Classe Audio VSX-81TXV and VSX-81TXV-S represent a blend of power, technology, and aesthetics, designed to elevate the home entertainment experience. Their robust amplification, advanced audio processing, extensive connectivity options, and user-friendly features make them formidable choices in the realm of high-performance home theater receivers. Whether for casual viewing or critical listening, these models promise to deliver exceptional quality and performance for a diverse audience.