2

51463

(Qty: 22)

TS


FS

LSP


Finished Edge


Borde Terminado

RSP

Bord Fini


TK


FS


Finished Edge


TK

Borde Terminado


Bord Fini


Finished Edge


Borde Terminado

51539 White

Bord Fini


(Qty: 1)


3


51463 (#12316) Qty: 7


51463 (#12327) Qty: 6


C

Finished Edge

Borde Terminado

Bord Fini

51539 White

(Qty: 1)

TK

51483 (Qty: 8)

FS

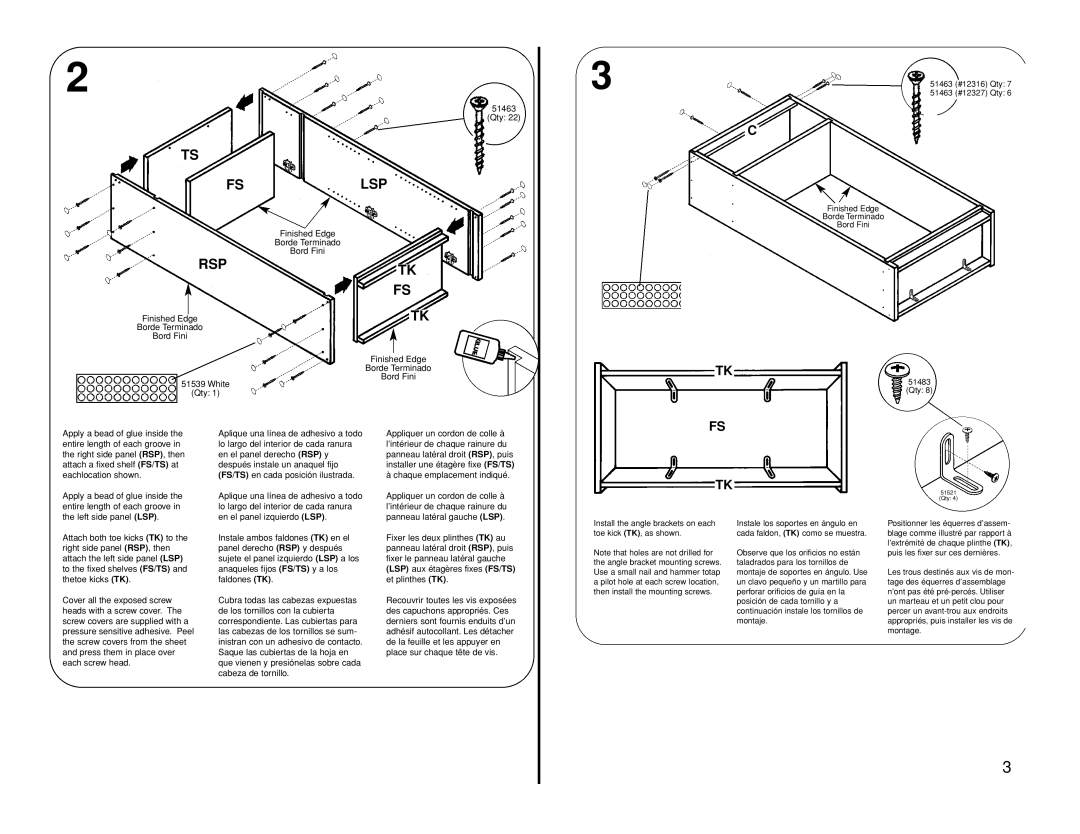
Apply a bead of glue inside the entire length of each groove in the right side panel (RSP), then attach a fixed shelf (FS/TS) at eachlocation shown.

Apply a bead of glue inside the entire length of each groove in the left side panel (LSP).

Aplique una línea de adhesivo a todo lo largo del interior de cada ranura en el panel derecho (RSP) y después instale un anaquel fijo (FS/TS) en cada posición ilustrada.

Aplique una línea de adhesivo a todo lo largo del interior de cada ranura en el panel izquierdo (LSP).

Appliquer un cordon de colle à l’intérieur de chaque rainure du panneau latéral droit (RSP), puis installer une étagère fixe (FS/TS) à chaque emplacement indiqué.

Appliquer un cordon de colle à l’intérieur de chaque rainure du panneau latéral gauche (LSP).

TK

51521 (Qty: 4)

Attach both toe kicks (TK) to the right side panel (RSP), then attach the left side panel (LSP) to the fixed shelves (FS/TS) and thetoe kicks (TK).

Cover all the exposed screw heads with a screw cover. The screw covers are supplied with a pressure sensitive adhesive. Peel the screw covers from the sheet and press them in place over each screw head.

Instale ambos faldones (TK) en el panel derecho (RSP) y después sujete el panel izquierdo (LSP) a los anaqueles fijos (FS/TS) y a los faldones (TK).

Cubra todas las cabezas expuestas de los tornillos con la cubierta correspondiente. Las cubiertas para las cabezas de los tornillos se sum- inistran con un adhesivo de contacto. Saque las cubiertas de la hoja en que vienen y presiónelas sobre cada cabeza de tornillo.

Fixer les deux plinthes (TK) au panneau latéral droit (RSP), puis fixer le panneau latéral gauche (LSP) aux étagères fixes (FS/TS) et plinthes (TK).

Recouvrir toutes les vis exposées des capuchons appropriés. Ces derniers sont fournis enduits d’un adhésif autocollant. Les détacher de la feuille et les appuyer en place sur chaque tête de vis.

Install the angle brackets on each toe kick (TK), as shown.

Note that holes are not drilled for the angle bracket mounting screws. Use a small nail and hammer totap a pilot hole at each screw location, then install the mounting screws.

Instale los soportes en ángulo en cada faldon, (TK) como se muestra.

Observe que los orificios no están taladrados para los tornillos de montaje de soportes en ángulo. Use un clavo pequeño y un martillo para perforar orificios de guía en la posición de cada tornillo y a continuación instale los tornillos de montaje.

Positionner les équerres d’assem- blage comme illustré par rapport à l’extrémité de chaque plinthe (TK), puis les fixer sur ces dernières.

Les trous destinés aux vis de mon- tage des équerres d’assemblage n’ont pas été pré-percés. Utiliser un marteau et un petit clou pour percer un avant-trou aux endroits appropriés, puis installer les vis de montage.

3

Page 3
Image 3
Closet Maid 12327, 12316 manual Lsp

12327, 12316 specifications

Closet Maid offers innovative storage solutions that cater to modern organizational needs, and two of their standout products are models 12327 and 12316. Both of these storage systems exemplify versatility while providing a practical approach to home organization.

The Closet Maid 12327 is a four-tier shelving unit designed to maximize vertical space in closets, utility rooms, or garages. The product exemplifies solid construction with adjustable shelves made from high-quality particleboard, ensuring durability. These shelves can accommodate various items ranging from shoes to craft supplies, making it an excellent choice for homeowners looking to optimize their storage capabilities. The unit also features a sleek design that complements many interior aesthetics, proving that functionality doesn’t have to sacrifice style.

On the other hand, the Closet Maid 12316 is a multi-cube storage organizer that offers a contemporary touch. This unit includes several square compartments ideal for storing cubes or baskets, but it can also be used to display books and decorative items. The modular design is particularly appealing as it allows users to rearrange and customize their storage based on their needs. Its sturdy construction ensures it can withstand the weight of various storage items without compromise.

Both models emphasize ease of assembly. Closet Maid provides clear instructions that allow users to set up their units without specialized tools, ensuring a convenient experience. Additionally, the materials used in both products are environmentally friendly, catering to sustainability-conscious consumers.

In terms of finish, both the 12327 and 12316 come in various colors and textures, allowing users to match their existing décor effortlessly. The clean lines and minimalistic designs promote a clutter-free appearance, helping create an organized and inviting space.

Technologically, Closet Maid has integrated smart design principles that enhance storage efficiency. The adjustable shelves in the 12327 cater to different item sizes, offering flexibility that few competitors can match. Meanwhile, the cube-style organization of the 12316 helps maintain a neat presentation of belongings, which can be particularly appealing in shared spaces.

In summary, Closet Maid's models 12327 and 12316 offer functional and stylish storage solutions that combine durability with aesthetic appeal. These products are ideal for anyone looking to enhance their home organization while ensuring easy access to their belongings. With a focus on user-friendly assembly and environmentally conscious materials, Closet Maid remains a top choice for modern storage solutions.