CUT-OUT
COUPE
ESPACIO RECORTADO
HOLD BY
BOTTOM
FRAME TENIR PAR LE BAS DU BÂTI
SUJÉTELO POR EL BASTIDOR INFERIOR

3

SIDE PANEL PANNEAU LATÉRAL PANEL LATERAL


CROSSWIRE TO OUTSIDE!


CÂBLE TRANSVERSAL VERS


L’EXTÉRIEUR !


¡ALAMBRE HORIZONTAL


HACIA FUERA!


1st and 2nd wires


1er et 2e câbles


1a y

2a alambres


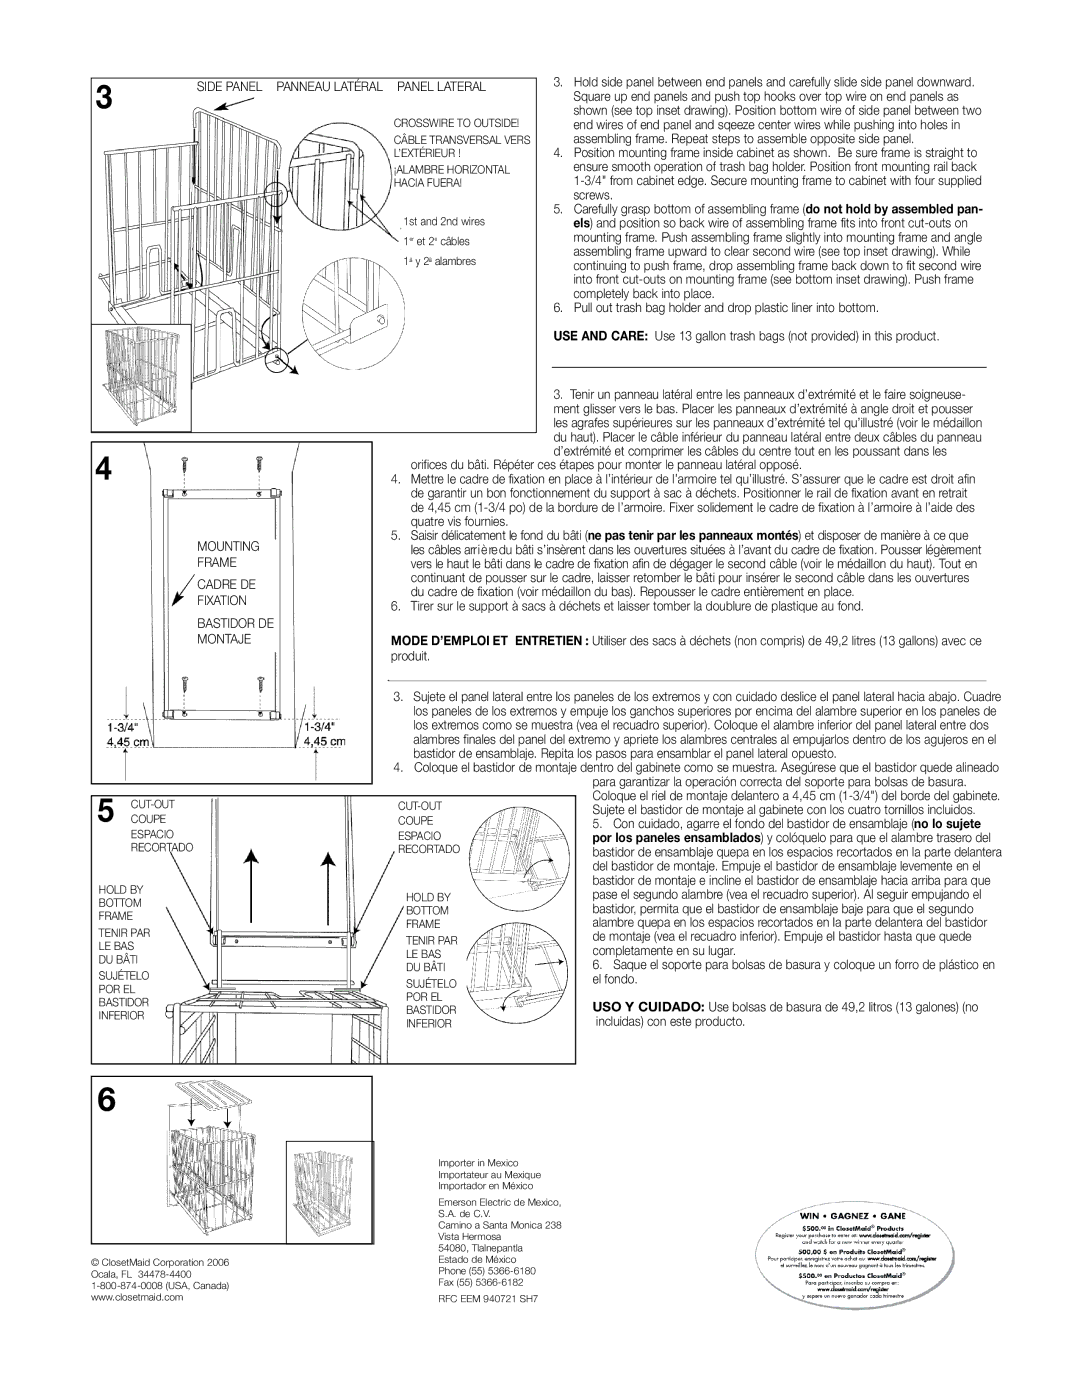
3.Hold side panel between end panels and carefully slide side panel downward. Square up end panels and push top hooks over top wire on end panels as shown (see top inset drawing). Position bottom wire of side panel between two end wires of end panel and sqeeze center wires while pushing into holes in assembling frame. Repeat steps to assemble opposite side panel.

4.Position mounting frame inside cabinet as shown. Be sure frame is straight to ensure smooth operation of trash bag holder. Position front mounting rail back 1-3/4" from cabinet edge. Secure mounting frame to cabinet with four supplied screws.

5.Carefully grasp bottom of assembling frame (do not hold by assembled pan- els) and position so back wire of assembling frame fits into front cut-outs on mounting frame. Push assembling frame slightly into mounting frame and angle assembling frame upward to clear second wire (see top inset drawing). While continuing to push frame, drop assembling frame back down to fit second wire into front cut-outs on mounting frame (see bottom inset drawing). Push frame completely back into place.

6.Pull out trash bag holder and drop plastic liner into bottom.

USE AND CARE: Use 13 gallon trash bags (not provided) in this product.

4

MOUNTING

FRAME

CADRE DE

FIXATION

BASTIDOR DE

MONTAJE

5 CUT-OUT COUPE ESPACIO RECORTADO

HOLD BY

BOTTOM

FRAME

TENIR PAR

LE BAS

DU BÂTI

SUJÉTELO

POR EL

BASTIDOR

INFERIOR

3.Tenir un panneau latéral entre les panneaux d’extrémité et le faire soigneuse- ment glisser vers le bas. Placer les panneaux d’extrémité à angle droit et pousser les agrafes supérieures sur les panneaux d’extrémité tel qu’illustré (voir le médaillon du haut). Placer le câble inférieur du panneau latéral entre deux câbles du panneau d’extrémité et comprimer les câbles du centre tout en les poussant dans les

orifices du bâti. Répéter ces étapes pour monter le panneau latéral opposé.

4.Mettre le cadre de fixation en place à l’intérieur de l’armoire tel qu’illustré. S’assurer que le cadre est droit afin de garantir un bon fonctionnement du support à sac à déchets. Positionner le rail de fixation avant en retrait

de 4,45 cm (1-3/4 po) de la bordure de l’armoire. Fixer solidement le cadre de fixation à l’armoire à l’aide des quatre vis fournies.

5 . Saisir délicatement le fond du bâti (ne pas tenir par les panneaux montés) et disposer de manière à ce que les câbles arr i è re du bâti s’insèrent dans les ouvertures situées à l’avant du cadre de fixation. Pousser légèrement vers le haut le bâti dans le cadre de fixation afin de dégager le second câble (voir le médaillon du haut). Tout en continuant de pousser sur le cadre, laisser retomber le bâti pour insérer le second câble dans les ouvertures du cadre de fixation (voir médaillon du bas). Repousser le cadre entièrement en place.

6. Tirer sur le support à sacs à déchets et laisser tomber la doublure de plastique au fond.

MODE D’EMPLOI ET ENTRETIEN : Utiliser des sacs à déchets (non compris) de 49,2 litres (13 gallons) avec ce produit.

3.Sujete el panel lateral entre los paneles de los extremos y con cuidado deslice el panel lateral hacia abajo. Cuadre los paneles de los extremos y empuje los ganchos superiores por encima del alambre superior en los paneles de los extremos como se muestra (vea el recuadro superior). Coloque el alambre inferior del panel lateral entre dos alambres finales del panel del extremo y apriete los alambres centrales al empujarlos dentro de los agujeros en el bastidor de ensamblaje. Repita los pasos para ensamblar el panel lateral opuesto.

4.Coloque el bastidor de montaje dentro del gabinete como se muestra. Asegúrese que el bastidor quede alineado para garantizar la operación correcta del soporte para bolsas de basura. Coloque el riel de montaje delantero a 4,45 cm (1-3/4") del borde del gabinete.

Sujete el bastidor de montaje al gabinete con los cuatro tornillos incluidos.

5. Con cuidado, agarre el fondo del bastidor de ensamblaje (no lo sujete por los paneles ensamblados) y colóquelo para que el alambre trasero del bastidor de ensamblaje quepa en los espacios recortados en la parte delantera del bastidor de montaje. Empuje el bastidor de ensamblaje levemente en el bastidor de montaje e incline el bastidor de ensamblaje hacia arriba para que pase el segundo alambre (vea el recuadro superior). Al seguir empujando el bastidor, permita que el bastidor de ensamblaje baje para que el segundo alambre quepa en los espacios recortados en la parte delantera del bastidor de montaje (vea el recuadro inferior). Empuje el bastidor hasta que quede completamente en su lugar.

6. Saque el soporte para bolsas de basura y coloque un forro de plástico en el fondo.

USO Y CUIDADO: Use bolsas de basura de 49,2 litros (13 galones) (no incluidas) con este producto.

6

© ClosetMaid Corporation 2006 Ocala, FL 34478-4400

1-800-874-0008 (USA, Canada) www.closetmaid.com

Importer in Mexico Importateur au Mexique Importador en México

Emerson Electric de Mexico, S.A. de C.V.

Camino a Santa Monica 238 Vista Hermosa

54080, Tlalnepantla Estado de México Phone (55) 5366-6180 Fax (55) 5366-6182

RFC EEM 940721 SH7

Page 2
Image 2
Closet Maid 3024 Side Panel Panneau Latéral Panel Lateral, Mounting Frame Cadre DE Fixation Bastidor DE Montaje

3024 specifications

The Closet Maid 3024 is a versatile storage solution designed to maximize space efficiency in any home. This modular shelving system is particularly suited for closets, providing a sturdy and aesthetically pleasing organization option for both small and large areas. With a focus on quality and functionality, the Closet Maid 3024 offers a variety of features tailored to meet the needs of modern homeowners.

One of the standout characteristics of the Closet Maid 3024 is its adjustable shelving. The system includes multiple shelves that can be easily repositioned to accommodate items of different heights. This feature allows users to customize their storage layout according to personal preferences and changing needs. Whether it's shoes, clothing, or accessories, the adjustable aspect ensures that every item can be neatly arranged and easily accessible.

The Closet Maid 3024 is constructed from durable materials, ensuring that it can withstand the rigors of daily use while maintaining its aesthetic appeal. The laminate finish not only adds to its sleek appearance, but also makes it resistant to scratches and easy to clean. Additionally, the sturdy construction provides peace of mind that heavy items can be safely stored without compromising the structural integrity of the shelving.

Another notable aspect of the Closet Maid 3024 is its easy installation process. The system is designed with user-friendliness in mind, featuring pre-drilled holes and a simple assembly process. Users can set up their shelving without the need for professional help, making it an ideal project for DIY enthusiasts. Furthermore, with clear instructions included, the installation can typically be completed in a matter of hours.

In terms of design, the Closet Maid 3024 blends seamlessly with various home décor styles. Available in multiple finishes, including white, walnut, and espresso, it can complement traditional and contemporary spaces alike. The clean lines and minimalist design also contribute to an organized look, making it perfect for those looking to declutter their environments.

Overall, the Closet Maid 3024 stands out as an excellent choice for individuals seeking effective and stylish storage solutions. With its adjustable shelving, durable construction, easy installation, and versatile design, it meets the demands of efficient space management while enhancing the visual appeal of any room.