Views of the Remote Control
Connections
Connections
Connections
Remote Control |
|
|
Title |
| Display |
Power | N/P | N/P |
|
| Setup |
Menu |
| Play/Pause |
Enter |
|
|
Direction buttons |
| Stop |
Mute |
| Zoom |
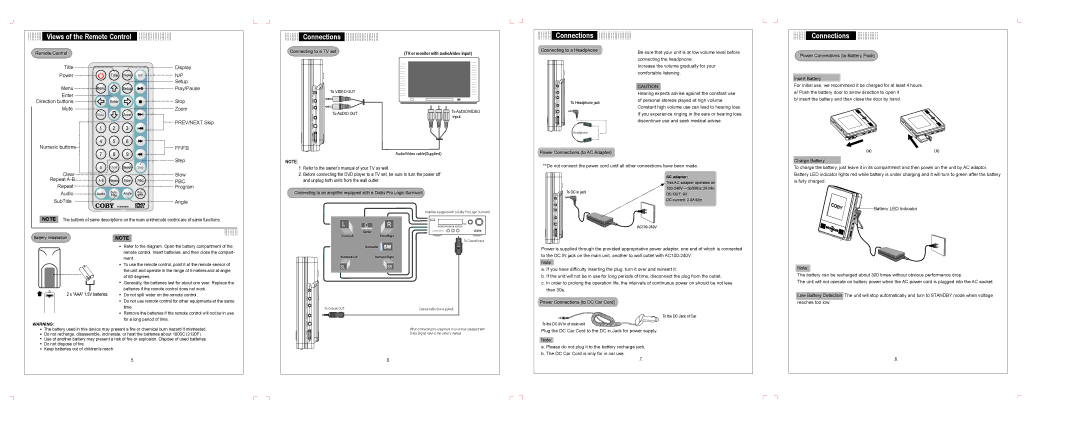
Connecting to a TV set | (TV or monitor with audio/video input) |
|
To VIDEO OUT
Connecting to a Headphone
To Headphone jack
Be sure that your unit is at low volume level before connecting the headphone.
Increase the volume gradually for your comfortable listening.
CAUTION:
Hearing experts advise against the constant use of personal stereos played at high volume. Constant high volume use can lead to hearing loss.
Power Connections (to Battery Pack)
Insert Battery
For initial use, we recommend it be charged for at least 4 hours. a/ Push the battery door to arrow direction to open it
b/ insert the battery and then close the door by hand.
| Mute |
| PREV/NEXT Skip |
Numeric buttons | FF/FB |
To AUDIO OUT
Audio/Video cable(Supplied)
To AUDIO/VIDEO input
Headphone
Power Connections (to AC Adapter)
If you experience ringing in the ears or hearing loss, discontinue use and seek medical advise.
(a) | (b) |
| Step |
Clear | Step |
Clear | Slow |
Repeat | PBC |
Repeat | Program |
Audio |
|
SubTitle | Angle |
NOTE:
1.Refer to the owner's manual of your TV as well.
2.Before connecting the DVD player to a TV set, be sure to turn the power off and unplug both units from the wall outlet.
Connecting to an amplifier equipped with a Dolby Pro Logic Surround
**Do not connect the power cord until all other connections have been made.
| AC adapter: | |
| This AC adapter operates on | |
To DC in jack | ||
DC OUT: 9V | ||
| ||
| DC current: 2.0A Min |
Charge Battery
To charge the battery, just leave it in its compartment and then power on the unit by AC adaptor. Battery LED indicator lights red while battery is under charging and it will turn to green after the battery is fully charged.
NOTE The buttons of same descriptions on the main unit/remote control are of same functions.
Battery Installation | NOTE |
![]() Refer to the diagram. Open the battery compartment of the remote control. Insert batteries, and then close the compart- ment.
Refer to the diagram. Open the battery compartment of the remote control. Insert batteries, and then close the compart- ment.
![]() To use the remote control, point it at the remote sensor of the unit and operate in the range of 5 meters and at angle of 60 degrees.
To use the remote control, point it at the remote sensor of the unit and operate in the range of 5 meters and at angle of 60 degrees.
![]() Generally, the batteries last for about one year. Replace the batteries if the remote control does not work.
Generally, the batteries last for about one year. Replace the batteries if the remote control does not work.
![]() Do not spill water on the remote control.
Do not spill water on the remote control.
![]() Do not use remote control for other equipments at the same time.
Do not use remote control for other equipments at the same time.
![]() Remove the batteries if the remote control will not be in use for a long period of time.
Remove the batteries if the remote control will not be in use for a long period of time.
WARNING:
![]() The battery used in this device may present a fire or chemical burn hazard if mistreated.
The battery used in this device may present a fire or chemical burn hazard if mistreated.
![]() Do not recharge, disassemble, incinerate, or heat the batteries about 1000C (2120F).
Do not recharge, disassemble, incinerate, or heat the batteries about 1000C (2120F).
![]() Use of another battery may present a risk of fire or explosion. Dispose of used batteries.
Use of another battery may present a risk of fire or explosion. Dispose of used batteries.
![]() Do not dispose of fire.
Do not dispose of fire.
![]() Keep batteries out of children's reach.
Keep batteries out of children's reach.
.5.
Amplifier equipped with a Dolby Pro Logic Surround
To Coaxial Input
|
|
|
|
|
|
|
|
|
|
|
|
To Coaxial OUT |
|
|
| Coaxial cable (not supplied) | |
|
|
|
|
|
|
When connecting the equipment to a receiver equipped with
Dolby Digital, refer to the owner's manual.
.6.
Power is supplied through the provided appropriative power adapter, one end of which is connected to the DC IN jack on the main unit, another to wall outlet with
Note:
a. If you have difficulty inserting the plug, turn it over and reinsert it.
b. If the unit will not be in use for long periods of time, disconnect the plug from the outlet.
c. In order to prolong the operation life, the intervals of continuous power on should be not less than 30s.
Power Connections (to DC Car Cord)
![]()
![]()
![]()
![]()
![]()
![]()
![]()
![]()
![]()
![]() To the DC Jack of Car To the DC 9V In of main unit
To the DC Jack of Car To the DC 9V In of main unit ![]()
![]()
![]()
![]()
![]()
![]()
Plug the DC Car Cord to the DC in Jack for power supply.
Note:
a. Please do not plug it to the battery recharge jack. b. The DC Car Cord is only for in car use.
.7.
![]()
![]() Battery LED Indicator
Battery LED Indicator
Note:
The battery can be recharged about 300 times without obvious performance drop.
The unit will not operate on battery power when the AC power cord is plugged into the AC socket.
Low Battery Detection: The unit will stop automatically and turn to STANDBY mode when voltage reaches too low.
.8.