Follow instructions and warnings to avoid fires, serious injury, or death.
 WARNING:
1.Gasoline and Coleman® fuel are extremely flammable; handle with care. Fuel vapors are invisible, explosive, and can be ignited by ignition sources many feet away.
2.This stove is designed to use unleaded automotive fuel or Coleman® fuel. Never use leaded automotive fuel. Do not use Canadian unleaded gasoline.
3.Store fuel in a clean, properly marked container away from flame (including pilot lights), other sources of ignition, or excessive heat.
4.Always fill outdoors. Never fill tank, loosen or remove fuel cap near flame (including pilot lights), other ignition sources or while stove is hot to touch.
5.Always light and use stove outdoors; never inside house, camper, tent, or other unventilated or enclosed areas.
6.This stove consumes air (oxygen). Do not use in unventilated or enclosed areas to avoid endangering your life.
7.Use for cooking only. Never alter in any way or use with any device or part not expressly approved by Coleman®. Never use as a space heater. Never leave stove unattended while burning.
8.Keep stove away from flammables. Never allow fabric, clothing, or any flammable material to come within 1.2m (4 ft.) of the top and 0.3m (1 ft.) of all sides of the stove.
9.When stove is in use, all metal parts of the burner assembly and generator become extremely hot. DO NOT TOUCH.
10.Never place heavy or large capacity utensils on stove.
11.Never pump the stove while a utensil is on it.
12.Keep out of reach of children.
Observez ces directives et avis pour prévenir incendies, blessures sérieuses ou mort.
 AVIS:
AVIS:
1.L’essence et le combustible liquide Coleman® sont extrêmement inflammables, manipulez-les avec soin. Invisibles et explosives, leurs vapeurs peuvent être enflammées par des sources d’inflammation éloignées.
2.Ce réchaud est conçu pour brûler l’essence sans plomb ou le combustible Coleman®. Ne vous servez jamais d'essence contenant du plomb. N’utilisez pas non plus d’essence canadienne sans plomb.
3.Rangez le carburant dans un bidon propre et clairement marqué, loin des flammes (y compris des veilleuses), des sources d’inflammation et de la grande chaleur.
4.Remplissez le réservoir à l’air libre. Ne faites jamais le plein et n’enlevez ou ne desserrez jamais le bouchon près de flammes (y compris de veilleuses), d’autres sources d’inflammation ou quand le réchaud est chaud.
5.Allumez et utilisez toujours le réchaud à l’air libre, jamais dans maison, campeuse, tente et autre endroit clos ou sans ventilation.
6.Ce réchaud consume l’oxygène de l’air. Ne vous en servez pas dans les endroits clos ou sans ventilation, vous pourriez mettre votre vie en danger.
7.N’employez le réchaud que pour cuisiner. Ne le modifiez pas et n’utilisez pas de dispositifs ou de pièces n’étant pas expressément approuvé(e)s par Coleman. Ne vous en servez pas pour le chauffage d’appoint. Ne le laissez pas sans surveillance quand il est allumé.
8.Éloignez le réchaud des produits inflammables. Veillez à ce que tissus, vêtements et autres matériaux inflam- mables ne soient jamais à moins de 1,2 m (4 pi) du dessus et 0,3 m (1 pi) des côtés du réchaud.
9.Pendant l’utilisation, les pièces en métal de l’ensemble du brûleur et le générateur deviennent brûlants. N’Y
TOUCHEZ PAS.
10.Ne posez jamais de récipient très lourd ou de grande capacité sur le réchaud.
11.N’utilisez pas la pompe quand il y a un récipient sur le réchaud.
12.Gardez le réchaud hors de la portée des enfants.
Siga las instrucciones y advertencias para evitar incendios, lesiones graves o muerte.
 ADVERTENCIA:
1.La gasolina y el combustible Coleman® son extremadamente inflamables; manéjese con cuidado. Los vapores de combustible son invisibles, explosivos y pueden ser encendidos por fuentes de encendido a metros de distancia.
2.Esta estufa está diseñada para usarse con combustible sin plomo para automóviles ó con combustible Coleman® solamente. Nunca use combustible con plomo para automóviles. No use gasolina sin plomo Canadiense.
3.Almacene el combustible en un recipiente limpio y debidamente marcado, lejos de llamas (incluyendo llamas piloto), otras fuentes de encendido o calor excesivo.
4.Siempre debe llenarse al aire libre. Nunca llene el tanque, afloje o quite la tapa del combustible cerca de llamas (incluyendo llamas piloto), otras fuentes de encendido o mientras la estufa esté caliente al tacto.
5.Siempre debe encender y usar la estufa al aire libre; nunca dentro de la casa, cámper, carpa u otras áreas sin venti- lación o áreas cerradas.
6.Esta estufa consume aire (oxígeno). Para evitar poner en peligro su vida no use en áreas sin ventilación o en áreas cerradas.
7.Use para cocinar solamente. No altere nunca de ninguna manera, ni use con una pieza o dispositivo que no sea aprobado expresamente por Coleman. Nunca use como un calentador de área. Nunca deje la estufa desatendida mientras está encendida.
8.Mantenga la estufa alejada de inflamables. No deje que tela, ropa o cualquier material inflamable esté a menos de 1.2m (4 pies) de la parte superior y .3m (1 pie) de los lados de la estufa.
9.Cuando la estufa está en uso, todas las partes de metal del ensamblaje del quemador y el generador se ponen muy calientes. NO LOS TOQUE.
10.Nunca coloque utensilios muy grandes o pesados en la estufa.
11.Nunca bombee la estufa con utensilios encima.
12.Mantenga fuera del alcance de los niños.
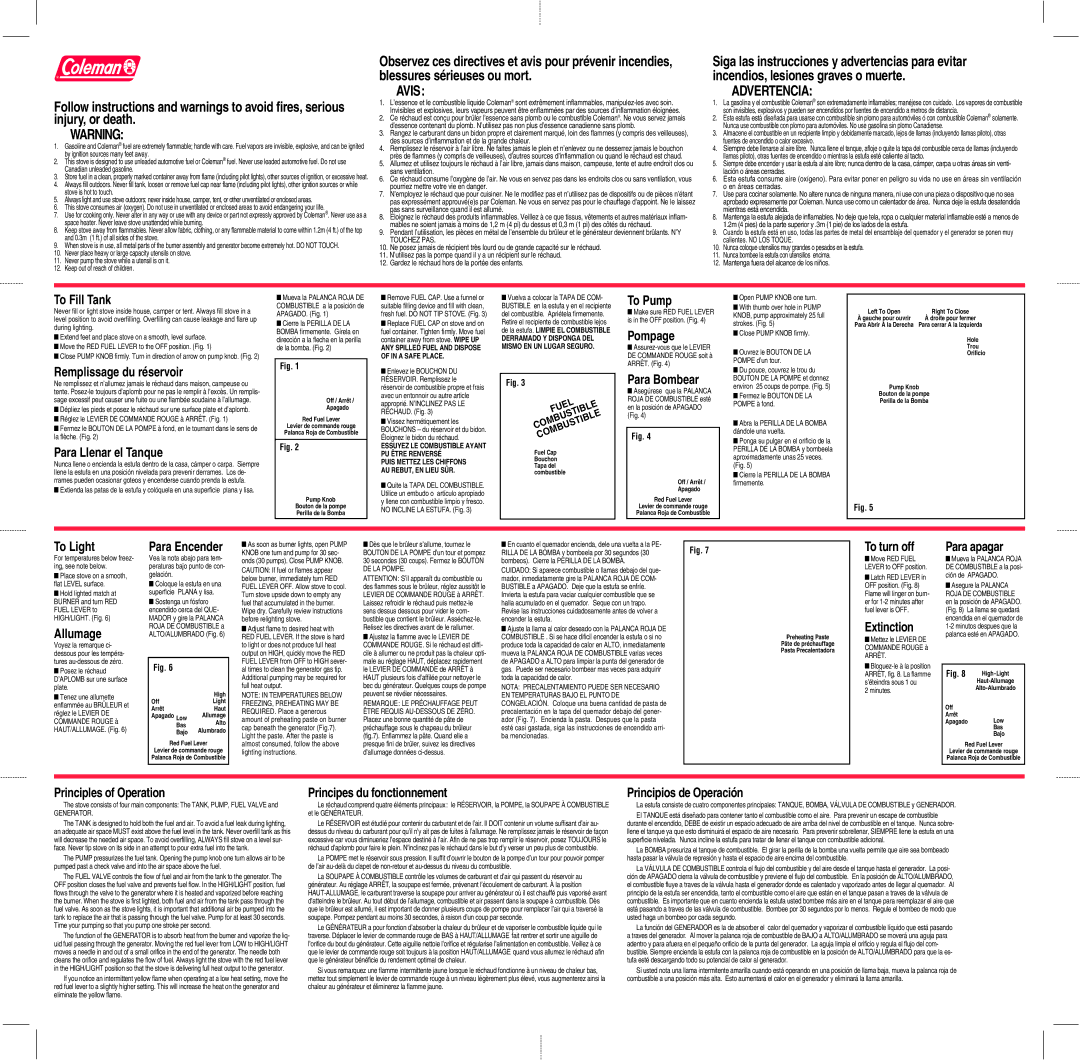
To Fill Tank
Never fill or light stove inside house, camper or tent. Always fill stove in a level position to avoid overfilling. Overfilling can cause leakage and flare up during lighting.
■Extend feet and place stove on a smooth, level surface.
■Move the RED FUEL LEVER to the OFF position. (Fig. 1)
■Close PUMP KNOB firmly. Turn in direction of arrow on pump knob. (Fig. 2)
Remplissage du réservoir
Ne remplissez et n’allumez jamais le réchaud dans maison, campeuse ou tente. Posez-le toujours d’aplomb pour ne pas le remplir à l’excès. Un remplis- sage excessif peut causer une fuite ou une flambée soudaine à l’allumage.
■Dépliez les pieds et posez le réchaud sur une surface plate et d’aplomb.
■Réglez le LEVIER DE COMMANDE ROUGE à ARRÊT. (Fig. 1)
■Fermez le BOUTON DE LA POMPE à fond, en le tournant dans le sens de la flèche. (Fig. 2)
Para Llenar el Tanque
Nunca llene o encienda la estufa dentro de la casa, cámper o carpa. Siempre llene la estufa en una posición nivelada para prevenir derrames. Los de- rrames pueden ocasionar goteos y encenderse cuando prenda la estufa.
■ Extienda las patas de la estufa y colóquela en una superficie plana y lisa.
■Mueva la PALANCA ROJA DE COMBUSTIBLE a la posición de APAGADO. (Fig. 1)
■Cierre la PERILLA DE LA BOMBA firmemente. Gírela en dirección a la flecha en la perilla de la bomba. (Fig. 2)
Fig. 1
Off / Arrêt /
Apagado
Red Fuel Lever
Levier de commande rouge Palanca Roja de Combustible
Fig. 2
Pump Knob
Bouton de la pompe
Perilla de la Bomba
■Remove FUEL CAP. Use a funnel or suitable filling device and fill with clean, fresh fuel. DO NOT TIP STOVE. (Fig. 3)
■Replace FUEL CAP on stove and on fuel container. Tighten firmly. Move fuel container away from stove. WIPE UP
ANY SPILLED FUEL AND DISPOSE OF IN A SAFE PLACE.
■Enlevez le BOUCHON DU RÉSERVOIR. Remplissez le réservoir de combustible propre et frais avec un entonnoir ou autre article approprié. N’INCLINEZ PAS LE RÉCHAUD. (Fig. 3)
■Vissez hermétiquement les BOUCHONS – du réservoir et du bidon. Éloignez le bidon du réchaud.
ESSUYEZ LE COMBUSTIBLE AYANT PU ÊTRE RENVERSÉ
PUIS METTEZ LES CHIFFONS AU REBUT, EN LIEU SÛR.
■Quite la TAPA DEL COMBUSTIBLE. Utilice un embudo o artículo apropiado y llene con combustible limpio y fresco. NO INCLINE LA ESTUFA. (Fig. 3)
■Vuelva a colocar la TAPA DE COM- BUSTIBLE en la estufa y en el recipiente del combustible. Apriétela firmemente. Retire el recipiente de combustible lejos de la estufa. LIMPIE EL COMBUSTIBLE
DERRAMADO Y DISPONGA DEL MISMO EN UN LUGAR SEGURO.
Fig. 3 |
FUEL |
COMBUSTIBLE |
COMBUSTIBLE |
Fuel Cap |
Bouchon |
Tapa del |
combustible |
To Pump
■Make sure RED FUEL LEVER is in the OFF position. (Fig. 4)
Pompage
■Assurez-vous que le LEVIER DE COMMANDE ROUGE soit à ARRÊT. (Fig. 4)
Para Bombear
■Asegúrese que la PALANCA ROJA DE COMBUSTIBLE esté en la posición de APAGADO (Fig. 4)
Fig. 4
Off / Arrêt /
Apagado
Red Fuel Lever
Levier de commande rouge Palanca Roja de Combustible
■Open PUMP KNOB one turn.
■With thumb over hole in PUMP KNOB, pump approximately 25 full strokes. (Fig. 5)
■Close PUMP KNOB firmly.
■Ouvrez le BOUTON DE LA POMPE d’un tour.
■Du pouce, couvrez le trou du BOUTON DE LA POMPE et donnez environ 25 coups de pompe. (Fig. 5)
■Fermez le BOUTON DE LA POMPE à fond.
■Abra la PERILLA DE LA BOMBA dándole una vuelta.
■Ponga su pulgar en el orificio de la PERILLA DE LA BOMBA y bombeela aproximadamente unas 25 veces.
(Fig. 5)
■Cierre la PERILLA DE LA BOMBA firmemente.
Left To Open | Right To Close |
À gauche pour ouvrir | À droite pour fermer |
Para Abrir A la Derecha | Para cerrar A la Izquierda |
| | |
| | Hole |
| | Trou |
| | Orificio |
| | |
Pump Knob
Bouton de la pompe
Perilla de la Bomba
Fig. 5
To Light
For temperatures below freez- ing, see note below.
■Place stove on a smooth, flat LEVEL surface.
■Hold lighted match at BURNER and turn RED FUEL LEVER to HIGH/LIGHT. (Fig. 6)
Allumage
Voyez la remarque ci- dessous pour les tempéra- tures au-dessous de zéro.
■Posez le réchaud D’APLOMB sur une surface plate.
■Tenez une allumette enflammée au BRÛLEUR et réglez le LEVIER DE COMMANDE ROUGE à HAUT/ALLUMAGE. (Fig. 6)
Para Encender
Vea la nota abajo para tem- peraturas bajo punto de con- gelación.
■Coloque la estufa en una superficie PLANA y lisa.
■Sostenga un fósforo encendido cerca del QUE- MADOR y gire la PALANCA ROJA DE COMBUSTIBLE a ALTO/ALUMBRADO (Fig. 6)
Fig. 6
| | High |
| Off | Light |
| Arrêt | Haut |
| Apagado Low | Allumage |
| Bas | Alto |
| Alumbrado |
| Bajo |
Red Fuel Lever
Levier de commande rouge Palanca Roja de Combustible
■As soon as burner lights, open PUMP KNOB one turn and pump for 30 sec- onds (30 pumps). Close PUMP KNOB.
CAUTION: If fuel or flames appear below burner, immediately turn RED FUEL LEVER OFF. Allow stove to cool. Turn stove upside down to empty any fuel that accumulated in the burner. Wipe dry. Carefully review instructions before relighting stove.
■Adjust flame to desired heat with RED FUEL LEVER. If the stove is hard to light or does not produce full heat output on HIGH, quickly move the RED FUEL LEVER from OFF to HIGH sever- al times to clean the generator gas tip. Additional pumping may be required for full heat output.
NOTE: IN TEMPERATURES BELOW FREEZING, PREHEATING MAY BE REQUIRED. Place a generous amount of preheating paste on burner cap beneath the generator (Fig.7). Light the paste. After the paste is almost consumed, follow the above lighting instructions.
■Dès que le brûleur s’allume, tournez le BOUTON DE LA POMPE d’un tour et pompez 30 secondes (30 coups). Fermez le BOUTON DE LA POMPE.
ATTENTION: S’il apparaît du combustible ou des flammes sous le brûleur, réglez aussitôt le LEVIER DE COMMANDE ROUGE à ARRÊT. Laissez refroidir le réchaud puis mettez-le sens dessus dessous pour vider le com- bustible que contient le brûleur. Asséchez-le. Relisez les directives avant de le rallumer.
■Ajustez la flamme avec le LEVIER DE COMMANDE ROUGE. Si le réchaud est diffi- cile à allumer ou ne produit pas la chaleur opti- male au réglage HAUT, déplacez rapidement le LEVIER DE COMMANDE de ARRÊT à HAUT plusieurs fois d’affilée pour nettoyer le bec du générateur. Quelques coups de pompe peuvent se révéler nécessaires.
REMARQUE: LE PRÉCHAUFFAGE PEUT ÊTRE REQUIS AU-DESSOUS DE ZÉRO. Placez une bonne quantité de pâte de préchauffage sous le chapeau du brûleur (fig.7). Enflammez la pâte. Quand elle a presque fini de brûler, suivez les directives d’allumage données ci-dessus.
■En cuanto el quemador encienda, dele una vuelta a la PE- RILLA DE LA BOMBA y bombeela por 30 segundos (30 bombeos). Cierre la PERILLA DE LA BOMBA.
CUIDADO: Si aparece combustible o llamas debajo del que- mador, inmediatamente gire la PALANCA ROJA DE COM- BUSTIBLE a APAGADO. Deje que la estufa se enfríe. Invierta la estufa para vaciar cualquier combustible que se halla acumulado en el quemador. Seque con un trapo. Revise las instrucciones cuidadosamente antes de volver a encender la estufa.
■Ajuste la llama al calor deseado con la PALANCA ROJA DE COMBUSTIBLE . Si se hace dificil encender la estufa o si no produce toda la capacidad de calor en ALTO, inmediatamente mueva la PALANCA ROJA DE COMBUSTIBLE varias veces de APAGADO a ALTO para limpiar la punta del generador de gas. Puede ser necesario bombear mas veces para adquirir toda la capacidad de calor.
NOTA: PRECALENTAMIENTO PUEDE SER NECESARIO EN TEMPERATURAS BAJO EL PUNTO DE CONGELACIÓN. Coloque una buena cantidad de pasta de precalentación en la tapa del quemador debajo del gener- ador (Fig. 7). Encienda la pasta. Despues que la pasta esté casi gastada, siga las instrucciones de encendido arri- ba mencionadas.
Preheating Paste
Pâte de préchauffage Pasta Precalentadora
To turn off
■Move RED FUEL LEVER to OFF position.
■Latch RED LEVER in OFF position. (Fig. 8) Flame will linger on burn- er for 1-2 minutes after fuel lever is OFF.
Extinction
■Mettez le LEVIER DE COMMANDE ROUGE à
ARRÊT.
■Bloquez-le à la position ARRÊT, fig. 8. La flamme s’éteindra sous 1 ou
2 minutes.
Para apagar
■Mueva la PALANCA ROJA DE COMBUSTIBLE a la posi- ción de APAGADO.
■Asegure la PALANCA ROJA DE COMBUSTIBLE en la posición de APAGADO. (Fig. 8) La llama se quedará encendida en el quemador de 1-2 minutos despues que la palanca esté en APAGADO.
Fig. 8 | High-Light |
| Haut-Allumage |
|
| Alto-Alumbrado |
Off | |
Arrêt | Low |
Apagado |
| Bas |
| Bajo |
Red Fuel Lever
Levier de commande rouge Palanca Roja de Combustible
Principles of Operation
The stove consists of four main components: The TANK, PUMP, FUEL VALVE and
GENERATOR.
The TANK is designed to hold both the fuel and air. To avoid a fuel leak during lighting, an adequate air space MUST exist above the fuel level in the tank. Never overfill tank as this will decrease the needed air space. To avoid overfilling, ALWAYS fill stove on a level sur- face. Never tip stove on its side in an attempt to pour extra fuel into the tank.
The PUMP pressurizes the fuel tank. Opening the pump knob one turn allows air to be pumped past a check valve and into the air space above the fuel.
The FUEL VALVE controls the flow of fuel and air from the tank to the generator. The OFF position closes the fuel valve and prevents fuel flow. In the HIGH/LIGHT position, fuel flows through the valve to the generator where it is heated and vaporized before reaching the burner. When the stove is first lighted, both fuel and air from the tank pass through the fuel valve. As soon as the stove lights, it is important that additional air be pumped into the tank to replace the air that is passing through the fuel valve. Pump for at least 30 seconds. Time your pumping so that you pump one stroke per second.
The function of the GENERATOR is to absorb heat from the burner and vaporize the liq- uid fuel passing through the generator. Moving the red fuel lever from LOW to HIGH/LIGHT moves a needle in and out of a small orifice in the end of the generator. The needle both cleans the orifice and regulates the flow of fuel. Always light the stove with the red fuel lever in the HIGH/LIGHT position so that the stove is delivering full heat output to the generator.
If you notice an intermittent yellow flame when operating at a low heat setting, move the red fuel lever to a slightly higher setting. This will increase the heat on the generator and eliminate the yellow flame.
Principes du fonctionnement
Le réchaud comprend quatre éléments principaux: le RÉSERVOIR, la POMPE, la SOUPAPE À COMBUSTIBLE et le GÉNÉRATEUR.
Le RÉSERVOIR est étudié pour contenir du carburant et de l’air. Il DOIT contenir un volume suffisant d’air au-
dessus du niveau du carburant pour qu’il n’y ait pas de fuites à l’allumage. Ne remplissez jamais le réservoir de façon excessive car vous diminueriez l’espace destiné à l’air. Afin de ne pas trop remplir le réservoir, posez TOUJOURS le réchaud d’aplomb pour faire le plein. N’inclinez pas le réchaud dans le but d’y verser un peu plus de combustible.
La POMPE met le réservoir sous pression. Il suffit d’ouvrir le bouton de la pompe d’un tour pour pouvoir pomper de l’air au-delà du clapet de non-retour et au-dessus du niveau du combustible.
La SOUPAPE À COMBUSTIBLE contrôle les volumes de carburant et d’air qui passent du réservoir au générateur. Au réglage ARRÊT, la soupape est fermée, prévenant l’écoulement de carburant. À la position HAUT-ALLUMAGE, le carburant traverse la soupape pour arriver au générateur où il est chauffé puis vaporisé avant d’atteindre le brûleur. Au tout début de l’allumage, combustible et air passent dans la soupape à combustible. Dès que le brûleur est allumé, il est important de donner plusieurs coups de pompe pour remplacer l’air qui a traversé la soupape. Pompez pendant au moins 30 secondes, à raison d’un coup par seconde.
Le GÉNÉRATEUR a pour fonction d’absorber la chaleur du brûleur et de vaporiser le combustible liquide qui le traverse. Déplacer le levier de commande rouge de BAS à HAUT/ALLUMAGE fait rentrer et sortir une aiguille de l’orifice du bout du générateur. Cette aiguille nettoie l’orifice et régularise l’alimentation en combustible. Veillez à ce que le levier de commande rouge soit toujours à la position HAUT/ALLUMAGE quand vous allumez le réchaud afin que le générateur bénéficie du rendement optimal de chaleur.
Si vous remarquez une flamme intermittente jaune lorsque le réchaud fonctionne à un niveau de chaleur bas, mettez tout simplement le levier de commande rouge à un niveau légèrement plus élevé, vous augmenterez ainsi la chaleur au générateur et éliminerez la flamme jaune.
Principios de Operación
La estufa consiste de cuatro componentes principales: TANQUE, BOMBA, VÁLVULA DE COMBUSTIBLE y GENERADOR.
El TANQUE está diseñado para contener tanto el combustible como el aire. Para prevenir un escape de combustible durante el encendido, DEBE de existir un espacio adecuado de aire arriba del nivel de combustible en el tanque. Nunca sobre- llene el tanque ya que esto disminuirá el espacio de aire necesario. Para prevenir sobrellenar, SIEMPRE llene la estufa en una superficie nivelada. Nunca incline la estufa para tratar de llenar el tanque con combustible adicional.
La BOMBA presuriza el tanque de combustible. El girar la perilla de la bomba una vuelta permite que aire sea bombeado hasta pasar la válvula de represión y hasta el espacio de aire encima del combustible.
La VÁLVULA DE COMBUSTIBLE controla el flujo del combustible y del aire desde el tanque hasta el generador. La posi- ción de APAGADO cierra la válvula de combustible y previene el flujo del combustible. En la posición de ALTO/ALUMBRADO, el combustible fluye a traves de la válvula hasta el generador donde es calentado y vaporizado antes de llegar al quemador. Al principio de la estufa ser encendida, tanto el combustible como el aire que están en el tanque pasan a traves de la válvula de combustible. Es importante que en cuanto encienda la estufa usted bombee más aire en el tanque para reemplazar el aire que está pasando a traves de las válvula de combustible. Bombee por 30 segundos por lo menos. Regule el bombeo de modo que usted haga un bombeo por cada segundo.
La función del GENERADOR es la de absorber el calor del quemador y vaporizar el combustible líquido que está pasando a traves del generador. Al mover la palanca roja de combustible de BAJO a ALTO/ALUMBRADO se moverá una aguja para adentro y para afuera en el pequeño orificio de la punta del generador. La aguja limpia el orificio y regula el flujo del com- bustible. Siempre encienda la estufa con la palanca roja de combustible en la posición de ALTO/ALUMBRADO para que la es- tufa esté descargando todo su potencial de calor al generador.
Si usted nota una llama intermitente amarilla cuando está operando en una posición de llama baja, mueva la palanca roja de combustible a una posición más alta. Esto aumentará el calor en el generador y eliminará la llama amarilla.