INSTALLATION INSTRUCTIONS

IMPORTANT: READ CAREFULLY BEFORE INSTALLING FIXTURE.

Talon Large

Sheet 1 of 3

11/29/07IMI-682

WARNING: Risk of Fire/Electric Shock. If not qualified, consult an electrician.

WARNING: Risk of Electric Shock. Disconnect power at fuse or circuit breaker before installing or servicing.

WARNING: Risk of Burn. Disconnect power and allow fixture to cool before changing bulb or handling fixture.

WARNING: Risk of Personal Injury. Fixture may become damaged and/or unstable if not installed properly. Tighten all fixture components to their recommended torque values.

WARNING: Risk of Fire/Electrical Shock. Upside down installation can result in overheating or accumulation of water in fixture. Install right side up.

Tools Required Socket, 5/16" Socket, 3/4" Deep Well Socket, Electrical wiring tools.

NOTE: These luminaires are designed for outdoor lighting services, and


should not be used in area of limited ventilation or in high ambient


temperature enclosures. Construction is suitable for down lighting only.


Best results will be obtained if installed and maintained according to the


following recommendations.

Latches

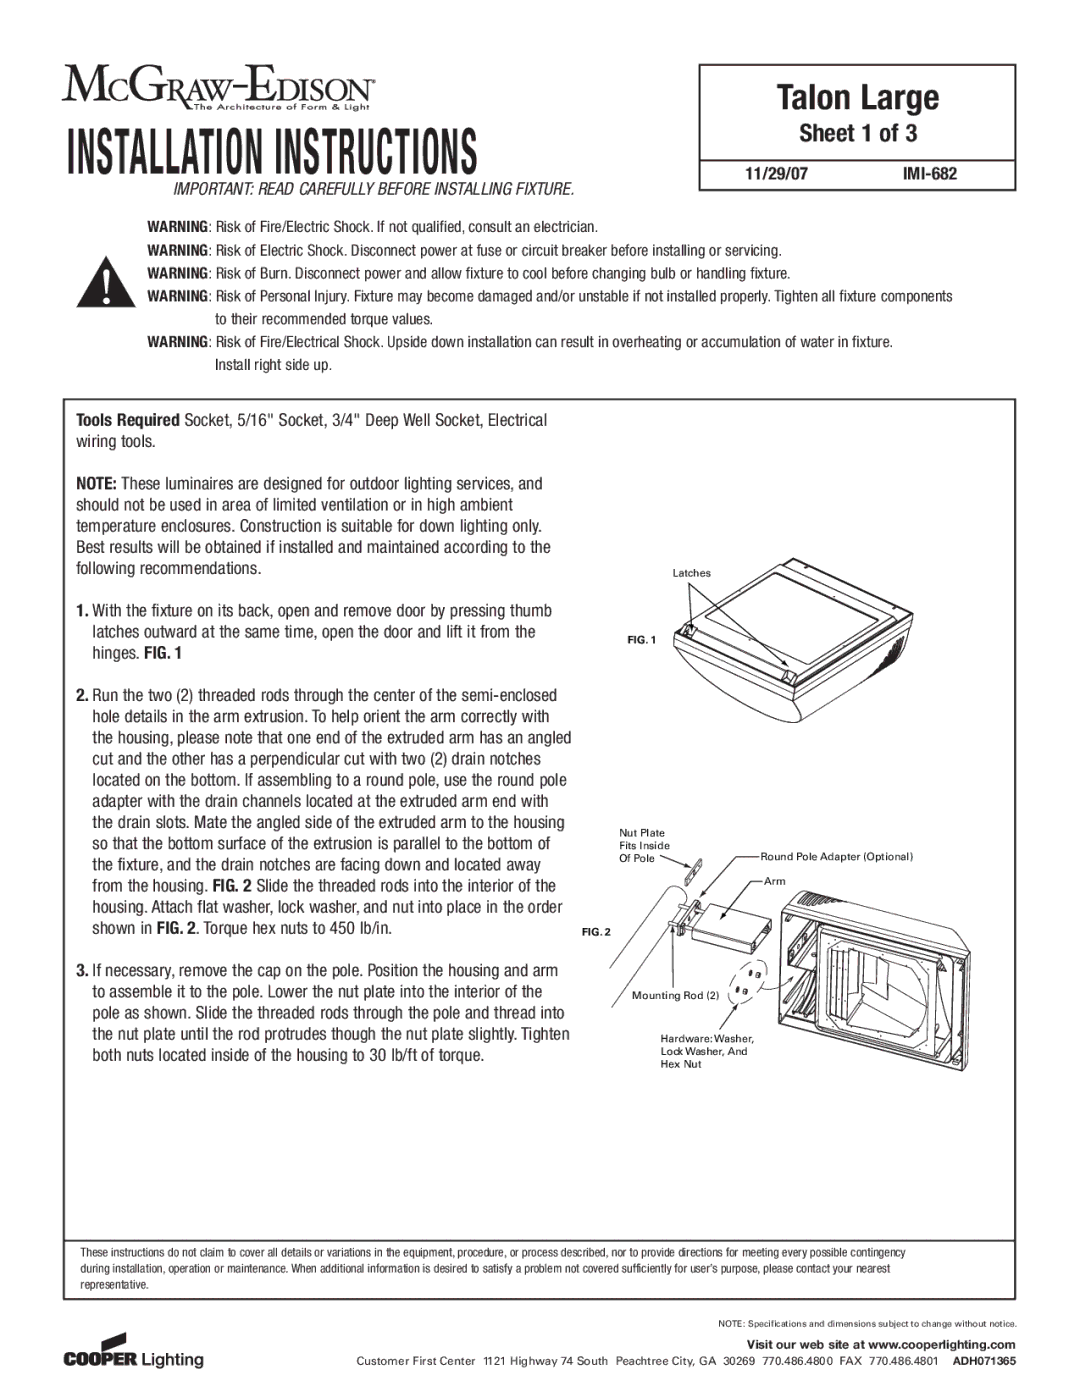
1.With the fixture on its back, open and remove door by pressing thumb

latches outward at the same time, open the door and lift it from the

FIG. 1

hinges. FIG. 1


2. Run the two (2) threaded rods through the center of the semi-enclosed


hole details in the arm extrusion. To help orient the arm correctly with


the housing, please note that one end of the extruded arm has an angled


cut and the other has a perpendicular cut with two (2) drain notches


located on the bottom. If assembling to a round pole, use the round pole


adapter with the drain channels located at the extruded arm end with


the drain slots. Mate the angled side of the extruded arm to the housing

Nut Plate

so that the bottom surface of the extrusion is parallel to the bottom of

Fits Inside

the fixture, and the drain notches are facing down and located away

Of Pole


from the housing. FIG. 2 Slide the threaded rods into the interior of the


housing. Attach flat washer, lock washer, and nut into place in the order


shown in FIG. 2. Torque hex nuts to 450 lb/in.

FIG. 2

3. If necessary, remove the cap on the pole. Position the housing and arm


to assemble it to the pole. Lower the nut plate into the interior of the

Mounting Rod (2)

pole as shown. Slide the threaded rods through the pole and thread into


the nut plate until the rod protrudes though the nut plate slightly. Tighten

Hardware: Washer,

both nuts located inside of the housing to 30 lb/ft of torque.

Lock Washer, And

Hex Nut


Round Pole Adapter (Optional)

Arm

These instructions do not claim to cover all details or variations in the equipment, procedure, or process described, nor to provide directions for meeting every possible contingency during installation, operation or maintenance. When additional information is desired to satisfy a problem not covered sufficiently for user’s purpose, please contact your nearest representative.

NOTE: Specifications and dimensions subject to change without notice.

Visit our web site at www.cooperlighting.com

Customer First Center 1121 Highway 74 South Peachtree City, GA 30269 770.486.4800 FAX 770.486.4801 ADH071365

Page 1
Image 1
Cooper Lighting IMI-682 installation instructions Sheet 1, Hinges. FIG, Shown in . Torque hex nuts to 450 lb/in

IMI-682 specifications

Cooper Lighting's IMI-682 is a standout choice for commercial and industrial lighting solutions, representing a meld of advanced technology and practical design. With its remarkable blend of efficiency and style, the IMI-682 is engineered to deliver exceptional performance while enhancing the aesthetics of any space.

One of the key features of the IMI-682 is its energy-efficient LED technology. This integration not only reduces energy consumption but also extends the lifespan of the luminaire, ensuring long-term savings on maintenance and replacement costs. The IMI-682 provides an impressive lumen output, ensuring bright, uniform lighting that is ideal for various applications, including warehouses, retail spaces, and manufacturing facilities.

The design of the IMI-682 focuses on versatility. It is available in multiple configurations to suit different lighting needs, including adjustable beam angles and various color temperatures, allowing for tailored solutions in diverse environments. This flexibility makes it an excellent option for both new constructions and retrofitting existing lighting systems.

Another standout characteristic of the IMI-682 is its robust construction. Built with high-quality materials, this lighting fixture is designed to withstand the rigors of industrial settings, offering durability and reliability. Additionally, the fixture features an IP65 rating, making it suitable for both indoor and outdoor installations while providing protection against dust and water ingress.

The IMI-682 also incorporates advanced control technologies, allowing for easy integration with building management systems and smart lighting solutions. Its ability to work with dimmers and occupancy sensors further enhances energy savings and operational efficiency, making it an ideal choice for modern facilities aiming to improve their sustainability practices.

In terms of installation, the IMI-682 is designed for ease of use. Its lightweight nature and user-friendly mounting options simplify the installation process, reducing downtime and disruption in busy environments.

Overall, the Cooper Lighting IMI-682 is an innovative fixture that combines advanced LED technology, robust design, and operational flexibility, making it a top-tier choice for those seeking high-performance lighting solutions. With its blend of efficiency, durability, and adaptability, it stands out as a reliable option for a wide range of commercial and industrial applications.