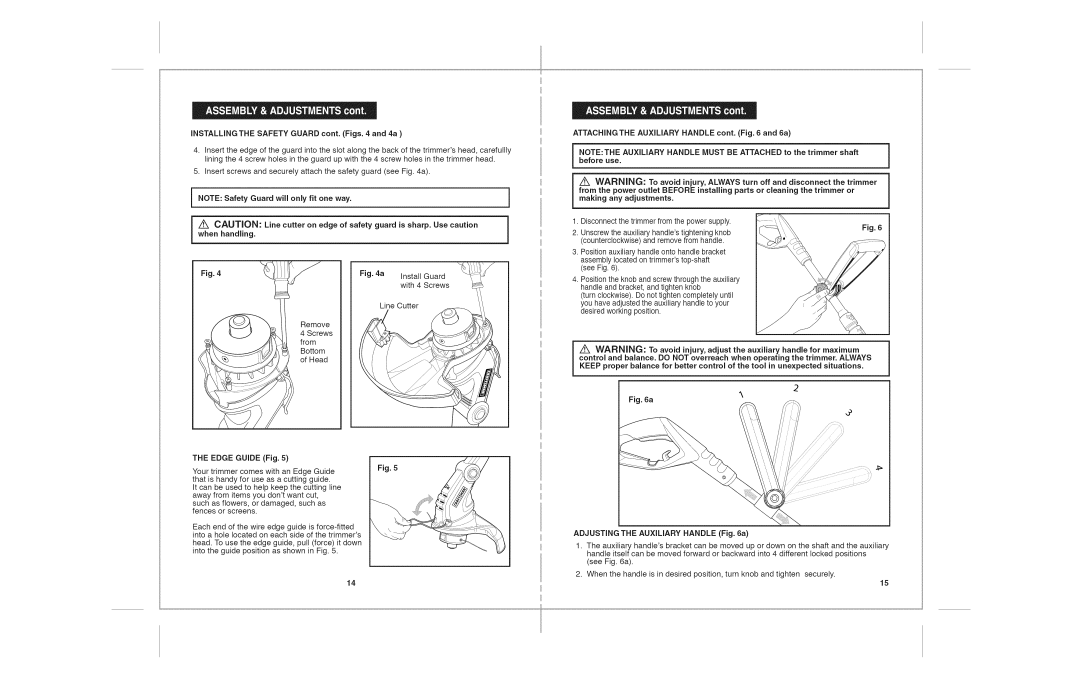
INSTALLING THE SAFETY GUARD cont. (Figs. 4 and 4a )

4.Insert the edge of the guard into the slot along the back of the trimmer's head, carefullly lining the 4 screw holes in the guard up with the 4 screw holes in the trimmer head.

5.Insert screws and securely attach the safety guard (see Fig. 4a).

{NOTE: Safety Guard will only fit one way.

iZ_ CAUTION: Line cutter on edge of safety guard is sharp. Use caution

i

ATTACHING THE AUXILIARY HANDLE cont. (Fig. 6 and 6a)


i

i beforeOTE:THEuse. AUXILIARY HANDLE MUST BE ATTACHED to

the trimmer shaft

from the power outlet BEFORE installing parts or cleaning the trimmer or

i making_ WARNING:any adjustmentsTo avoid. injury, ALWAYS turn off and disconnect the trimmer

1. Disconnect the trimmer from the power supply.

when

handling.


1


Fig. 4


Fig. 4a

Install Guard

2. Unscrew the auxiliary handle'stightening knob (counterclockwise) and remove from handle.

3. Position auxiliary handle onto handle bracket assembly located on trimmer'stop-shaft (see Fig. 6).

Fig. 6

with 4 Screws

Line Cutter

Remove

4Screws from Bottom of Head

THE EDGE GUIDE (Fig. 5)

Your trimmer comes with an Edge Guide

Fig. 5


that is handy for use as a cutting guide.


It can be used to help keep the cutting line


away from items you don'twant cut,


such as flowers, or damaged, such as


fences or screens.


Each end of the wire edge guide is force-fitted


into a hole located on each side of the trimmer's


head. To use the edge guide, putt (force) it down


into the guide position as shown in Fig. 5.


14


4. Position the knob and screw through the auxiliary handle and bracket, and tighten knob

(turn clockwise). Do not tighten completely until you have adjusted the auxiliary handle to your desired working position.

z_ WARNING: To avoid injury, adjust the auxiliary handle for maximum control and balance. DO NOT overreach when operating the trimmer. ALWAYS KEEP proper balance for better control of the tool in unexpected situations.

2

Fig. 6a

ADJUSTING THE AUXILIARY HANDLE (Fig. 6a)

1.The auxiliary handle's bracket can be moved up or down on the shaft and the auxiliary handle itself can be moved forward or backward into 4 different locked positions

(see Fig. 6a).

2.When the handle is in desired position, turn knob and tighten securely.

15

Page 8
Image 8
Craftsman 172.74544 warranty Installing the Safety Guard cont. Figs and 4a, Handling, Adjusting the Auxiliary Handle a

172.74544 specifications

The Craftsman 172.74544 is an advanced portable air compressor designed for both professional and DIY applications. Renowned for its reliability and performance, this model offers a host of features that make it versatile for various tasks, ranging from inflating tires to powering pneumatic tools.

One of the standout characteristics of the Craftsman 172.74544 is its robust motor, which provides a powerful 1.5 horsepower. This strength enables the compressor to deliver a maximum pressure of 125 PSI, offering sufficient pressure for a wide range of applications. Additionally, it features a 6-gallon capacity tank, which allows for longer run times and reduces the need for frequent refills. The tank's design ensures efficient air storage, contributing to the compressor's performance in maintaining consistent pressure.

The Craftsman 172.74544 incorporates a reliable oil-free pump, eliminating the need for regular oil changes and reducing maintenance concerns. This design not only enhances portability but also allows for easy operation without the hassle of oil and lubrication management. The oil-free technology also contributes to a cleaner workspace, making it ideal for indoor use or where oil residue could be a concern.

Portability is a key feature of this compressor, as it comes equipped with easy-grip handles and a lightweight design, making it convenient to transport to job sites or around the home. The sturdy rubber feet provide stability during operation, minimizing vibrations and ensuring safety.

The compressor is also user-friendly, featuring a simple pressure gauge that allows users to monitor air pressure easily. Additionally, it includes a quick-connect coupling that makes attaching and detaching hoses quick and straightforward. This attention to user experience enhances the overall efficiency of the tool, ensuring that users can focus on their tasks rather than dealing with complicated setups.

Overall, the Craftsman 172.74544 stands out due to its blend of power, portability, and low maintenance requirements. Whether you are a professional looking to enhance your toolkit or a homeowner needing a reliable air compressor for minor projects, the Craftsman 172.74544 certainly meets those demands with its impressive design and functionality.