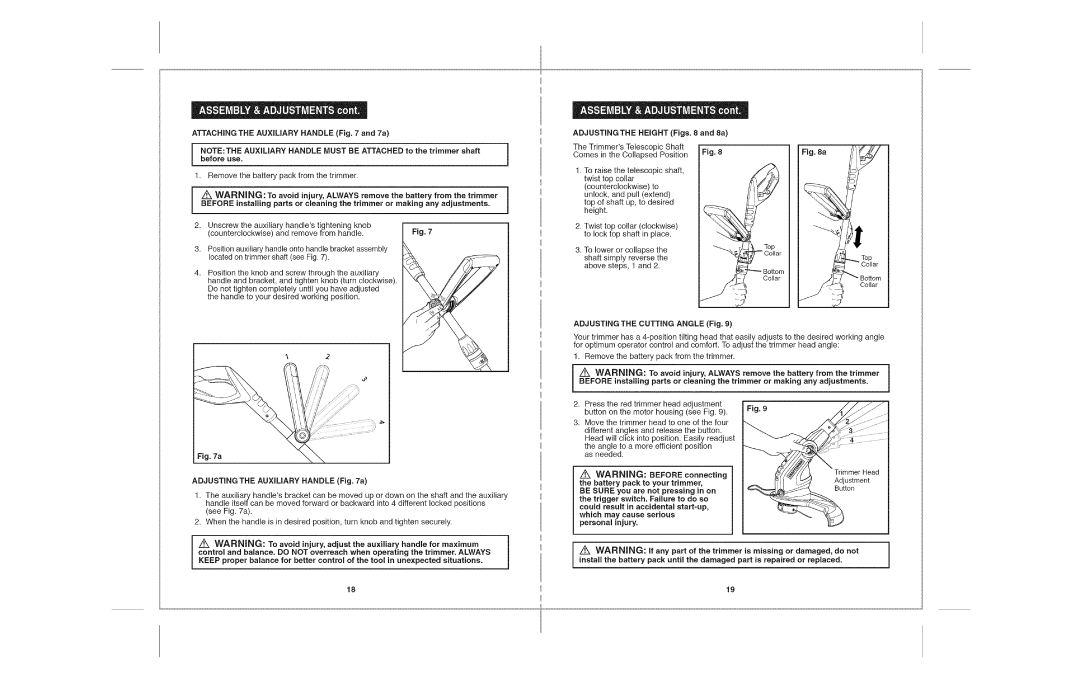
ATTACHING THE AUXiLiARY HANDLE (Fig. 7 and 7a)


]

NOTE: THE AUXiLiARY HANDLE MUST BE ATTACHED to the trimmer shaft

before use.


1. Remove the battery pack from the trimmer.


J

Z_ WARNING: To avoid injury, ALWAYS remove the battery

from the trimmer

BEFORE installing parts or cleaning the trimmer or making any adjustments.


2.Unscrew the auxiliary handle's tightening knob

(counterclockwise) and remove from handle.

Fig. 7

3.Position auxiliary handle onto handle bracket assembly located on trimmer shaft (see Fig. 7).

4.Position the knob and screw through the auxiliary handle and bracket, and tighten knob (turn clockwise). Do not tighten completely until you have adjusted

the handle to your desired working position.

ADJUSTINGTHE HEIGHT (Figs. 8 and 8a)


The Trimmer's Telescopic Shaft

Fig. 8

Fig. 8a

Comes in the Collapsed Position


1.

To raise

the telescopic shaft,


twist top

collar


(counterclockwise)

to


unlock, and pull (extend)


top of shaft up,

to desired


height.


2.

Twist top collar

(clockwise)


to lock top shaft in place.


3.

To lower or collapse

the


shaft simply reverse

the


above steps, 1 and 2.

Collar

ADJUSTING THE CUTTING ANGLE (Fig. 9)

Your trimmer has a 4-position tilting head that easily adjusts to the desired working angle for optimum operator control and comfort. To adjust the trimmer head angle:

1. Remove the battery pack from the trimmer.

BEFOREz WARNING:installing Topartsavoidor cleaninginjury, ALWAYSthe trimmerremoveor themakingbatteryany fromadjustmentsthe trimmer.

Fig. 7a

ADJUSTINGTHE AUXILIARY HANDLE (Fig. 7a)

1.The auxiliary handle's bracket can be moved up or down on the shaft and the auxiliary handle itself can be moved forward or backward into 4 different locked positions

(see Fig. 7a).

2.When the handle is in desired position, turn knob and tighten securely.

2. Press the red trimmer head adjustment


button on the motor housing (see Fig. 9).

I Fig. 9

3.Move the trimmer head to one of the four

different angles and release the button. Head will click into position. Easily readjust

the angle to a more efficient position as needed.

Z_ WARNING: BEFORE connecting

the battery pack to your trimmer,

BE SURE you are not pressing in on the trigger switch. Failure to do so could result in accidental start-up,which may cause serious

personal injury.

Trimmer Head

Adjustment

Button

Z_ WARNING: To avoid injury, adjust the auxiliary handle for maximum

control and balance. DO NOT overreach when operating the trimmer. ALWAYS

1


KEEP proper balance for better control of the tool in unexpected situations.


Zinstall_ WARNING:the battery packIf anyuntilpart theof thedamagedtrimmer partis missingrepairedor damaged,or replaceddo. not

18

19

Page 10
Image 10
Craftsman 172.74815 warranty Attaching the AUXiLiARY Handle and 7a Before use, Adjustingthe Height Figs and 8a

172.74815 specifications

The Craftsman 172.74815 is a versatile and reliable tool that caters to both DIY enthusiasts and seasoned professionals. Designed to provide exceptional performance, this model boasts several features and technologies that set it apart in the crowded market of power tools.

One of the main features of the Craftsman 172.74815 is its powerful motor, delivering efficient and consistent performance for a variety of tasks. The robust motor enables users to tackle tough materials with ease, whether it's cutting, drilling, or sanding. This model is particularly praised for its ability to maintain speed under load, ensuring that projects progress smoothly without frustrating interruptions.

In terms of ergonomics, the Craftsman 172.74815 is designed with user comfort in mind. The tool features a lightweight construction that reduces fatigue during extended use, allowing for more productive work sessions. Its non-slip grip provides a secure hold, enhancing control and precision as users work on their projects.

Technology plays a significant role in the effectiveness of the Craftsman 172.74815. The tool incorporates innovative features such as adjustable speed settings, allowing users to customize the tool's performance based on the specific requirements of their tasks. This level of control is essential for achieving the best results, whether for delicate work or more heavy-duty applications.

Safety is another key consideration in the Craftsman 172.74815 design. The unit includes built-in safety features such as an electronic brake that quickly stops the tool's operation, minimizing the risk of accidents. Additionally, the dust-collecting capabilities help keep the workspace clean and free from debris, creating a better working environment.

Durability is a hallmark of the Craftsman brand, and the 172.74815 is no exception. Constructed with high-quality materials, this tool is built to withstand the rigors of frequent use. The attention to detail in its design ensures longevity, making it a wise investment for those looking to expand their toolkit.

In conclusion, the Craftsman 172.74815 stands out as a reliable and efficient tool for a wide range of applications. Its powerful motor, ergonomic design, adjustable speeds, and focus on safety make it a fantastic choice for anyone in need of a dependable power tool. Whether you are a weekend warrior or a professional contractor, the Craftsman 172.74815 is designed to meet your needs and help you achieve your project goals with ease.