MAINTENANCE

Pump and piping need not be disconnected to repair or re-

place motor or seal (see Figure 12). If motor is replaced, re- place the shaft seal (Key No. 6, Page 11). Keep one on hand for future use.

Be sure to prime pump before starting.

NOTICE: Check motor label for lubrication instructions.

The mechanical shaft seal in the pump is water lubricated and serf-adjusting.

NOTICE: Drain pump when disconnecting from service or when it might freeze.

PUMP DISASSEMBLY

1. Disconnect power to motor.

NOTICE: Mark wires for correct assembly.

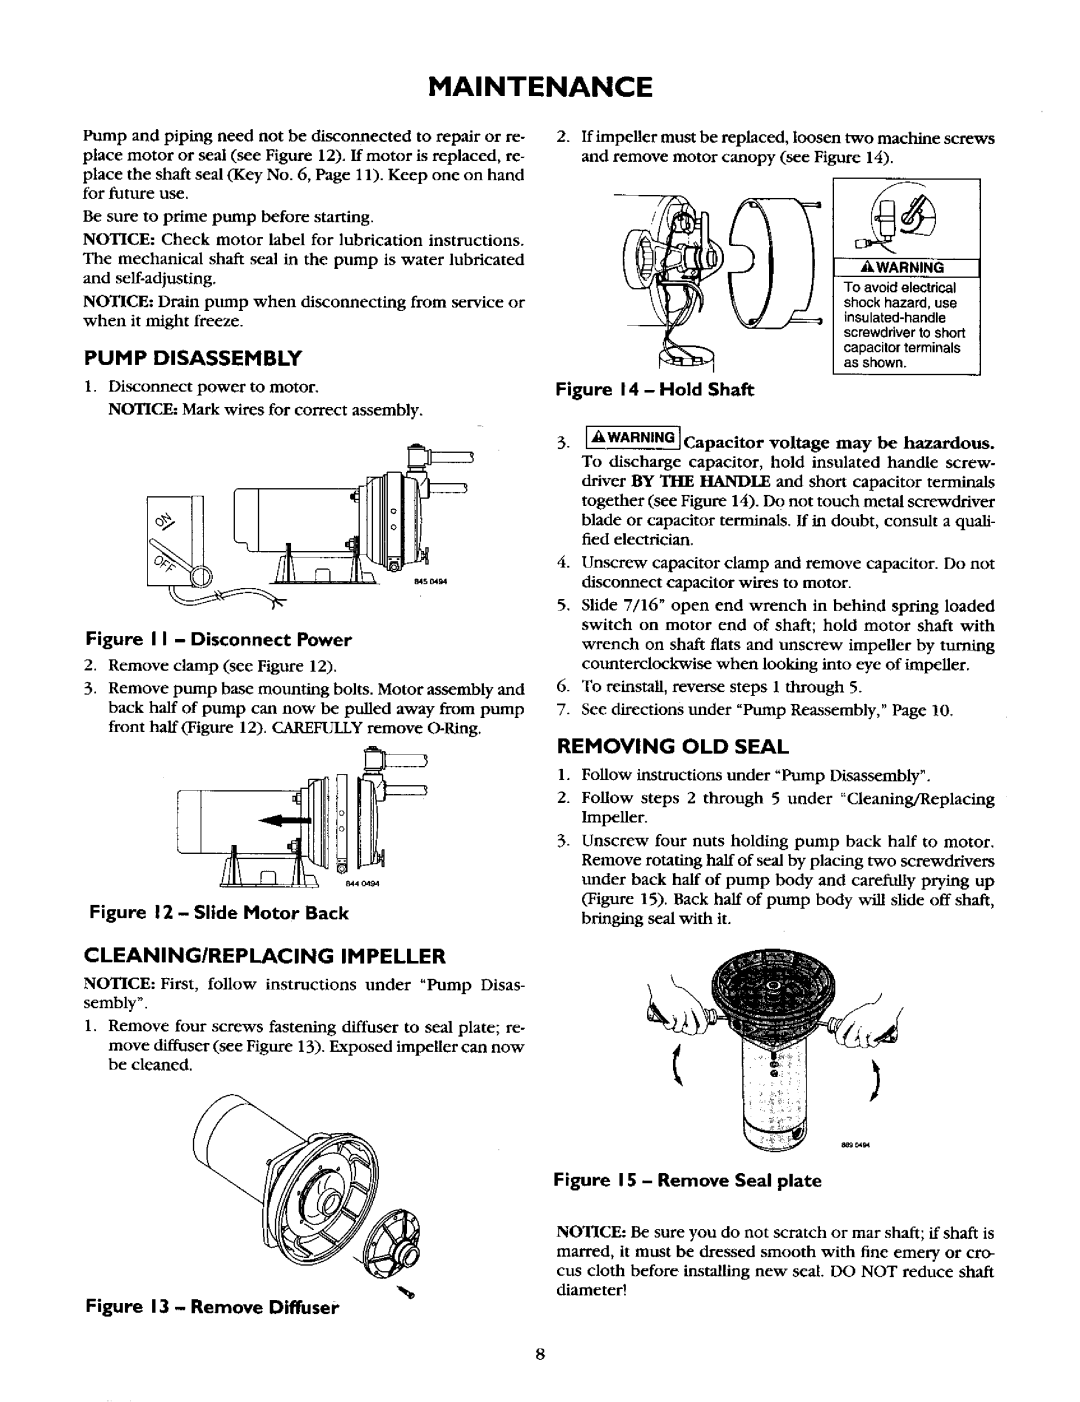
Figure I I - Disconnect Power

2.Remove clamp (see Figure 12).

3.Remove pump base mounting bolts. Motor assembly and back half of pump can now be pulled away from pump front half (Figure 12). CAREFULLY remove O-Ring.

Figure 12 - Slide Motor Back

CLEANINGIREPLACINGIMPELLER

NOTICE: First, follow instructions under "Pump Disas- sembly".

1.Remove four screws fastening diffuser to seal plate; re-

move diffuser (see Figure 13). Exposed impeller can now be cleaned.

2.If impeller must be replaced, loosen two machine screws and remove motor canopy (see Figure 14).

_WARNING

To avoidelectrical shockhazard,use insulated-handle screwdriverto short capacitorterminals as shown.

Figure 14 - Hold Shaft

3, AWARNING]Capacitor voltage may be hazardous.

To discharge capacitor, hold insulated handle screw-

driver BY THE HANDLE and short capacitor terminals together (see Figure 14). Do not touch metal screwdriver

blade or capacitor terminals. If in doubt, consult a quali- fied electrician.

4.Unscrew capacitor clamp and remove capacitor. Do not

disconnect capacitor wires to motor.

5.Slide 7/16" open end wrench in behind spring loaded switch on motor end of shaft; hold motor shaft with

wrench on shaft flats and unscrew impeller by turning

counterclockwise when looking into eye of impeller.

6.To reinstall, reverse steps 1 through 5.

7.See directions under "Pump Reassembly," Page 10.

REMOVING OLD SEAL

1.Follow instructions under "Pump Disassembly ".

2.Follow steps 2 through 5 under "Cleaning/Replacing Impeller.

3.Unscrew four nuts holding pump back half to motor. Remove rotating half of seal by placing two screwdrivers under back half of pump body and carefully prying up (Figure 15). Back half of pump body will slide off shaft, bringing seal with it.

Figure 15 - Remove Seal plate

NOTICE: Be sure you do not scratch or mar shaft; if shaft is marred, it must be dressed smooth with fine emery or cro-

cus cloth before installing new seal. DO NOT reduce shaft diameter!

Figure 13 - Remove Diffuser

Page 8
Image 8
Craftsman 390.262553, 390.262653, 390.262454 Maintenance, Pump Disassembly, Removing OLD Seal, Cleaningireplacingimpeller

390.262454, 390.262653, 390.262553 specifications

The Craftsman 390.262653, 390.262454, and 390.262553 are part of the well-respected Craftsman line of power tools, designed to meet the demands of both professionals and DIY enthusiasts. These tools are engineered with a blend of durability, efficiency, and precision, making them ideal for a variety of projects.

One of the standout features of the Craftsman 390 series is the robust motor. Each tool is equipped with a high-performance motor that delivers ample power for handling tough tasks, whether it's drilling, cutting, or fastening. The motors are designed to minimize overheating and maximize efficiency, allowing users to work for extended periods without interruption.

Ergonomics is a key focus in the design of the 390 models, with handles that provide a comfortable grip. This is particularly beneficial during prolonged use, as it helps reduce fatigue and improve control. The lightweight construction also adds to the overall ease of use, making these tools accessible for users of all skill levels.

In terms of technology, the Craftsman 390 series incorporates advanced features such as variable speed settings. This allows users to adjust the speed according to the task at hand, ensuring precision and adaptability for different materials. Additionally, some models may include LED lighting to illuminate the workspace, enhancing visibility in dimly lit areas.

Durability is another hallmark of the Craftsman brand, and the 390 series is no exception. These tools are built with high-quality materials that can withstand rigorous use on job sites or in home projects. The warranty offered by Craftsman further demonstrates their confidence in the longevity of these products.

Safety is prioritized as well, with features designed to protect the user during operation. This includes mechanisms that prevent accidental starts and protect against electrical overloads.

Overall, the Craftsman 390.262653, 390.262454, and 390.262553 combine power, versatility, and user-friendly design, making them reliable choices for those looking to tackle a range of tasks efficiently. Whether you're a seasoned professional or just starting, these tools promise to deliver performance and reliability for all your crafting needs.