Your new tractor has been assembled at the factory with exception of those parts left unassembled for shipping purposes. To ensure safe and proper operation of your tractor aU parts and hardware you assemble must be tightened securely. Use the correct tools as necessary to insure proper tightness. Review the video cassette before

you begin.

TOOLS REQUIRED

FOR ASSEMBLY


_.:_._./Insert

A socket wrench set will make assembly


'_

.----3/S Hex Bolt

easier. Standard wrench sizes you need

are listed below.


_T..._3/8 LockWasher

(1)

9/16"wrench

(1)

Pliers


_"_-Larga Rat Washer

(2)

1/2"wranch

(1)

Utility knife


(1) Tire pressure gauge

When right or left hand is mentioned in this manual, it means, from your point of view, when you are in the operating position (seated behind the steering wheel).

Steering

Wheel

Steenng _._

Boot-------"--- _

Tabs

TO REMOVETRACTOR FROM CARTON

UNPACK CARTON

1.Remove all accessible loose parts and parts cartons from carton.

2.Cut, from top to bottom, along lines on all four corners of carton, and lay panels flat.

3.Check for any additional loose parts or cartons and remove.

Adapter--------___

Extension

/ Shaft

5/16 Locknut _,,...._

_._5/16 Hex Bolt

BEFORE REMOVINGTRACTOR FROM SKID

ATrACH STEERING WHEEL

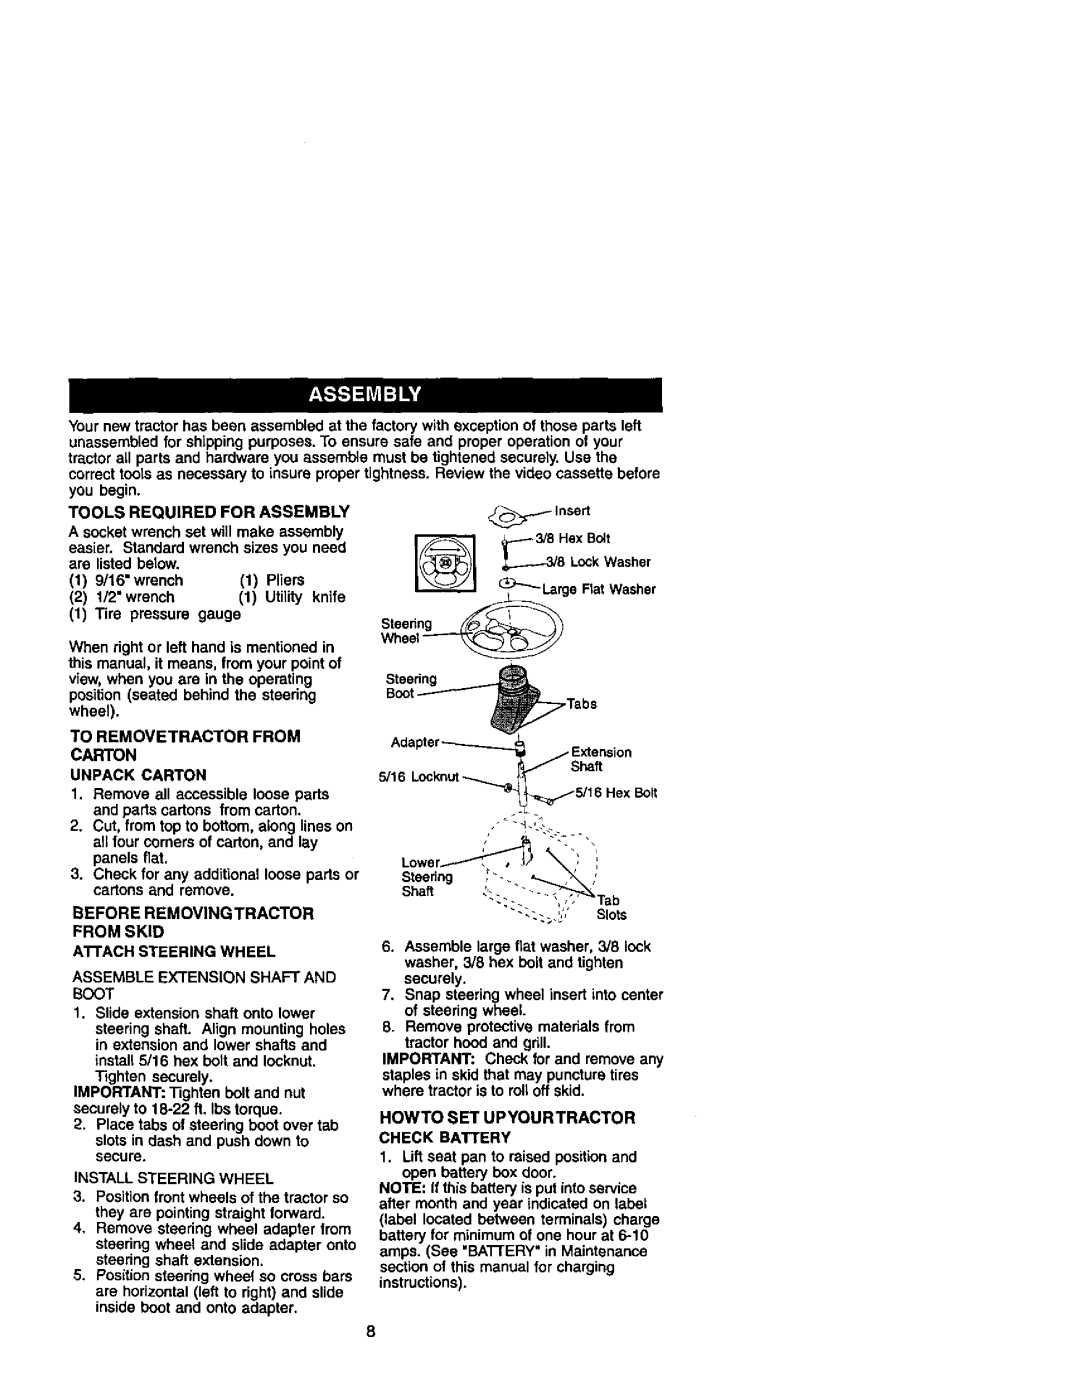
ASSEMBLE EXTENSION SHAFT AND BOOT

1.Slide extension shaft onto lower

steering shaft. Align mounting holes in extension and lower shafts and install 5/16 hex bolt and lecknut.

Tighten securely.

IMPORTANT: Tighten bolt and nut securely to 18-22 ft. Ibs torque.

2.Place tabs of steering boot over tab slots in dash and push down to secure.

INSTALL STEERING WHEEL

3.Position front wheels of the tractor so they are pointing straight forward.

4.Remove steering wheel adapter from steering wheel and slide adapter onto steedng shaft extension.

5.Position steering wheel so cross bars

are horizontal (left to right) and slide inside boot and onto adapter.

6.Assemble large flat washer, 3/8 lock washer, 3/8 hex bolt and tighten securely.

7.Snap steering wheel insert into center of steering wheel.

8.Remove protective materials from

tractor hood and grill.

IMPORTANT: Check for and remove any staples in skid that may puncture tires where tractor is to roll off skid.

HOWTO SET UPYOURTRACTOR CHECK BA'rrERY

1.Lift seat pan to raised position and open battery box door.

NOTE: If this battery is put into service after month and year indicated on label (label located between terminals) charge battery for minimum of one hour at 6-10 amps. (See "BATrERY" in Maintenance section of this manual for charging instructions).

8

Page 8
Image 8
Craftsman 410 Before Removingtractor from Skid, Tools Required For Assembly, To Removetractor from Carton Unpack Carton

272, 410 specifications

The Craftsman 410,272 is a versatile and powerful tool designed for both DIY enthusiasts and professional craftsmen. This product epitomizes the careful blend of innovative technology and user-friendly features, making it a popular choice in the woodworking and construction sectors.

One of the standout characteristics of the Craftsman 410,272 is its robust motor. With a high-performance engine, it delivers exceptional torque, allowing users to tackle a wide range of applications with ease. From cutting and drilling to sanding and shaping, this tool ensures you achieve precise results in a fraction of the time compared to traditional methods.

In terms of design, the Craftsman 410,272 boasts an ergonomic handle that enhances comfort during prolonged use. This thoughtful design reduces hand fatigue and allows for better control, resulting in improved accuracy. The lightweight construction also makes it easily portable, so you can take it wherever your projects lead you.

Another noteworthy feature is the integrated tool storage. This clever addition allows users to keep their equipment organized and readily accessible, minimizing downtime during tasks. The quick-release mechanism simplifies the swapping of attachments, enhancing versatility and productivity.

Craftsman has incorporated advanced safety features into the 410,272, ensuring that you can work confidently. The safety guard prevents accidental injuries, while the variable speed control allows you to adjust the tool’s performance according to the material you are working with. This level of adaptability is essential for achieving optimal results on different surfaces.

The Craftsman 410,272 is also compatible with a wide array of attachments and accessories, making it an all-in-one solution for various projects. Whether you need to drill, cut, or finish, you can customize the tool to meet your specific requirements.

In conclusion, the Craftsman 410,272 stands out for its powerful motor, ergonomic design, integrated storage, safety features, and compatibility with various attachments. It is engineered to provide efficiency and precision, making it an invaluable addition to any workshop or job site. With its combination of performance and versatility, this tool is sure to enhance your craftsmanship, whether you are a seasoned professional or just starting your journey in the world of DIY projects. Craftsmanship has never been easier or more reliable.