...................................

ASSEMBLY

A.PREPARATION

_5

our Qperator s Manual has been developed to help you assemble the unit and to understand its safe operation. It is important that you read your manual completely to become familiar with the unit before you begin assembly.

1.READ YOUR OPERATOR'S MANUAL.

2.The only tool required is a Phillips screwdriv- er.

B.BLOWER TUBE ASSEMBLY

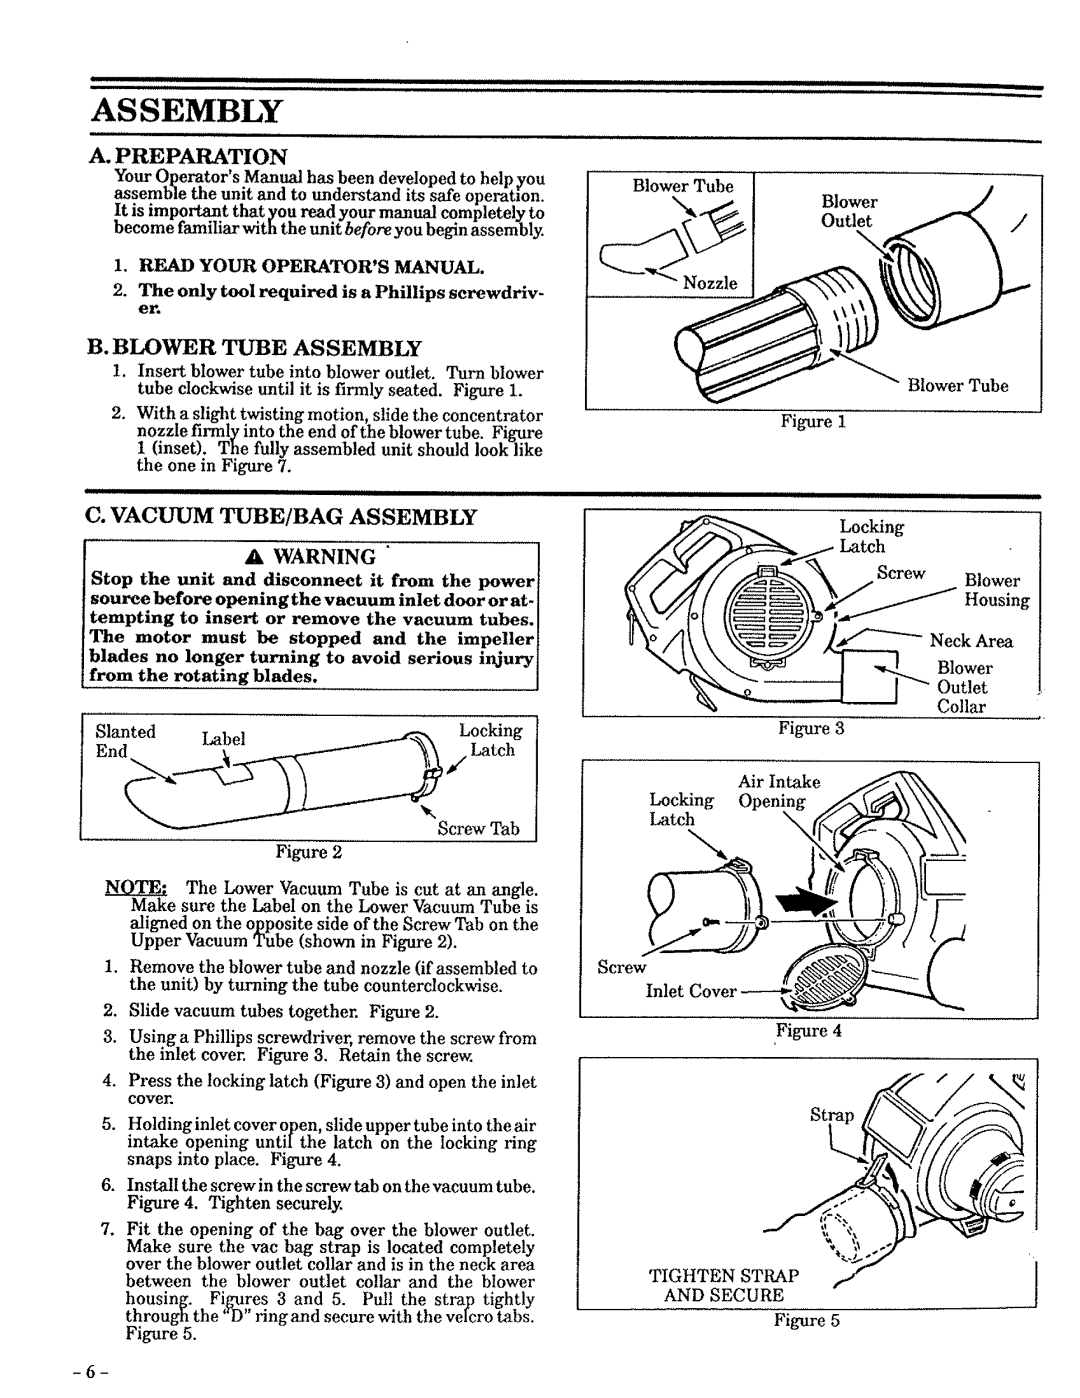
1.Insert blower tube into blower outlet. Turn blower tube clockwise until it is firmly seated. Figure 1.

2.With a slight twisting motion, slide the concentrator nozzle firmly into the end of the blower tube. Figure I (inset). The fully assembled unit should look like the one in Figure 7.

II]WII

IIIII

IIIIIIIII

II]llJ

II

IIIIIIIII

II

IIIIIIIJl

]

IIII

C. VACUUM TUBE/BAG ASSEMBLY

A WARNING

Stop the unit and disconnect it from the power source before opening the vacuum inlet door or at-

tempting to insert or remove the vacuum tubes.

The motor must be stopped and the impeller

blades no longer turning to avoid serious injury

from the rotating blades.

Slanted

Label

Locking

End _


_/Latch


Screw Tab


Figure

2

The Lower Vacuum Tube is cut at an a_gle. Make sure the Label on the Lower Vacuum Tube is

aligned on the opposite side of the Screw Tab on the Upper Vacuum Tube (shown in Figure 2).

1.Remove the blower tube and nozzle (if assembled to the unit) by turning the tube counterclockwise.

2.Slide vacuum tubes together. Figure 2.

3.Using a Phillips screwdriver, remove the screw from the inlet cover. Figure 3. Retain the screw.

4.Press the locking latch (Figure 3) and open the inlet cover.

5.Holding inlet cover open, slide upper tube into the air

intake opening untiIthe latch on the locking ring snaps into place. Figure 4.

6.Install the screw in the screw tab on the vacuum tube. Figure 4. Tighten securely.

7.Fit the opening of the bag over the blower outlet. Make sure the vac bag strap is located completely over the blower outlet collar and is in the neck area between the blower outlet collar and the blower

housing. Figures 3 and 5. Pull the strap tightly through the "D' ringand secure with the veIcro tabs. Figure 5.

-6-

,

.........................???? ,

.......

i

,,

I It


i i

,

Blower Tube

Blower

Outlet

Btower Tube

Figure 1

]ll]]lllllllllllllIIIllI III I II II

II

Illllllll I I I I

III I

]]IU

Locking

Latch

Screw

Blower

Housing

Neck Area

Blower

Outlet

Collar

Figure 3

Air Intake

Locking

Latch

%

Screw

Inlet

Figure 4

TIGHTEN STRAP

J

AND SECURE

Figure

5

Page 6
Image 6
Craftsman 257.796362 manual Preparation, Blower Tube Assembly, Vacuum TUBE/BAG Assembly, Read Your Operators Manual

257.796362, 79636 specifications

The Craftsman 79636,257.796362 is a versatile and powerful tool that has gained popularity among both DIY enthusiasts and professional tradespeople. Known for its durability and efficiency, this model stands out in the market for its robust design and advanced features.

One of the primary characteristics of the Craftsman 79636,257.796362 is its high-performance motor. This electric tool operates with significant power, allowing users to tackle a wide range of tasks with ease. Whether you’re drilling into tough materials or working on intricate projects, this tool is designed to deliver consistent results, reducing the time and effort required for various applications.

The ergonomics of the Craftsman 79636,257.796362 are noteworthy. It is designed with user comfort in mind, featuring a lightweight build that reduces fatigue during extended periods of use. The comfortable grip provides added control, enhancing precision while working. This thoughtful design makes it suitable for both professional usage and home improvement projects.

In addition to its powerful motor and ergonomic design, the Craftsman 79636,257.796362 incorporates advanced technology for enhanced performance. The tool often features variable speed settings, allowing users to adjust the speed according to the task at hand. This flexibility leads to better results, especially when working with different materials or when performing delicate applications.

Another significant feature is the tool’s durable construction. Built to withstand rigorous use, the Craftsman 79636,257.796362 is made from high-quality materials that resist wear and tear. This reliability ensures that users can depend on it for years, making it a smart investment for anyone serious about their craft.

Compatibility with various accessories further enhances the Craftsman 79636,257.796362's versatility. It is designed to accommodate a wide range of attachments and bits, allowing users to customize their tool for specific tasks. This adaptability makes it an excellent choice for those looking to expand their toolkit without needing multiple specialized tools.

In summary, the Craftsman 79636,257.796362 offers a perfect blend of power, comfort, and durability. Its advanced technologies, coupled with user-focused design, make it an essential tool for a wide array of applications. Whether you’re a seasoned professional or a DIY novice, this model is sure to meet your expectations and excel in delivering results.