INTELLIGENT
Laptop Computer Cart
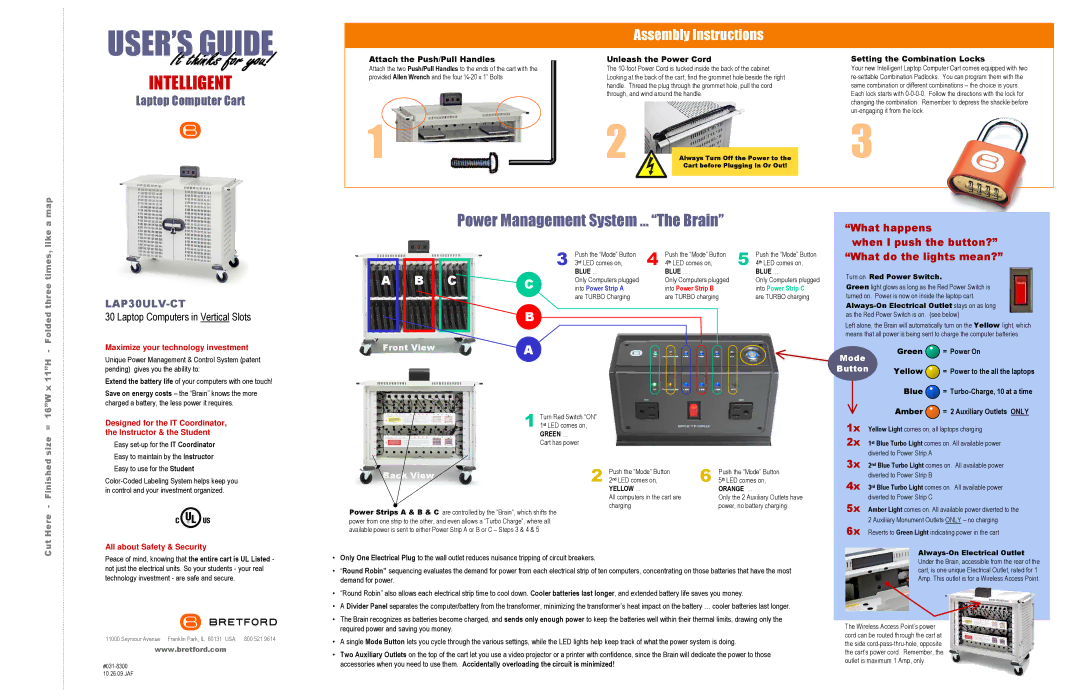
Attach the Push/Pull Handles
Attach the two Push/Pull Handles to the ends of the cart with the provided Allen Wrench and the four ¼-20 x 1” Bolts
1 
Unleash the Power Cord
The 10-foot Power Cord is tucked inside the back of the cabinet. Looking at the back of the cart, find the grommet hole beside the right handle. Thread the plug through the grommet hole, pull the cord through, and wind around the handle.
2Always Turn Off the Power to the Cart before Plugging In Or Out!
Setting the Combination Locks
Your new Intelligent Laptop Computer Cart comes equipped with two re-settable Combination Padlocks. You can program them with the same combination or different combinations – the choice is yours. Each lock starts with 0-0-0-0. Follow the directions with the lock for changing the combination. Remember to depress the shackle before un-engaging it from the lock.
3
x 11”H - Folded three times,
LAP30ULV-CT
30 Laptop Computers in Vertical Slots
Maximize your technology investment
Unique Power Management & Control System (patent pending) gives you the ability to:
Extend the battery life of your computers with one touch!
Save on energy costs – the “Brain” knows the more charged a battery, the less power it requires.
3 | Push the “Mode” Button | 4 | Push the “Mode” Button | 5 | Push the “Mode” Button |
3rd LED comes on, | 4th LED comes on, | 4th LED comes on, |
| BLUE … | | BLUE … | | BLUE … |
C | Only Computers plugged | | Only Computers plugged | | Only Computers plugged |
into Power Strip A | | into Power Strip B | | into Power Strip C |
| are TURBO Charging | | are TURBO charging | | are TURBO charging |
A
“What do the lights mean?”
Turn on Red Power Switch.
Green light glows as long as the Red Power Switch is turned on. Power is now on inside the laptop cart. Always-On Electrical Outlet stays on as long as the Red Power Switch is on. (see below)
Left alone, the Brain will automatically turn on the Yellow light, which means that all power is being sent to charge the computer batteries.
Mode | Green | = Power On |
| |
Button | Yellow | = Power to the all the laptops |
|
Blue  = Turbo-Charge, 10 at a time
Cut Here - Finished size = 16”W
Designed for the IT Coordinator, the Instructor & the Student
Easy set-up for the IT Coordinator
Easy to maintain by the Instructor
Easy to use for the Student
Color-Coded Labeling System helps keep you in control and your investment organized.
All about Safety & Security
Peace of mind, knowing that the entire cart is UL Listed - not just the electrical units. So your students - your real technology investment - are safe and secure.
11000 Seymour Avenue Franklin Park, IL 60131 USA | 800 521 9614 |
www.bretford.com
#031-8300 10.26.09 JAF
1Turn Red Switch “ON” 1st LED comes on,
GREEN … Cart has power
| Back View | Push the “Mode” Button | Push the “Mode” Button |
| 2 2nd LED comes on, | 6 5th LED comes on, |
| |
| | YELLOW … | ORANGE … |
| | All computers in the cart are | Only the 2 Auxiliary Outlets have |
| | charging | power, no battery charging |
Power Strips A & B & C are controlled by the “Brain”, which shifts the power from one strip to the other, and even allows a “Turbo Charge”, where all available power is sent to either Power Strip A or B or C – Steps 3 & 4 & 5
•Only One Electrical Plug to the wall outlet reduces nuisance tripping of circuit breakers.
•“Round Robin” sequencing evaluates the demand for power from each electrical strip of ten computers, concentrating on those batteries that have the most demand for power.
•“Round Robin” also allows each electrical strip time to cool down. Cooler batteries last longer, and extended battery life saves you money.
•A Divider Panel separates the computer/battery from the transformer, minimizing the transformer’s heat impact on the battery … cooler batteries last longer.
•The Brain recognizes as batteries become charged, and sends only enough power to keep the batteries well within their thermal limits, drawing only the required power and saving you money.
•A single Mode Button lets you cycle through the various settings, while the LED lights help keep track of what the power system is doing.
•Two Auxiliary Outlets on the top of the cart let you use a video projector or a printer with confidence, since the Brain will dedicate the power to those accessories when you need to use them. Accidentally overloading the circuit is minimized!
Amber  = 2 Auxiliary Outlets ONLY
1x Yellow Light comes on, all laptops charging
2x 1st Blue Turbo Light comes on. All available power diverted to Power Strip A
3x 2nd Blue Turbo Light comes on. All available power diverted to Power Strip B
4x 3rd Blue Turbo Light comes on. All available power diverted to Power Strip C
5x Amber Light comes on. All available power diverted to the
2 Auxiliary Monument Outlets ONLY – no charging
6x Reverts to Green Light indicating power in the cart
Always-On Electrical Outlet Under the Brain, accessible from the rear of the cart, is one unique Electrical Outlet, rated for 1 Amp. This outlet is for a Wireless Access Point.
The Wireless Access Point’s power cord can be routed through the cart at the side cord-pass-thru-hole, opposite the cart’s power cord. Remember, the outlet is maximum 1 Amp, only.