![]()
![]()
![]()
![]()
![]()
The Front Panel
|
| G A I N |
|
| L E V E L |
| T R E B L E |
|
| M I D D L E |
|
| B A S S |
| R E V E R B |
|
| ||
| 4 | 5 |
| 4 | 5 |
| 4 | 5 |
| 4 | 5 |
| 4 | 5 |
| 4 | 5 |
|
|
| 6 |
| 6 |
| 6 |
| 6 |
| 6 |
| 6 | O N | O N | ||||||
|
|
|
|
|
|
|
|
|
|
|
|
|
|
|
|
|
| ||
| 3 | 7 | 3 |
| 7 | 3 |
| 7 | 3 |
| 7 | 3 |
| 7 | 3 |
|
| 7 |
|
| 2 | 8 | 2 |
| 8 | 2 |
| 8 | 2 |
| 8 | 2 |
| 8 | 2 |
|
| 8 |
|
| 1 | 9 | 1 |
| 9 | 1 |
| 9 | 1 |
| 9 | 1 |
| 9 | 1 |
|
| 9 |
|
I N P U T | 0 | 1 0 |
| 0 | 1 0 |
| 0 | 1 0 |
| 0 | 1 0 |
| 0 | 1 0 |
| 0 | 1 0 | S T A N D B Y | P O W E R |
1 | 2 | 3 | 4 | 5 | 6 | 7 | 8 | 9 | 10 |
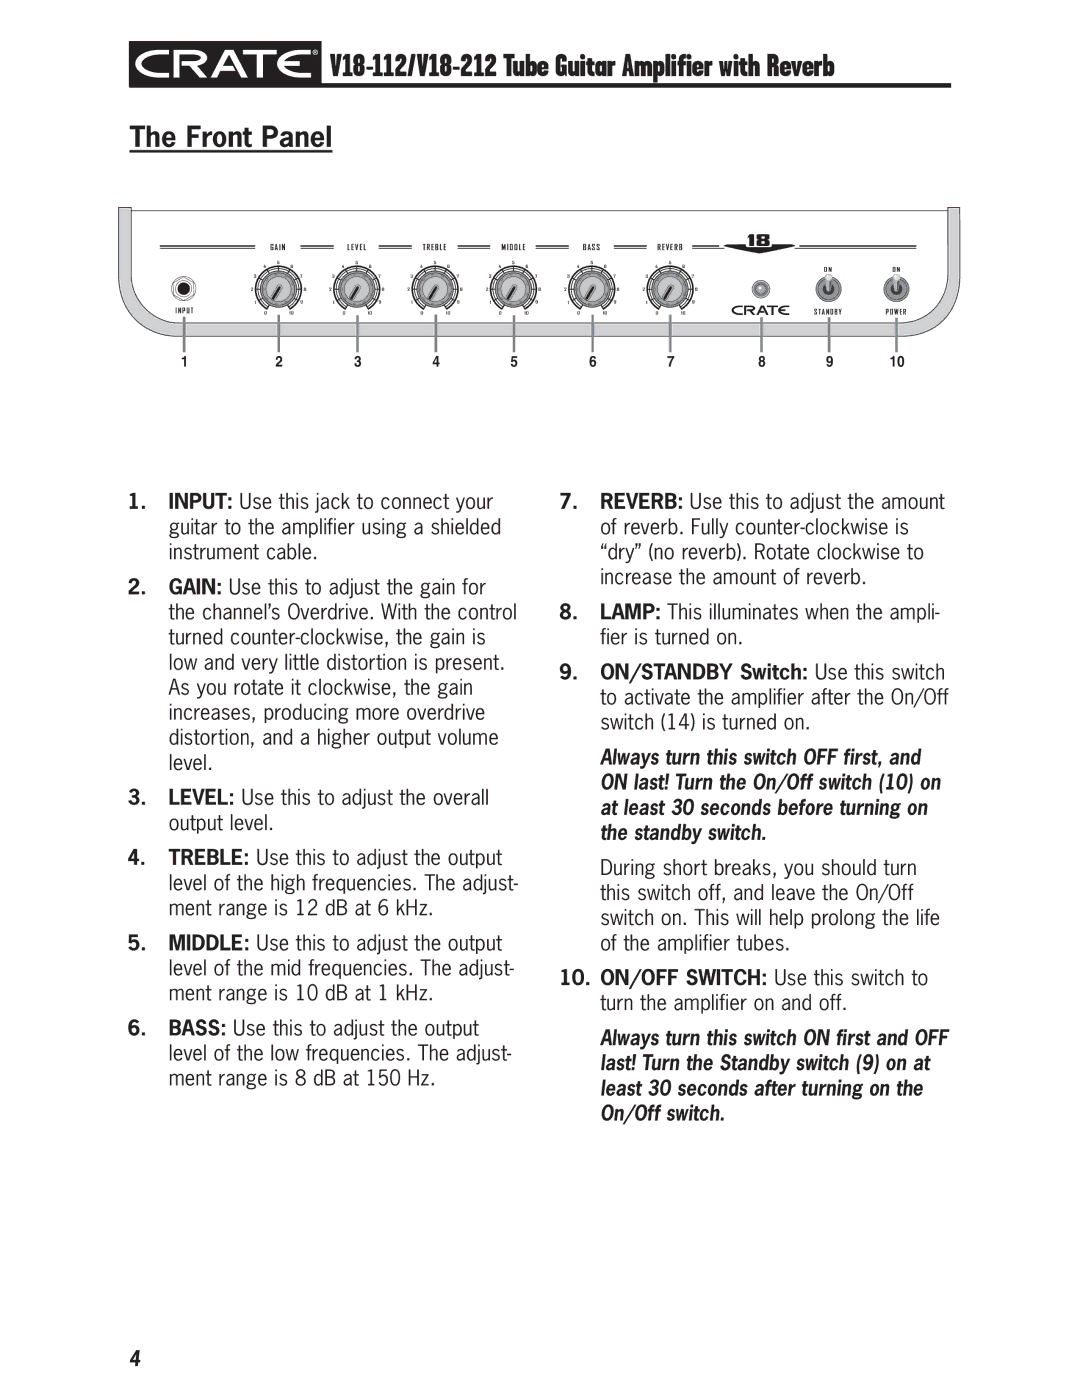
1.INPUT: Use this jack to connect your guitar to the amplifier using a shielded instrument cable.
2.GAIN: Use this to adjust the gain for the channel’s Overdrive. With the control turned
3.LEVEL: Use this to adjust the overall output level.
4.TREBLE: Use this to adjust the output level of the high frequencies. The adjust- ment range is 12 dB at 6 kHz.
5.MIDDLE: Use this to adjust the output level of the mid frequencies. The adjust- ment range is 10 dB at 1 kHz.
6.BASS: Use this to adjust the output level of the low frequencies. The adjust- ment range is 8 dB at 150 Hz.
7.REVERB: Use this to adjust the amount of reverb. Fully
8.LAMP: This illuminates when the ampli- fier is turned on.
9.ON/STANDBY Switch: Use this switch to activate the amplifier after the On/Off switch (14) is turned on.
Always turn this switch OFF first, and ON last! Turn the On/Off switch (10) on at least 30 seconds before turning on the standby switch.
During short breaks, you should turn this switch off, and leave the On/Off switch on. This will help prolong the life of the amplifier tubes.
10.ON/OFF SWITCH: Use this switch to turn the amplifier on and off.
Always turn this switch ON first and OFF last! Turn the Standby switch (9) on at least 30 seconds after turning on the On/Off switch.
4
