Installation

D ISHWASHER

Choose where you want to install your dishwasher, you can place it so that its sides or back panel are side by side with furniture or up against the wall. The dishwasher is providedwithwatersupplyanddrain hoses, which can be directed towards the left or right to facilitate appropriateinstallation.

Levelling.

Once the appliance is positioned, adjust the feet by screwing them in or out depending on how high you want it and to level it so that it is horizontal. Make sure that it is not inclined more than 2 degrees. If the applianceislevel,itwill helpensure its correct operation.

Height Adjustment

Insert the appliance into the cutout andthenadjusttheheightusingthe screws located on the front bottom part of the machine. Use a screwdriver to turn the screws in the clockwise or anti-clockwise direction to increase or decrease the height respectively.

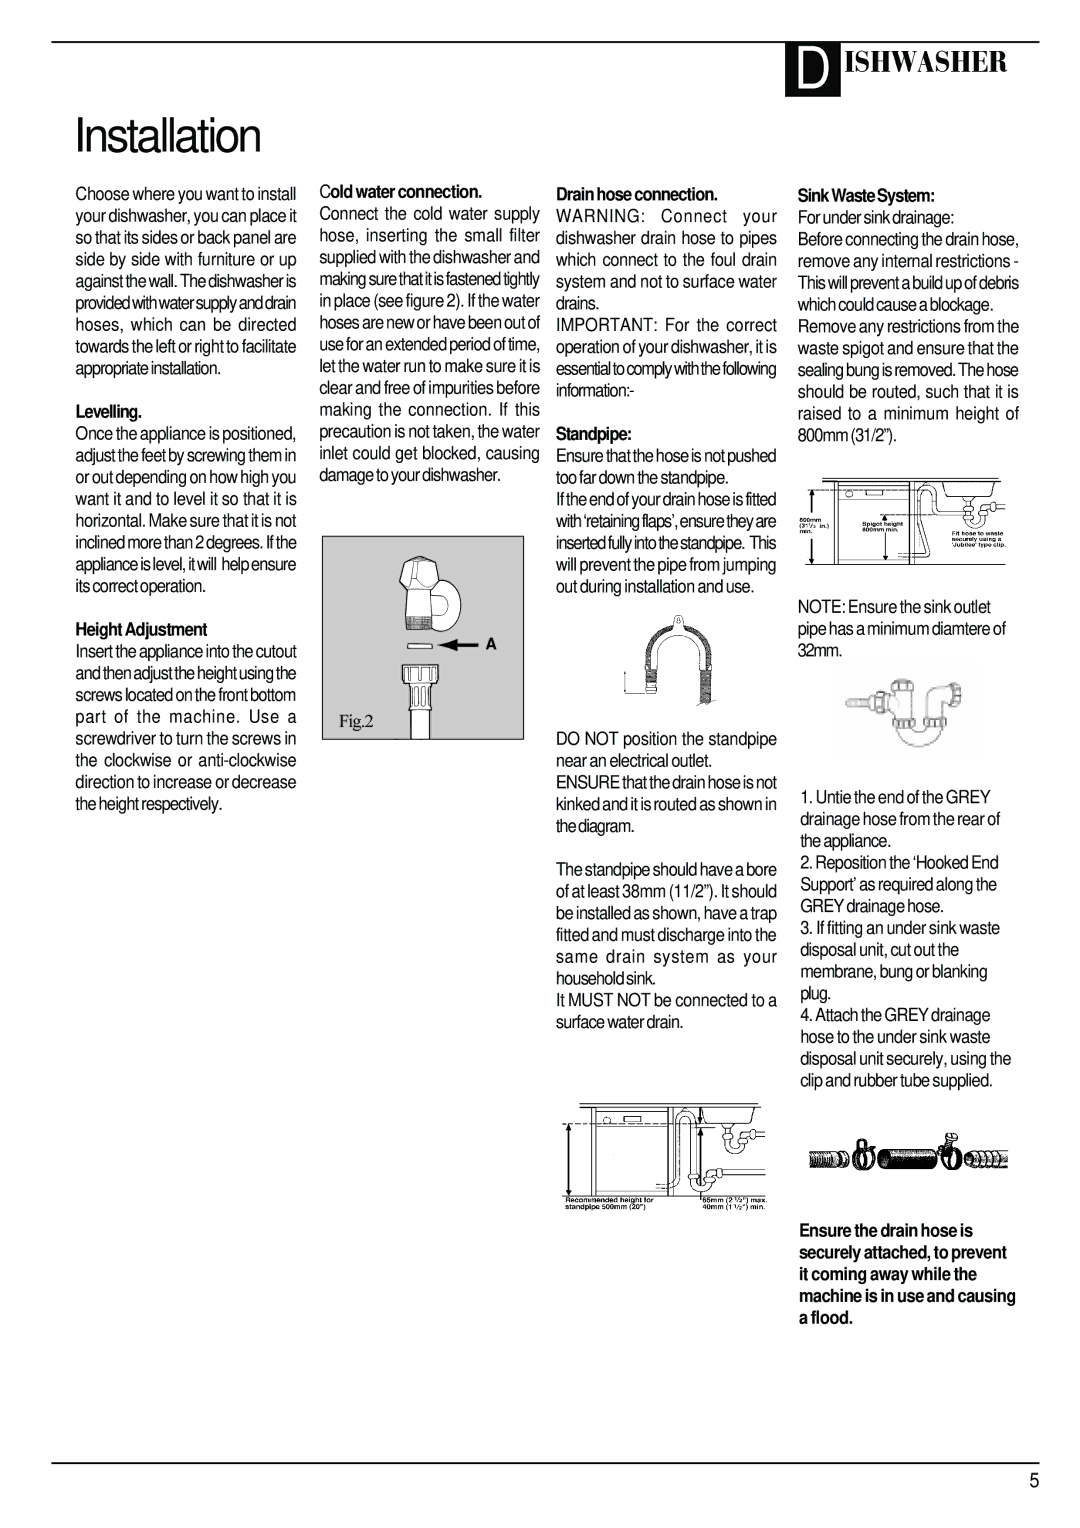
Cold water connection. Connect the cold water supply hose, inserting the small filter supplied with the dishwasher and makingsurethatitisfastenedtightly in place (see figure 2). If the water hoses are new or have been out of use for an extended period of time, let the water run to make sure it is clear and free of impurities before making the connection. If this precaution is not taken, the water inlet could get blocked, causing damage to your dishwasher.

A

Fig.2

Drain hose connection. WARNING: Connect your dishwasher drain hose to pipes which connect to the foul drain system and not to surface water drains.

IMPORTANT: For the correct operation of your dishwasher, it is essentialtocomplywiththefollowing information:-

Standpipe:

Ensure that the hose is not pushed too far down the standpipe.

If the end of your drain hose is fitted with‘retainingflaps’,ensuretheyare insertedfullyintothestandpipe. This will prevent the pipe from jumping out during installation and use.

DO NOT position the standpipe near an electrical outlet. ENSURE that the drain hose is not kinked and it is routed as shown in thediagram.

The standpipe should have a bore of at least 38mm (11/2”). It should be installed as shown, have a trap fitted and must discharge into the same drain system as your householdsink.

It MUST NOT be connected to a surface water drain.

Sink Waste System: For under sink drainage:

Before connecting the drain hose, remove any internal restrictions - This will prevent a build up of debris which could cause a blockage.

Remove any restrictions from the waste spigot and ensure that the sealingbungisremoved.Thehose should be routed, such that it is raised to a minimum height of 800mm(31/2”).

NOTE: Ensure the sink outlet pipe has a minimum diamtere of 32mm.

1.Untie the end of the GREY drainage hose from the rear of the appliance.

2.Reposition the ‘Hooked End Support’ as required along the GREY drainage hose.

3.If fitting an under sink waste disposal unit, cut out the membrane, bung or blanking plug.

4.Attach the GREY drainage hose to the under sink waste disposal unit securely, using the clip and rubber tube supplied.

Ensure the drain hose is securely attached, to prevent it coming away while the machine is in use and causing a flood.

5

Page 5
Image 5
Creda IDI60 manual Levelling, Height Adjustment, Standpipe

IDI60 specifications

The Creda IDI60 is a versatile and efficient electric cooker designed to meet the needs of modern kitchens. This appliance combines both practicality and cutting-edge technology, making it a popular choice for home cooks and professional chefs alike. The IDI60 stands out for its sleek design, user-friendly interface, and robust performance.

One of the main features of the Creda IDI60 is its powerful electric cooktop. It comes equipped with multiple zoned cooking areas, featuring rapid-heating elements that ensure quick and even cooking results. The cooktop includes both standard and high-speed induction zones, allowing users to switch between traditional cooking and faster induction heat, which is known for its efficiency.

The oven within the IDI60 is another highlight of this cooker. With a substantial capacity, it offers enough space to accommodate large meals, whether baking, roasting, or grilling. The oven is equipped with advanced heating technologies, including fan assistance, which provides even heat distribution, significantly reducing cooking times and improving the quality of baked goods.

Another important characteristic of the Creda IDI60 is its user-friendly control panel. The intuitive interface allows cooks to adjust settings with ease. Digital timers, temperature controls, and pre-set cooking functions provide added convenience, making it simple to achieve perfect results.

Safety is also a key aspect of the IDI60. It includes features such as auto shut-off, residual heat indicators, and child safety locks, ensuring peace of mind for households with children. The appliance is designed with practicality in mind, featuring easy-to-clean surfaces and removable components that facilitate maintenance and upkeep.

The Creda IDI60 also emphasizes energy efficiency. With programmable settings and energy-saving features, it helps reduce electricity consumption without sacrificing performance. This not only benefits the environment but also helps consumers save on energy bills.

In conclusion, the Creda IDI60 electric cooker is a blend of innovation and functionality, making it an excellent addition to any kitchen. Its powerful cooktop, spacious oven, user-friendly controls, and safety features position it as an ideal choice for anyone looking to elevate their cooking experience. Whether you're an experienced chef or a culinary novice, the IDI60 promises to deliver exceptional performance and reliability in your cooking endeavors.