ELECTRICALSYSTEM

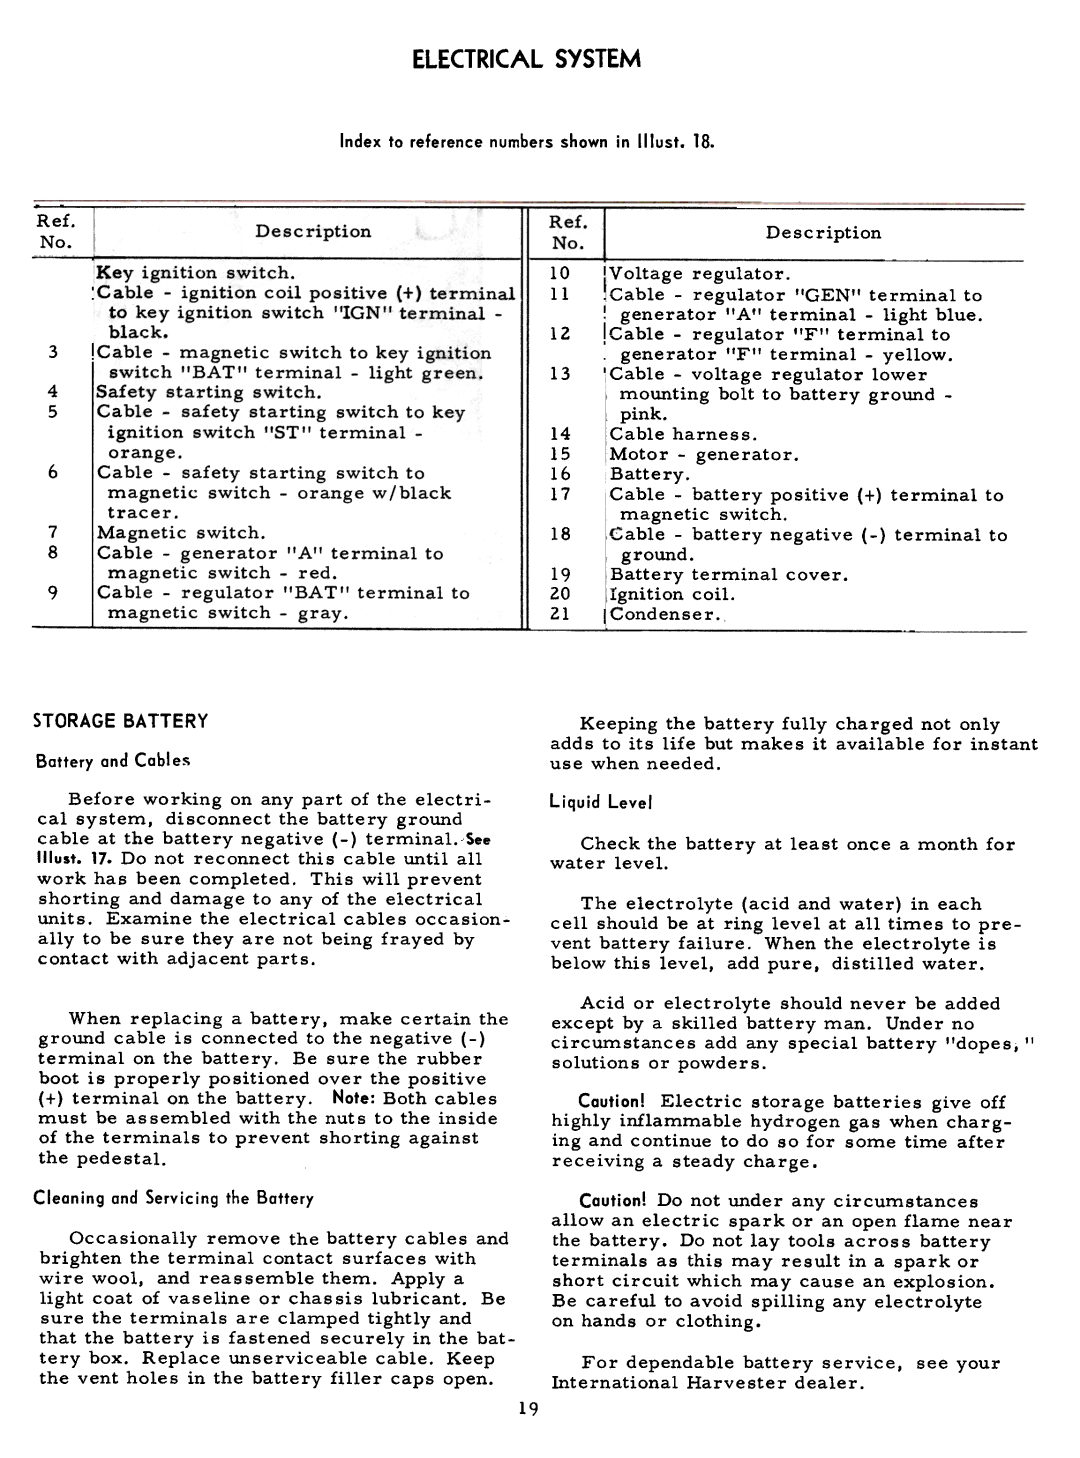
Index to reference numbers shown in Illust. 18.

Ref.

No.

3

4

5

6

7

8

9

Description

Key ignition switch.

Cable -ignition coil positive (+) terminal to key ignition switch "IGN" terminal -

black.

Cable -magnetic switch to key ignition

switch "BAT" terminal -light green. Safety starting switch.

Cable -safety starting switch to key ignition switch "ST" terminal -

orange.

Cable -safety starting switch to magnetic switch -orange w/black

tracer.

Magnetic switch.

Cable -generator "A" terminal to magnetic switch -red.

Cable -regulator "BAT" terminal to magnetic switch -gray.

---

Ref.

No.

10

11

12

13

14

15

16

17

18

19

20

21


Description


Voltage

regulator.


Cable

-regulator

"GENtl

terminal

to

generator

"All

terminal

-light

blue.

Cable

-regulator

tIF" terminal

to


generator

t'F"

terminal

-yellow.


Cable

-voltage

regulator

lower


mounting

bolt to battery ground -


pink.


Cable

harness.


Motor

-generator.


Battery.

Cable -battery positive (+) terminal to magnetic switch.

"';able -battery negative (-) terminal to

ground.

Battery terminal cover. ignition coil.Ivondenser.

STORAGEBATTERY

Battery and Cable$

Before working on any part of the electri- cal system, disconnect the battery ground

cable at the battery negative (-) terminal. See Illust. 17. Do not reconnect this cable until all

work has been completed. This will prevent shorting and damage to any of the electrical

units. Examine the electrical cables occasion- ally to be sure they are not being frayed by contact with adjacent parts.

When replacing a battery, make certain the ground cable is connected to the negative (-) terminal on the battery. Be sure the rubber boot is properly positioned over the positive

(+)terminal on the battery. Note: Both cables must be assembled with the nuts to the inside

of the terminals to prevent shorting against the pedestal.

Cleaning and Servicing the Battery

Occasionally remove the battery cables and brighten the terminal contact surfaces with wire wool, and reassemble them. Apply a

light coat of vaseline or chassis lubricant. Be

sure the terminals are clamped tightly and

that the battery is fastened securely in the bat-

tery box. Replace unserviceable cable. Keep the vent holes in the battery filler caps open.

Keeping the battery fully charged not only

adds to its life but makes it available for instant use when needed.

Liquid Level

Check the battery at least once a month for water level.

The electrolyte (acid and water) in each cell should be at ring level at all times to pre-

vent battery failure. When the electrolyte is

below this level, add pure, distilled water.

Acid or electrolyte should never be added

except by a skilled battery man. Under no

circumstances add any special battery !'dopes; 11 solutions or powders.

Caution! Electric storage batteries give off

highly inflammable hydrogen gas when charg-

ing and continue to do so for some time after

receiving a steady charge.

Caution! Do not under any circumstances

allow an electric spark or an open flame near

the battery. Do not lay tools across battery

terminals as this may result in a spark or

short circuit which may cause an explosion.

Be careful to avoid spilling any electrolyte on hands or clothing.

For dependable battery service, see your

International Harvester dealer.

19

Page 21
Image 21
Cub Cadet 71 manual Storagebattery

71 specifications

The Cub Cadet 71 is a classic garden tractor that has earned a place in the hearts of gardening enthusiasts and landscapers since its introduction in the 1970s. Renowned for its robust design and exceptional performance, the Cub Cadet 71 embodies reliability and efficiency in outdoor tasks.

At the heart of the Cub Cadet 71 is its powerful Kohler K161 engine, a proud testament to American engineering. This 7-horsepower engine provides ample power for mowing, tilling, and a variety of other gardening tasks. Its air-cooled, single-cylinder design ensures longevity and ease of maintenance, allowing users to focus on their gardening rather than frequent repairs.

One of the standout features of the Cub Cadet 71 is its cutting deck. With a 38-inch width, it effectively maneuvers through tight spaces while still providing a wide enough cutting path for larger areas. The deck is designed for a clean cut, featuring durable stamped steel construction that enhances its longevity. The height adjustment lever allows users to customize cutting heights according to their grass type and seasonal growth, ensuring optimal results.

The innovative gear drive transmission is another highlight of the Cub Cadet 71. This system provides seamless shifting between gears, allowing for better control when navigating slopes or tackling uneven terrain. The tractor also features a comfortable operator's platform with ergonomic controls, making it easy to operate for extended periods.

For enthusiasts looking to expand the capabilities of their Cub Cadet 71, various attachments are available. From snow throwers to front-end loaders, these accessories enhance the tractor’s functionality year-round, making it a versatile tool in any homeowner’s arsenal.

Safety is a key consideration in the design of the Cub Cadet 71. The tractor features a sturdy frame and low center of gravity, providing stability while on slopes. Additionally, the easy-to-use pedal system ensures that operators can maintain full control, reducing the risk of accidents.

In conclusion, the Cub Cadet 71 is not just a garden tractor; it’s a reliable partner for anyone passionate about maintaining their yard. With its powerful engine, versatile features, and robust design, it remains a beloved choice for those looking to enhance their gardening experience. Whether you’re a weekend warrior or a seasoned expert, the Cub Cadet 71 is sure to meet your demands with uncompromising performance.