Installation Instructions

Install Custom Panels

Panel Installation

Before you begin installing panels, refer to the “Custom Panel Specifications” for overlay models and verify that you are working with the panel design called for in your installation. If you have chosen the stainless steel design, your refrigerator has been shipped complete with a finished stainless steel front. It will not be necessary to install panels or handle hardware.

Be aware that panels used on refrigerators with the overlay design have the potential for coming into contact with adjacent cabinets and/or countertops when the refrigerator doors are opened. You will want to be mindful of the surrounding cabinetry and space limitations when planning for decorator panels. Refer to the 90° door stop information on page 6.

IMPORTANT: The weight of each panel cannot exceed 50lbs (23kg).The grille panel weight cannot exceed 10lbs (5kg).

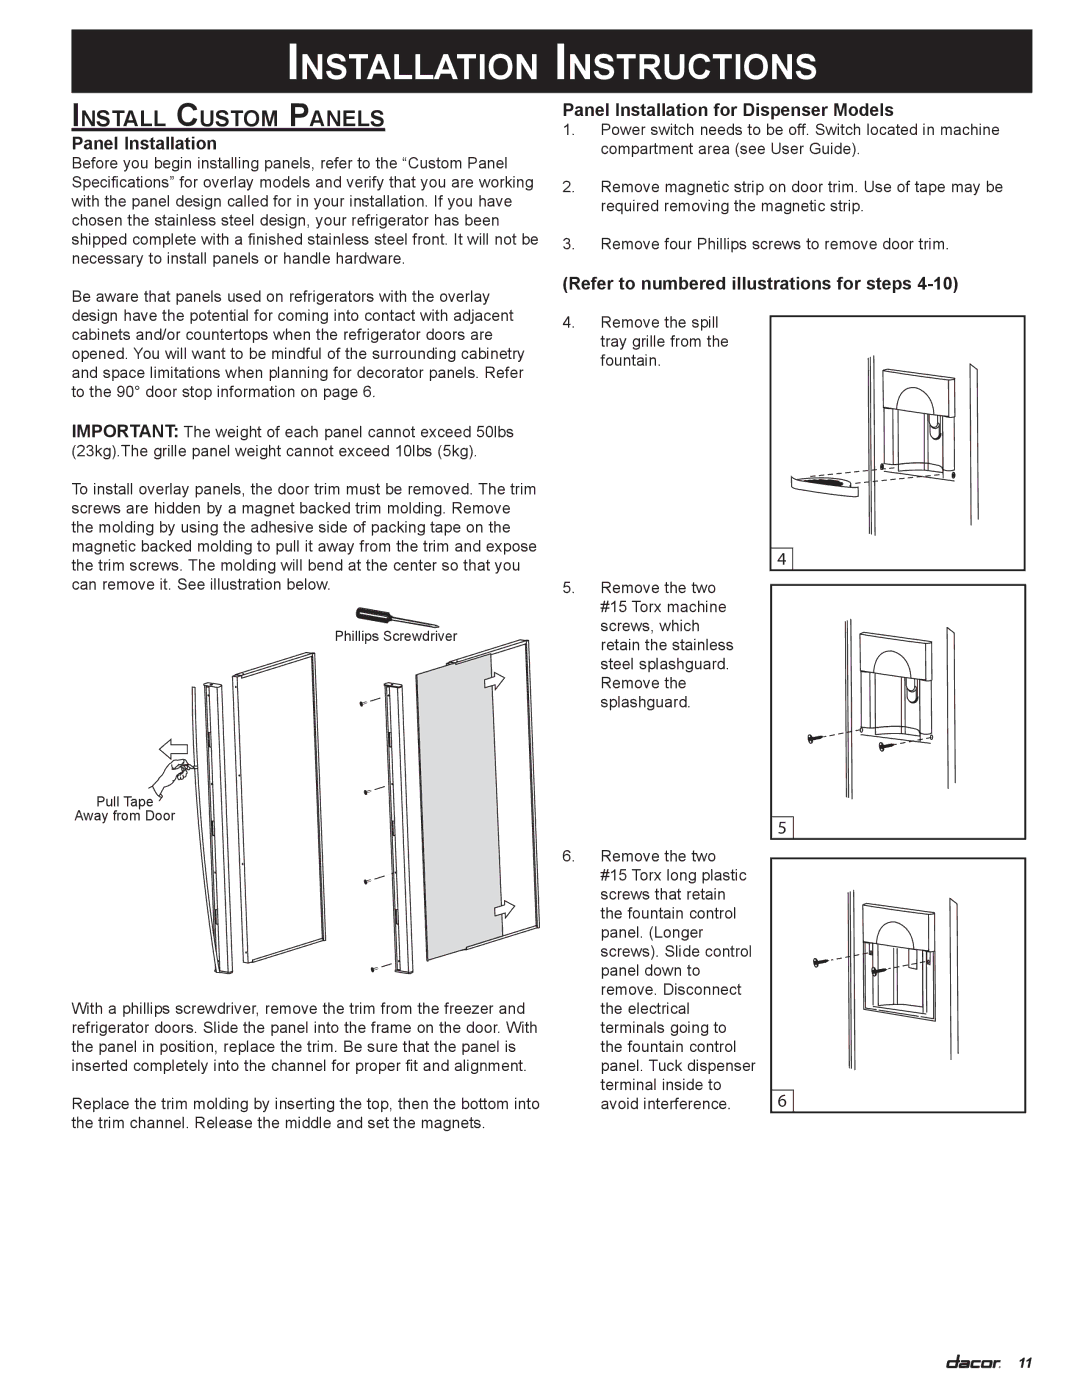
To install overlay panels, the door trim must be removed. The trim screws are hidden by a magnet backed trim molding. Remove the molding by using the adhesive side of packing tape on the magnetic backed molding to pull it away from the trim and expose the trim screws. The molding will bend at the center so that you can remove it. See illustration below.

Phillips Screwdriver

Pull Tape

Away from Door

With a phillips screwdriver, remove the trim from the freezer and refrigerator doors. Slide the panel into the frame on the door. With the panel in position, replace the trim. Be sure that the panel is inserted completely into the channel for proper fit and alignment.

Replace the trim molding by inserting the top, then the bottom into the trim channel. Release the middle and set the magnets.

Panel Installation for Dispenser Models

1.Power switch needs to be off. Switch located in machine compartment area (see User Guide).

2.Remove magnetic strip on door trim. Use of tape may be required removing the magnetic strip.

3.Remove four Phillips screws to remove door trim.

(Refer to numbered illustrations for steps 4-10)

4.Remove the spill tray grille from the fountain.

4

5.Remove the two #15 Torx machine screws, which

retain the stainless steel splashguard. Remove the splashguard.

5

6.

Remove the two


#15 Torx long plastic


screws that retain


the fountain control


panel. (Longer


screws). Slide control


panel down to


remove. Disconnect


the electrical


terminals going to


the fountain control


panel. Tuck dispenser


terminal inside to


avoid interference.

6


11

Page 13
Image 13
Dacor 100500 Install Custom Panels, Panel Installation for Dispenser Models, Refer to numbered illustrations for steps

100500 specifications

Dacor 100500 is a leading-edge product that exemplifies innovation and performance in the world of kitchen appliances. Known for its premium quality and stylish design, the Dacor 100500 stands out as a reliable and high-performing option for home chefs and culinary enthusiasts alike.

One of the main features of the Dacor 100500 is its advanced cooking technology, characterized by the use of a Dual-Fuel Convection system. This system combines the precise temperature control of gas cooking with the consistent heat circulation of an electric convection oven. As a result, users enjoy perfectly cooked meals every time, whether they are baking, roasting, or broiling. This makes the Dacor 100500 exceptionally versatile, catering to a wide array of cooking styles.

Another notable aspect of the Dacor 100500 is its intuitive interface. The appliance features a user-friendly touchscreen control panel that allows for easy navigation and control over various cooking functions. With this smart technology, users can select pre-programmed cooking modes, set timers, and adjust settings with ease, making the cooking experience more enjoyable and efficient.

Not only does the Dacor 100500 perform well functionally, but it also boasts an elegant design that complements any modern kitchen. The sleek stainless steel finish and seamless integration into cabinetry add a touch of sophistication. Additionally, the appliance is equipped with LED lighting, providing better visibility inside the oven while enhancing its overall aesthetic appeal.

Energy efficiency is another key characteristic of the Dacor 100500. It has been engineered to consume less energy without compromising performance. This makes it an eco-friendly choice for those looking to reduce their environmental footprint while enjoying exceptional cooking capabilities.

Safety features are also at the forefront of the Dacor 100500 design. It includes a child lock function, ensuring that little hands cannot inadvertently activate the appliance. Furthermore, the oven's cool-to-touch exterior minimizes the risk of burns, making it a safer option for families.

In summary, the Dacor 100500 is an outstanding appliance that integrates innovative cooking technology, elegant design, energy efficiency, and user-focused features. It is an ideal choice for those who value performance and style in the kitchen, ensuring that every culinary endeavor is met with success. Whether you're a seasoned chef or a novice home cook, the Dacor 100500 promises to enhance your cooking experience on multiple levels.