W . d e l l . c o m s u p p o r t . d e l l . c o m
Parallel connector Diagnostic lights Mouse connector
Network adapter Video connector
See the setup diagram
Abbreviations and Acronyms
Contents
Problems writing to a CD-RW drive
Mail, Modem, and Internet Problems
Program is designed for an earlier Microsoft
When to Use the Dell Diagnostics
If the screen is difficult to read
Restoring the Computer to an Earlier Operating State
Removing the Front-Panel Insert
Front and Back View of the Computer
Reattaching the Front Door and Hinge Arms
Adding or Replacing the AGP Card
106
Limited Warranty for Dell-Branded Hardware
Limited Warranty Terms for Dell-Branded Hardware
102
Contents
Safety Instructions
Safety General
Safety When Working Inside Your Computer
Safety When Using Your Computer
Safety Protecting Against Electrostatic Discharge
Safety Ergonomic Computing Habits
Safety Battery Disposal
Safety Instructions
Finding Information for Your Computer
Microsoft Windows License Label
Page
Finding Information for Your Computer
Setting Up and Using Your Computer
Printer Cable
Setting Up a Printer
Connecting a Parallel Printer
Setting Up and Using Your Computer
Connecting a USB Printer
Parallel connector on computer
Screws Clips Parallel printer Cable Notches
Transferring Information to a New Computer
USB connector on computer USB printer cable
Setting Up and Using Your Computer
Setting Up a Home and Office Network
Connecting to a Network Adapter
Network Setup Wizard
Setting Up Your Internet Connection
Connecting to the Internet
Setting Up and Using Your Computer
Copying CDs and DVDs
How to Copy a CD or DVD
Using Blank CD-Rs and CD-RWs
Hyper-Threading
Helpful Tips
Turning Off Your Computer
Setting Up and Using Your Computer
Solving Problems
Solving Problems
Finding Solutions
Solving Problems
Finding Help Information
Battery Problems
Floppy drive problems
Drive Problems
Problems writing to a CD-RW drive
CD drive problems
Mail, Modem, and Internet Problems
DVD drive problems
Hard drive problems
Verify That the Modem is Communicating with Windows
Error Messages
General Problems
Computer stops responding
Program stops responding
Other software problems
Program crashes repeatedly
Solid blue screen appears
General hardware problems
Other technical problems
Contact the Ieee 1394 device manufacturer Solving Problems
Ieee 1394 Device Problems
Mouse Problems
Keyboard Problems
Check the Mouse Cable
Speed light
Network Problems
Power Problems
Activity light
Page
Printer Problems
Scanner Problems
No sound from speakers
Sound and Speaker Problems
No sound from headphones
Video and Monitor Problems
If the screen is blank
If the screen is difficult to read
Adjust the Windows Display Settings
Solving Problems
Advanced Troubleshooting
Diagnostic Lights
Card see page 82 and then
Reinstall it see page 91,
If the problem persists or
Has occurred
Or reinstalled all modules
Faulty memory connector
See page 87, reinstall one
Identified a faulty connector
Drive to the system board
Hard drive, CD drive, and DVD
Dell Diagnostics
When to Use the Dell Diagnostics
Starting the Dell Diagnostics
Advanced Troubleshooting
Extended Test
Possibility of tracing the problem quickly
Based on the symptom of the problem you are having
Option Function Express Test
What Is a Driver?
Drivers
Identifying Drivers
Reinstalling Drivers
Creating a Restore Point
Using Windows System Restore
Restoring the Computer to an Earlier Operating State
Undoing the Last System Restore
Resolving Software and Hardware Incompatibilities
Reinstalling Microsoft Windows XP
Reinstalling Windows XP
Before You Begin
Advanced Troubleshooting
When the Welcome to Microsoft screen appears, click Next
Adding Parts
Front and Back View of the Computer
Front View
On computers with an optional floppy drive Adding Parts
Hard drive light
Headphone connector
CD or DVD drive
Drive
Back View
Code. For more information, see
Printer, plug it into a USB connector
Mouse, plug it into a USB connector
Connector
Voice or musical input into a sound or telephony program
Microphone connector
USB keyboard, plug it into a USB connector
Occasionally, such as joysticks or cameras
Reattaching the Front Door and Hinge Arms
Reattaching the Hinge Arms
Front-panel insert
Pivot bar Hinge arms in horizontal position
View slots
Reattaching the Front Door
Opening the Computer Cover
Arrow Release button Back of computer Adding Parts
Looking Inside Your Computer
System Board
Installing a Card
Installing and Removing Cards
Retention arm Lever
Filler bracket Card Edge connector
Bracket within slot Adding Parts
Not fully seated card Fully seated card
Retention arm Alignment guide Alignment bar Filler bracket
Removing a Card
DDR Memory Overview
Adding Memory
Memory Installation Guidelines
Addressing Memory with 4-GB Configurations
Installing Memory
To microprocessor
Securing clips Connector Adding Parts
Notch Memory module Cutouts Crossbar
Removing an AGP Card
Adding or Replacing the AGP Card
AGP card Card clip lever Slot connector
Installing an AGP Card
Notch Lever Tab Card clip AGP connector
PCI connector
Adding a Second Hard Drive
First hard drive in lower bay Hard drive bay
Rail tabs
First hard-drive cable primary boot drive
Power cable
Adding a Floppy Drive
Insert release tabs Floppy-drive bay
Removing the Front-Panel Insert
Insert frame for floppy-drive bay
Floppy drive light
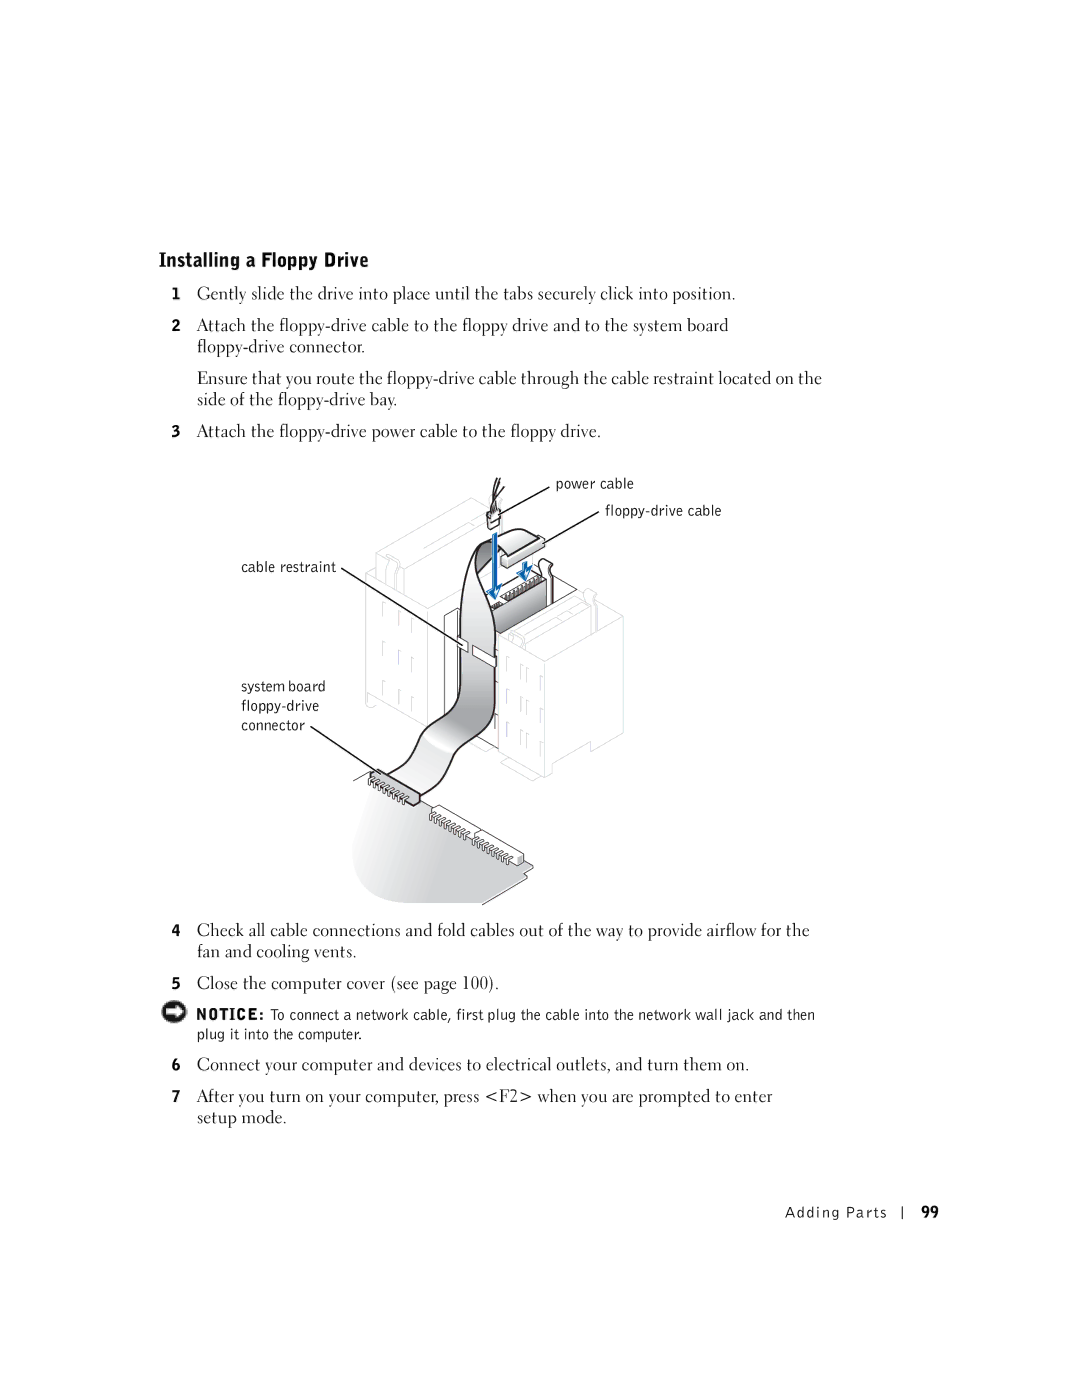
Power cable Floppy-drive cable Cable restraint
Installing a Floppy Drive
100 Adding Parts
Closing the Computer Cover
P e n d i
System clock Or 800-MHz data rate Video Type
Specifications
Write-back Sram
Integrated PCI Network Interface
PCI
Audio
USB 2.0-compliant connectors
Solid green for power-on states
Two front-panel and six back-panel
Page
106 Appendix
Standard Settings
Appendix 107
Viewing Settings
System Setup Screens
Boot Sequence
108 Appendix
Appendix 109
Clearing Forgotten Passwords
110 Appendix
Replacing the Battery
Appendix 111
Battery Battery socket Battery
112 Appendix
Definition of Dell-Installed Software and Peripherals
Dell Technical Support Policy U.S. Only
Definition of Third-Party Software and Peripherals
Customer Care Fax
International Access Code Tech Support and Customer Care
General Support
Country Code Sales City Code Tech Support Fax
Preferred Accounts Division PAD
Switchboard
Mail Australia autechsupport@dell.com
City Code Government and Business
City Code Customer Care Fax
Country Code Customer Service Penang, Malaysia
Spare Parts Sales & Extended Service Sales
Country Code Tech Support Fax
Dell Precision Technical Support servers and storage
Technical Support Dimension and Inspiron
Switches, routers, and so on Customer Experience
Technical Support OptiPlex, Latitude,
Fax Switchboard Home/Small Business
Switchboard Relational
Fax Switchboard Relational
Switchboard Home/Small Business
Fax calls from outside of France
International Access Code Country Code
City Codes 1 Technical Support Customer Care Switchboard
Country City
Large Accounts Customer Care
City Code Home/Small Business Customer Care
Global Segment Customer Care
Preferred Accounts Customer Care
Customer Advocacy
PowerConnect, and PowerVault
Dell Precision
Gold Queue EEC Hotline
General Support dial from within Jamaica only Appendix 121
City Code Technical Support
International Access Code Sales
International Access Code Technical Support servers
City Code Technical Support Dimension and Inspiron
Technical Support outside of Japan Dimension
City Code Customer Service
Customer Service Austin, Texas, U.S.A
Fax Technical Support and Customer Service
Switchboard Brussels, Belgium
Main
International Access Code Country Code Sales
Switchboard Fax
Customer Technical Support
Appendix 125
Fax Switchboard
Customer Service Fax
Reception Desk Fax
Customer Technical Support, Customer Service
International Access Code Country Code Technical Support
International Access Code Customer Service Penang, Malaysia
International Access Code Mail dellzasupport@dell.com
Employee Purchase Program EPP Support
Fax Technical Support
Appendix 127
Technical Support portable and desktop
Technical Support Corporate
Customer Care Home and Small Business
Customer Care Corporate
Customer Care Central Government Customer Care
Global Accounts Customer Care
Home and Small Business Customer Care
Preferred Accounts 500-5000 employees
Financial Services Dell Preferred Accounts DPA
Automated Order-Status Service
DellNet Service and Support
Financial Services lease/loans
Appendix 131
Regulatory Notices
Model number
NOM Information Mexico Only
Exporter Dell Inc One Dell Way Round Rock, TX Importer
Ship to Dell Computer de México, S.A. de C.V
Appendix 133
Limited Warranties
134 Appendix
How long does this limited warranty last?
Appendix 135
What will Dell do?
136 Appendix
May I transfer the limited warranty?
Appendix 137
138 Appendix
Appendix 139
Dell Software and Peripherals Canada Only
140 Appendix
Exclusions
Appendix 141
Intel’s Three Year Limited Warranty
What are ’Errata’?
142 Appendix
Index 143
D ex
144 Index
Help files accessing
Index 145
146 Index
Wizard, 39 reinstalling, 66 scanner, 48 System Restore