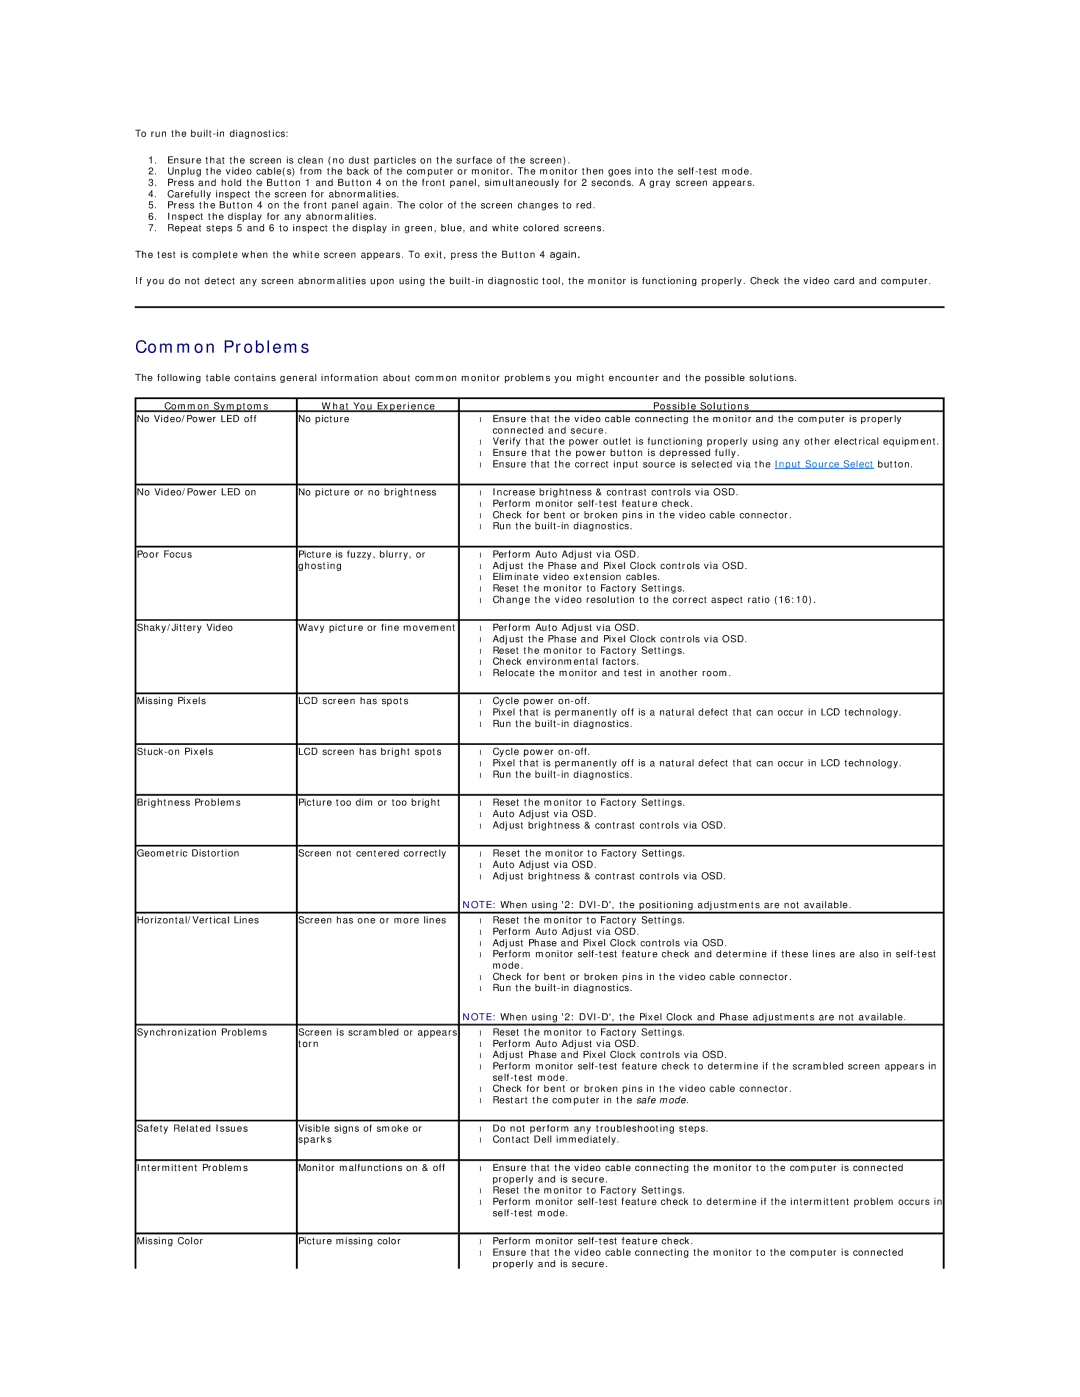
To run the built-in diagnostics:

1.Ensure that the screen is clean (no dust particles on the surface of the screen).

2.Unplug the video cable(s) from the back of the computer or monitor. The monitor then goes into the self-test mode.

3.Press and hold the Button 1 and Button 4 on the front panel, simultaneously for 2 seconds. A gray screen appears.

4.Carefully inspect the screen for abnormalities.

5.Press the Button 4 on the front panel again. The color of the screen changes to red.

6.Inspect the display for any abnormalities.

7.Repeat steps 5 and 6 to inspect the display in green, blue, and white colored screens.

The test is complete when the white screen appears. To exit, press the Button 4 again.

If you do not detect any screen abnormalities upon using the built-in diagnostic tool, the monitor is functioning properly. Check the video card and computer.

Common Problems

The following table contains general information about common monitor problems you might encounter and the possible solutions.

Common Symptoms

What You Experience


Possible Solutions

No Video/Power LED off

No picture

Ensure that the video cable connecting the monitor and the computer is properly


connected and secure.


Verify that the power outlet is functioning properly using any other electrical equipment.


Ensure that the power button is depressed fully.


Ensure that the correct input source is selected via the Input Source Select button.


No Video/Power LED on

No picture or no brightness

Increase brightness & contrast controls via OSD.


Perform monitor self-test feature check.


Check for bent or broken pins in the video cable connector.


Run the built-in diagnostics.


Poor Focus

Picture is fuzzy, blurry, or

Perform Auto Adjust via OSD.


ghosting

Adjust the Phase and Pixel Clock controls via OSD.


Eliminate video extension cables.


Reset the monitor to Factory Settings.


Change the video resolution to the correct aspect ratio (16:10).


Shaky/Jittery Video

Wavy picture or fine movement

Perform Auto Adjust via OSD.


Adjust the Phase and Pixel Clock controls via OSD.


Reset the monitor to Factory Settings.


Check environmental factors.


Relocate the monitor and test in another room.


Missing Pixels

LCD screen has spots

Cycle power on-off.


Pixel that is permanently off is a natural defect that can occur in LCD technology.


Run the built-in diagnostics.


Stuck-on Pixels

LCD screen has bright spots

Cycle power on-off.


Pixel that is permanently off is a natural defect that can occur in LCD technology.


Run the built-in diagnostics.


Brightness Problems

Picture too dim or too bright

Reset the monitor to Factory Settings.


Auto Adjust via OSD.


Adjust brightness & contrast controls via OSD.


Geometric Distortion

Screen not centered correctly

Reset the monitor to Factory Settings.


Auto Adjust via OSD.


Adjust brightness & contrast controls via OSD.


NOTE: When using '2: DVI-D', the positioning adjustments are not available.

Horizontal/Vertical Lines

Screen has one or more lines

Reset the monitor to Factory Settings.


Perform Auto Adjust via OSD.


Adjust Phase and Pixel Clock controls via OSD.


Perform monitor self-test feature check and determine if these lines are also in self-test


mode.


Check for bent or broken pins in the video cable connector.


Run the built-in diagnostics.


NOTE: When using '2: DVI-D', the Pixel Clock and Phase adjustments are not available.

Synchronization Problems

Screen is scrambled or appears

Reset the monitor to Factory Settings.


torn

Perform Auto Adjust via OSD.


Adjust Phase and Pixel Clock controls via OSD.


Perform monitor self-test feature check to determine if the scrambled screen appears in


self-test mode.


Check for bent or broken pins in the video cable connector.


Restart the computer in the safe mode.


Safety Related Issues

Visible signs of smoke or

Do not perform any troubleshooting steps.


sparks

Contact Dell immediately.


Intermittent Problems

Monitor malfunctions on & off

Ensure that the video cable connecting the monitor to the computer is connected


properly and is secure.


Reset the monitor to Factory Settings.


Perform monitor self-test feature check to determine if the intermittent problem occurs in


self-test mode.


Missing Color

Picture missing color

Perform monitor self-test feature check.


Ensure that the video cable connecting the monitor to the computer is connected


properly and is secure.

Page 30
Image 30
Dell P2210T, P2210F appendix Common Problems, Common Symptoms What You Experience Possible Solutions

P2210T, P2210F, P2210 specifications

The Dell P2210F, P2210, and P2210T represent a series of well-crafted displays, ideal for professional environments where reliable performance and dynamic viewing experiences are essential. Each model in this line features a 22-inch screen with a resolution of 1680 x 1050 pixels, providing ample workspace and vibrant imagery for various tasks such as graphic design, data analysis, and general office use.

One of the standout features across these models is their exceptional color accuracy and sharpness. The displays utilize a high-quality IPS panel technology, which ensures excellent viewing angles and color consistency, making them suitable for collaborative work settings. The P2210F and P2210T, in particular, are designed to cater to professionals who demand precision in their visual outputs, ensuring that colors remain true whether viewed head-on or from the side.

Ergonomics is another strong point of the P2210 series. Each monitor is equipped with a fully adjustable stand that allows users to tilt, swivel, and adjust the height, facilitating a comfortable viewing experience. This adaptability helps reduce strain during long hours of use, aligned with the growing emphasis on user wellness in work environments.

Connectivity options are generous across the series. With multiple inputs including DisplayPort, DVI, VGA, and USB ports, users can seamlessly connect their devices without the hassle of swapping cables. This flexibility is paramount in modern workplaces that often rely on multiple computer systems and formats.

Additionally, the P2210T model includes touch-screen capabilities, adding a layer of interactivity that is particularly useful in presentations and educational settings. This feature enhances user engagement, allowing for direct manipulation of content displayed on the screen.

In terms of energy efficiency, all three monitors are designed to be environmentally friendly, featuring low-energy consumption technologies, which help reduce overall operating costs. They meet various global energy efficiency standards, making them a responsible choice for organizations looking to adhere to sustainability practices.

To sum up, the Dell P2210F, P2210, and P2210T monitors are versatile displays that cater to a range of professional needs. With their impressive visuals, ergonomic designs, connectivity options, interactive capabilities, and energy-saving features, these monitors are an excellent investment for any business or individual seeking dependable performance and quality.