4

A.

B.

C.


D.


1

1


2


3


2


3


2


1


1


2

F.

G.

4

5

H.


3


2


1

4


1


5


2


2

E.

1

2

3

6

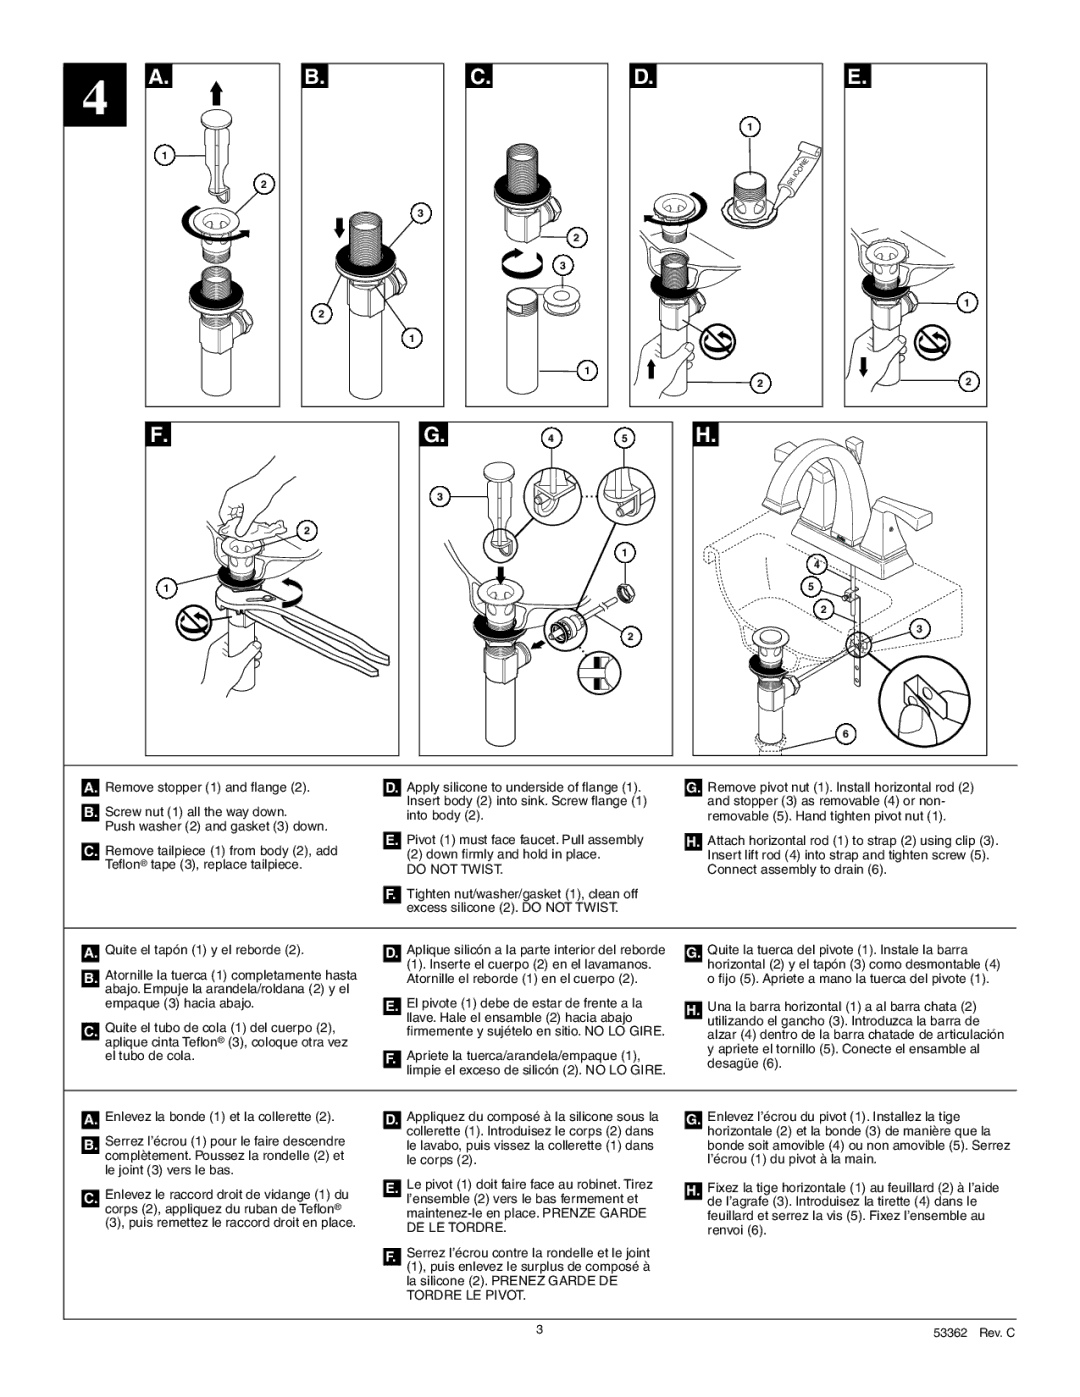
A.Remove stopper (1) and flange (2).

B.Screw nut (1) all the way down.

Push washer (2) and gasket (3) down.

C.Remove tailpiece (1) from body (2), add Teflon® tape (3), replace tailpiece.

D.Apply silicone to underside of flange (1).

Insert body (2) into sink. Screw flange (1) into body (2).

E.Pivot (1) must face faucet. Pull assembly

(2) down firmly and hold in place.

DO NOT TWIST.

F.Tighten nut/washer/gasket (1), clean off excess silicone (2). DO NOT TWIST.

G.Remove pivot nut (1). Install horizontal rod (2) and stopper (3) as removable (4) or non- removable (5). Hand tighten pivot nut (1).

H.Attach horizontal rod (1) to strap (2) using clip (3).

Insert lift rod (4) into strap and tighten screw (5).

Connect assembly to drain (6).

A.Quite el tapón (1) y el reborde (2).

B.Atornille la tuerca (1) completamente hasta abajo. Empuje la arandela/roldana (2) y el empaque (3) hacia abajo.

C.Quite el tubo de cola (1) del cuerpo (2), aplique cinta Teflon® (3), coloque otra vez el tubo de cola.

D.Aplique silicón a la parte interior del reborde

(1). Inserte el cuerpo (2) en el lavamanos.

Atornille el reborde (1) en el cuerpo (2).

E.El pivote (1) debe de estar de frente a la llave. Hale el ensamble (2) hacia abajo firmemente y sujételo en sitio. NO LO GIRE.

F.Apriete la tuerca/arandela/empaque (1), limpie el exceso de silicón (2). NO LO GIRE.

G.Quite la tuerca del pivote (1). Instale la barra horizontal (2) y el tapón (3) como desmontable (4) o fijo (5). Apriete a mano la tuerca del pivote (1).

H.Una la barra horizontal (1) a al barra chata (2) utilizando el gancho (3). Introduzca la barra de alzar (4) dentro de la barra chatade de articulación y apriete el tornillo (5). Conecte el ensamble al desagüe (6).

A.Enlevez la bonde (1) et la collerette (2).

B.Serrez l’écrou (1) pour le faire descendre complètement. Poussez la rondelle (2) et le joint (3) vers le bas.

C.Enlevez le raccord droit de vidange (1) du corps (2), appliquez du ruban de Teflon®

(3), puis remettez le raccord droit en place.

D.Appliquez du composé à la silicone sous la collerette (1). Introduisez le corps (2) dans le lavabo, puis vissez la collerette (1) dans le corps (2).

E.Le pivot (1) doit faire face au robinet. Tirez l’ensemble (2) vers le bas fermement et maintenez-le en place. PRENZE GARDE DE LE TORDRE.

F.Serrez l’écrou contre la rondelle et le joint (1), puis enlevez le surplus de composé à la silicone (2). PRENEZ GARDE DE TORDRE LE PIVOT.

G.Enlevez l’écrou du pivot (1). Installez la tige horizontale (2) et la bonde (3) de manière que la bonde soit amovible (4) ou non amovible (5). Serrez l’écrou (1) du pivot à la main.

H.Fixez la tige horizontale (1) au feuillard (2) à l’aide de l’agrafe (3). Introduisez la tirette (4) dans le feuillard et serrez la vis (5). Fixez l’ensemble au renvoi (6).

3

53362 Rev. C


Page 3
Image 3
Delta 2551 Series manual Do not Twist

2551 Series specifications

The Delta 2551 Series is a noteworthy entry in the world of pressure washing technology, designed to deliver superior performance and efficiency for both professional and residential applications. Built for versatility, the Delta 2551 is ideal for a variety of surfaces, from cleaning driveways and decks to washing vehicles and patios.

One of the standout features of the Delta 2551 Series is its powerful motor, which boasts impressive horsepower and high PSI ratings. This allows users to tackle tough dirt and stubborn stains with ease. The adjustable pressure settings enable operators to customize the intensity of the spray, ensuring delicate surfaces are not damaged while still effectively cleaning tougher areas.

The Delta 2551 Series is equipped with advanced technologies that enhance its usability. Its ergonomic design includes a comfortable handle that reduces fatigue during extended use. The integrated wheels and lightweight construction allow for easy maneuverability, making it convenient for users to transport the unit across various terrains.

Additionally, the Delta 2551 features an innovative quick-connect system for accessories and hoses. This eliminates the hassle of threading and unthreading connections, allowing users to switch between tasks rapidly. The onboard storage for nozzles and accessories ensures that everything is kept organized and within reach, minimizing downtime.

Another characteristic of the Delta 2551 Series is its energy-efficient operation. With an emphasis on reducing water consumption without sacrificing performance, this model is designed to be eco-friendly. Its operation minimizes the waste of resources while delivering effective cleaning results.

The unit also includes safety features, such as a thermal relief valve to prevent overheating and an automatic shut-off system that activates when the trigger is released. This ensures the longevity of the motor and protects against potential hazards.

In conclusion, the Delta 2551 Series combines power, efficiency, and user-friendly features, making it a standout choice for anyone looking to invest in a reliable pressure washer. Whether for commercial or home use, its remarkable performance and thoughtful design make it an exceptional tool for all cleaning needs.