2

A.

1


3


2


4


D.


2


3

1


B.


1


E.


3


2


1

4

5

C.


3


1


2

4


F.

4


4


5


2


3


1


6

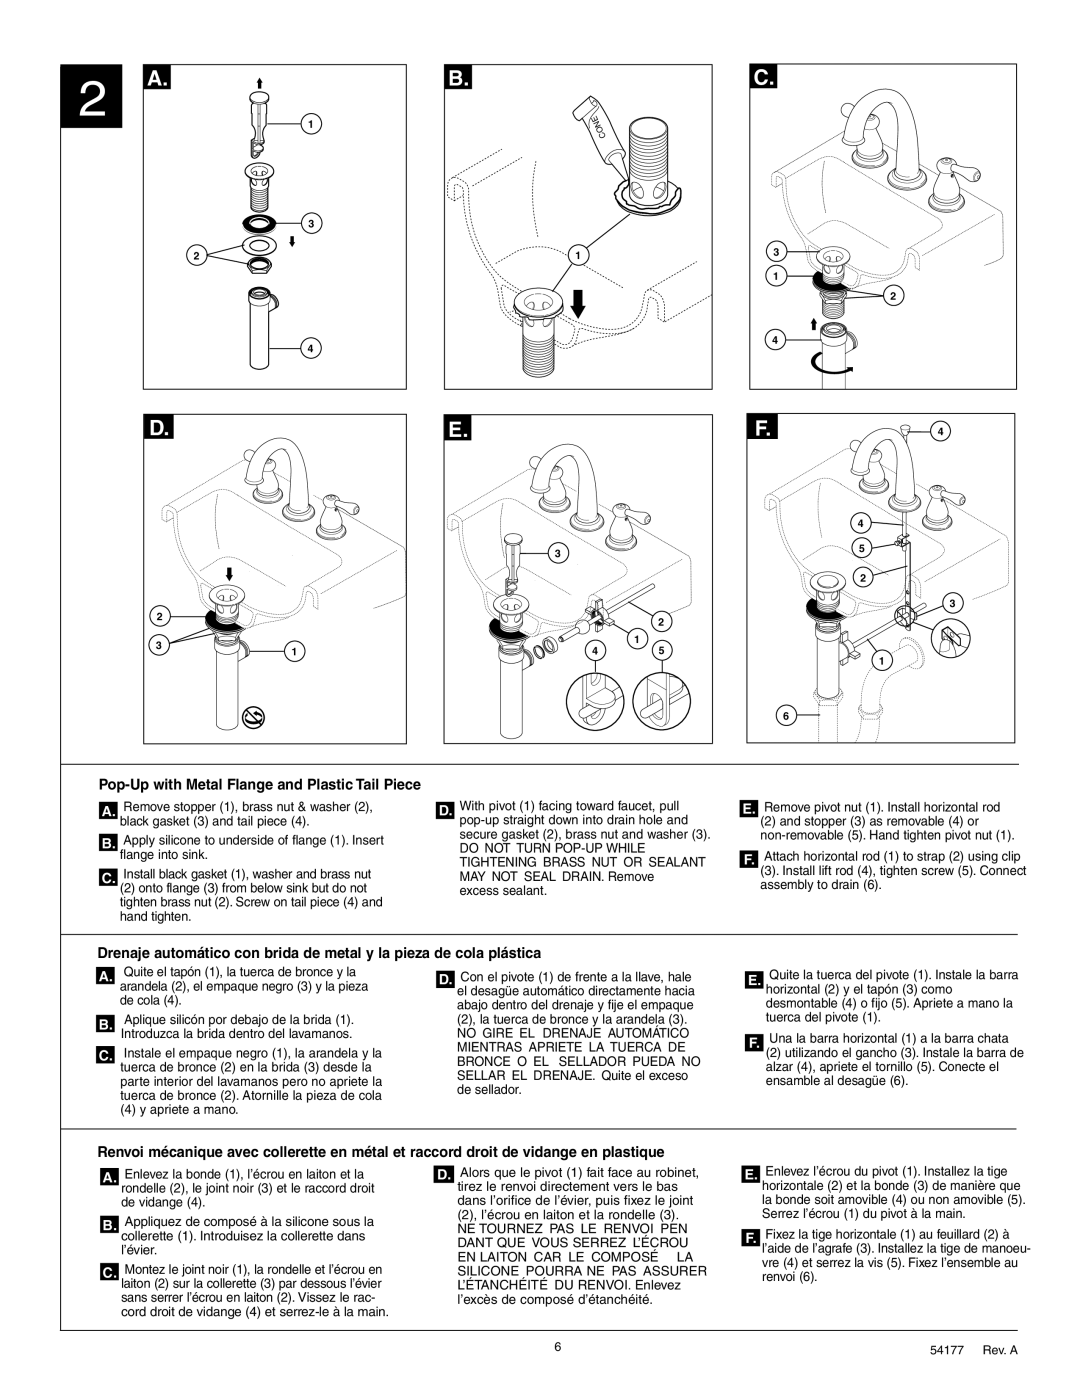
Pop-Up with Metal Flange and Plastic Tail Piece

A.Remove stopper (1), brass nut & washer (2), black gasket (3) and tail piece (4).

B.Apply silicone to underside of flange (1). Insert flange into sink.

C.Install black gasket (1), washer and brass nut

(2)onto flange (3) from below sink but do not tighten brass nut (2). Screw on tail piece (4) and hand tighten.

D.With pivot (1) facing toward faucet, pull pop-up straight down into drain hole and secure gasket (2), brass nut and washer (3).

DO  NOT  TURN POP-UP WHILE TIGHTENING  BRASS  NUT  OR  SEALANT MAY  NOT  SEAL  DRAIN. Remove excess sealant.

E.Remove pivot nut (1). Install horizontal rod

(2)and stopper (3) as removable (4) or

non-removable (5). Hand tighten pivot nut (1).

F.Attach horizontal rod (1) to strap (2) using clip

(3). Install lift rod (4), tighten screw (5). Connect assembly to drain (6).

Drenaje automático con brida de metal y la pieza de cola plástica

A.Quite el tapón (1), la tuerca de bronce y la arandela (2), el empaque negro (3) y la pieza de cola (4).

B.Aplique silicón por debajo de la brida (1). Introduzca la brida dentro del lavamanos.

C.Instale el empaque negro (1), la arandela y la tuerca de bronce (2) en la brida (3) desde la parte interior del lavamanos pero no apriete la tuerca de bronce (2). Atornille la pieza de cola

(4) y apriete a mano.

D.Con el pivote (1) de frente a la llave, hale el desagüe automático directamente hacia abajo dentro del drenaje y fije el empaque (2), la tuerca de bronce y la arandela (3).

NO  GIRE  EL DRENAJE  AUTOMÁTICO  MIENTRAS  APRIETE  LA  TUERCA  DE  BRONCE  O  EL  SELLADOR  PUEDA  NO SELLAR  EL  DRENAJE.  Quite el exceso de sellador.

E.Quite la tuerca del pivote (1). Instale la barra horizontal (2) y el tapón (3) como desmontable (4) o fijo (5). Apriete a mano la tuerca del pivote (1).

F.Una la barra horizontal (1) a la barra chata

(2)utilizando el gancho (3). Instale la barra de alzar (4), apriete el tornillo (5). Conecte el ensamble al desagüe (6).

Renvoi mécanique avec collerette en métal et raccord droit de vidange en plastique

A.Enlevez la bonde (1), l’écrou en laiton et la rondelle (2), le joint noir (3) et le raccord droit de vidange (4).

B.Appliquez de composé à la silicone sous la collerette (1). Introduisez la collerette dans l’évier.

C.Montez le joint noir (1), la rondelle et l’écrou en laiton (2) sur la collerette (3) par dessous l’évier sans serrer l’écrou en laiton (2). Vissez le rac- cord droit de vidange (4) et serrez-le à la main.

D.Alors que le pivot (1) fait face au robinet, tirez le renvoi directement vers le bas dans l’orifice de l’évier, puis fixez le joint (2), l’écrou en laiton et la rondelle (3).

NE TOURNEZ  PAS  LE  RENVOI  PEN DANT QUE  VOUS SERREZ  L’ÉCROU EN LAITON  CAR  LE  COMPOSÉ À LA SILICONE  POURRA NE  PAS  ASSURER L’ÉTANCHÉITÉ  DU RENVOI. Enlevez l’excès de composé d’étanchéité.

E.Enlevez l’écrou du pivot (1). Installez la tige horizontale (2) et la bonde (3) de manière que la bonde soit amovible (4) ou non amovible (5). Serrez l’écrou (1) du pivot à la main.

F.Fixez la tige horizontale (1) au feuillard (2) à l’aide de l’agrafe (3). Installez la tige de manoeu- vre (4) et serrez la vis (5). Fixez l’ensemble au renvoi (6).

6

54177      Rev. A

Page 6
Image 6
Delta 3575 Series manual Pop-Up with Metal Flange and Plastic Tail Piece, Apriete a mano

3575 Series specifications

The Delta 3575 Series represents a significant advancement in the realm of home improvement and residential plumbing. Known for their innovative design and user-friendly features, these faucets are engineered to provide exceptional performance while adding a touch of elegance to any kitchen or bathroom setting.

One of the standout features of the Delta 3575 Series is its advanced Touch2O Technology. This innovative system allows users to turn the faucet on or off with just a light touch anywhere on the spout or handle, making it incredibly convenient, especially when hands are full or dirty. This not only promotes hygiene but also conserves water, as users can easily pause the flow when needed.

Another impressive characteristic of the Delta 3575 Series is its MagnaTite Docking system. This technology secures the spray head in place with a powerful magnet, ensuring it stays in position when not in use. The result is a clean, streamlined look that enhances the overall aesthetic of the fixture while preventing any drooping or misalignment over time.

The faucet also boasts an impressive MultiFlow feature. This technology seamlessly switches between a powerful spray and a gentle stream, offering adaptability for a variety of tasks. Whether rinsing dishes, filling pots, or cleaning vegetables, the Delta 3575 Series caters to all needs with its versatile water flow options.

Delta's commitment to sustainability is evident in the series' WaterSense certification. This feature confirms that the faucets meet strict criteria for water efficiency without sacrificing performance. With a reduced flow rate, they help homeowners save water and reduce utility bills, making them an eco-conscious choice.

The Delta 3575 Series is also known for its durability and ease of installation. Constructed with high-quality materials, these faucets are built to withstand the rigors of daily use while maintaining their aesthetic appeal. Additionally, they often come with straightforward installation instructions and can be outfitted with various mounting options, making it possible for most homeowners to tackle the installation process with minimal effort.

In conclusion, the Delta 3575 Series combines cutting-edge technology, user-friendly features, and elegant design to meet the demands of modern living. With its innovative advancements, commitment to sustainability, and durable construction, this series stands out as an exemplary choice for anyone looking to upgrade their kitchen or bathroom fixtures.