4

A.

1 B.

5


2


3

2


1


2

1

C.

1

2

D.

2

3

1


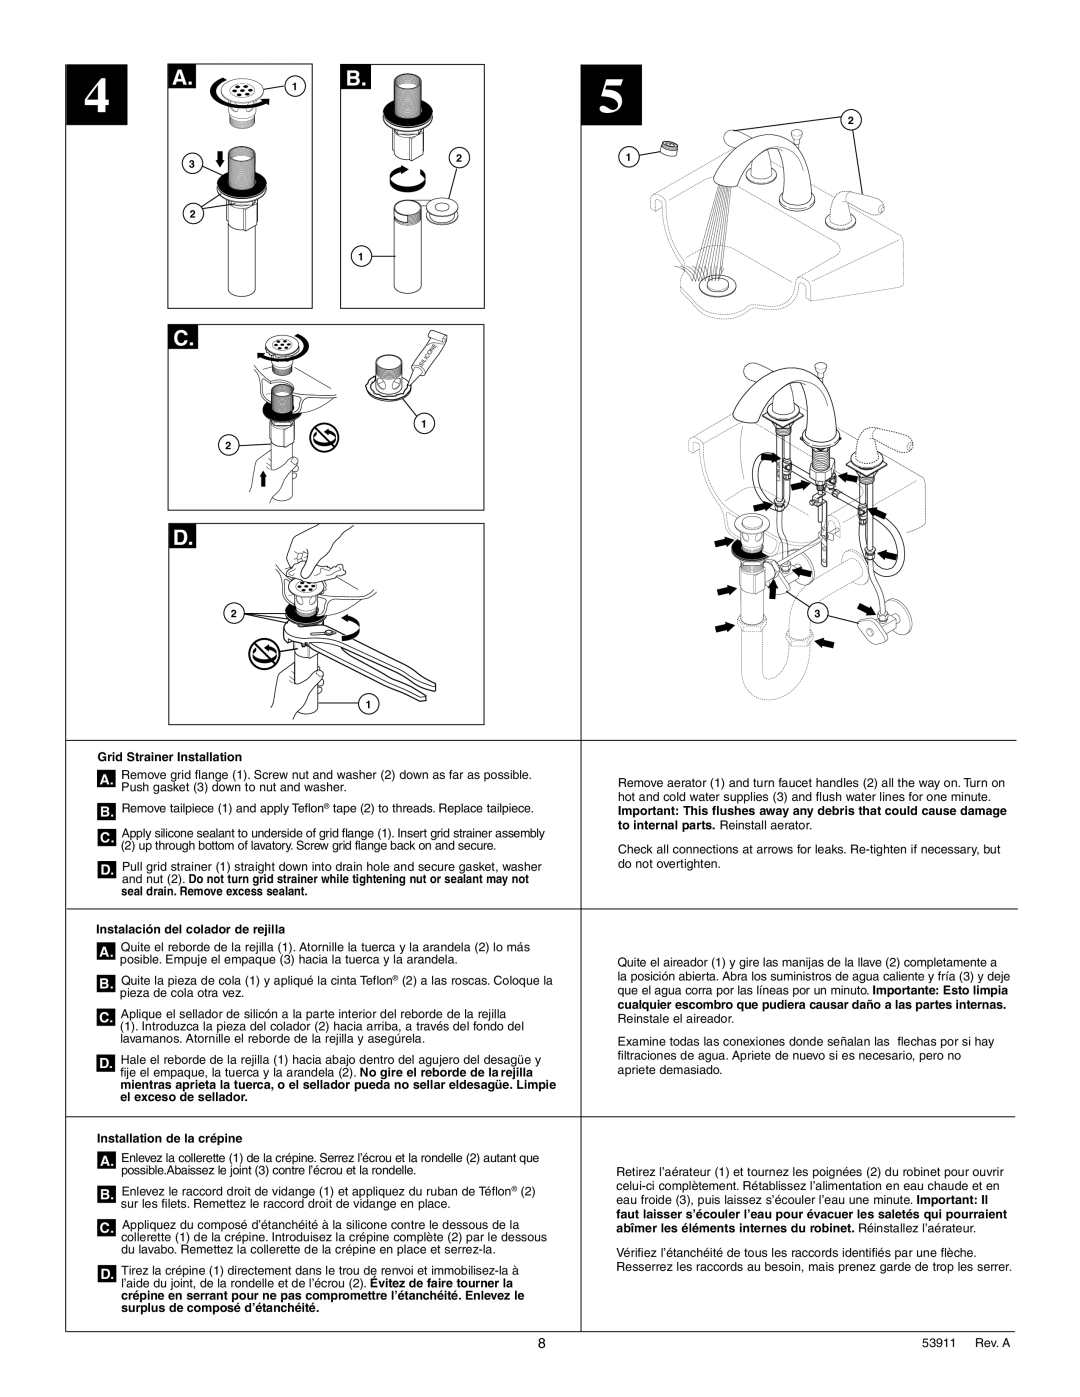
Grid Strainer Installation


Remove grid flange (1). Screw nut and washer (2) down as far as possible.


A.


Remove aerator (1) and turn faucet handles (2) all the way on. Turn on


Push gasket (3) down to nut and washer.

hot and cold water supplies (3) and flush water lines for one minute.


Remove tailpiece (1) and apply Teflon® tape (2) to threads. Replace tailpiece.


B.


Important: This flushes away any debris that could cause damage


Apply silicone sealant to underside of grid flange (1). Insert grid strainer assembly

to internal parts. Reinstall aerator.


C.


(2) up through bottom of lavatory. Screw grid flange back on and secure.

Check all connections at arrows for leaks. Re-tighten if necessary, but


Pull grid strainer (1) straight down into drain hole and secure gasket, washer

do not overtighten.


D.


and nut (2). Do not turn grid strainer while tightening nut or sealant may not


seal drain. Remove excess sealant.


Instalación del colador de rejilla


Quite el reborde de la rejilla (1). Atornille la tuerca y la arandela (2) lo más


A.


posible. Empuje el empaque (3) hacia la tuerca y la arandela.

Quite el aireador (1) y gire las manijas de la llave (2) completamente a


Quite la pieza de cola (1) y apliqué la cinta Teflon® (2) a las roscas. Coloque la

la posición abierta. Abra los suministros de agua caliente y fría (3) y deje


B.


pieza de cola otra vez.

que el agua corra por las líneas por un minuto. Importante: Esto limpia


Aplique el sellador de silicón a la parte interior del reborde de la rejilla

cualquier escombro que pudiera causar daño a las partes internas.


C.


Reinstale el aireador.


(1). Introduzca la pieza del colador (2) hacia arriba, a través del fondo del


lavamanos. Atornille el reborde de la rejilla y asegúrela.

Examine todas las conexiones donde señalan las flechas por si hay


Hale el reborde de la rejilla (1) hacia abajo dentro del agujero del desagüe y

filtraciones de agua. Apriete de nuevo si es necesario, pero no


D.


apriete demasiado.


fije el empaque, la tuerca y la arandela (2). No gire el reborde de la rejilla


mientras aprieta la tuerca, o el sellador pueda no sellar eldesagüe. Limpie


el exceso de sellador.


Installation de la crépine


Enlevez la collerette (1) de la crépine. Serrez l’écrou et la rondelle (2) autant que


A.


possible.Abaissez le joint (3) contre l’écrou et la rondelle.

Retirez l’aérateur (1) et tournez les poignées (2) du robinet pour ouvrir


Enlevez le raccord droit de vidange (1) et appliquez du ruban de Téflon® (2)

celui-ci complètement. Rétablissez l’alimentation en eau chaude et en


B.


sur les filets. Remettez le raccord droit de vidange en place.

eau froide (3), puis laissez s’écouler l’eau une minute. Important: Il


faut laisser s’écouler l’eau pour évacuer les saletés qui pourraient


Appliquez du composé d’étanchéité à la silicone contre le dessous de la


C.


abîmer les éléments internes du robinet. Réinstallez l’aérateur.


collerette (1) de la crépine. Introduisez la crépine complète (2) par le dessous


du lavabo. Remettez la collerette de la crépine en place et serrez-la.

Vérifiez l’étanchéité de tous les raccords identifiés par une flèche.


Tirez la crépine (1) directement dans le trou de renvoi et immobilisez-la à

Resserrez les raccords au besoin, mais prenez garde de trop les serrer.


D.


l’aide du joint, de la rondelle et de l’écrou (2). Évitez de faire tourner la


crépine en serrant pour ne pas compromettre l’étanchéité. Enlevez le


surplus de composé d’étanchéité.


8

53911      Rev. A

Page 8
Image 8
Delta 3584 Series manual Grid Strainer Installation, To internal parts. Reinstall aerator

3584 Series specifications

The Delta 3584 Series is a cutting-edge range of industrial electronics that has been making waves in various sectors, including manufacturing, automation, and telecommunications. This series is designed to meet the demands of modern industry while providing robust performance, efficiency, and versatility.

One of the defining features of the Delta 3584 Series is its advanced processing capability. Equipped with a high-performance microcontroller, the devices can handle complex tasks with ease, allowing for real-time data processing and analysis. This makes it ideal for applications where speed and accuracy are critical, such as in robotics and automated production lines.

In addition to processing power, the Delta 3584 Series utilizes a modular design, allowing users to customize their setups by integrating various functional modules as needed. This flexibility means that businesses can adapt the system to their specific requirements without the need for extensive overhauls or complete replacements. The series also incorporates an extensive range of connectivity options, including Ethernet, USB, and serial communication interfaces, enhancing its interoperability with existing systems and equipment.

Another key characteristic of the Delta 3584 Series is its commitment to energy efficiency. The devices are engineered to minimize power consumption while maintaining optimal performance levels. This not only helps reduce operational costs but also aligns with global sustainability goals by lessening the environmental impact of industrial processes.

The series boasts robust security features, which are essential in today’s landscape where cyber threats are a growing concern. With built-in encryption and secure communication protocols, the Delta 3584 Series ensures that sensitive data remains protected, contributing to the integrity of business operations.

User-friendly interfaces are another highlight of the Delta 3584 Series. Touchscreen capabilities, intuitive navigation, and customizable dashboards make it easy for operators to monitor and control processes efficiently, thus minimizing training time and maximizing productivity.

Overall, the Delta 3584 Series stands out as a versatile, reliable, and forward-thinking technology solution for industries looking to innovate and improve their operational efficiencies. With its combination of advanced features, modular design, energy efficiency, security, and user-friendly interfaces, this series is well-suited to support the industrial landscape of tomorrow.