OWNER’S MANUAL

INSTALLATION

Continued

Attaching Mounting Bracket To Wall

Note: Wall anchors, mounting screws, and spacers are in hardware package. The hard- ware package is provided with heater.

Attaching To Wall Stud Method

For attaching mounting bracket to wall studs

1.Drill holes at marked locations using 9/64" drill bit.

2.Place mounting bracket onto wall. Line up last hole on each end of bracket with holes drilled in wall.

3.Insert mounting screws through bracket and into wall studs.

4.Tighten screws until mounting bracket is firmly fastened to wall studs.

Attaching To Wall Anchor Method

For attaching mounting bracket to hollow walls (wall areas between studs) or solid walls (concrete or masonry)

1.Drill holes at marked locations using 5/16" drill bit. For solid walls (concrete or masonry), drill at least 1" deep.

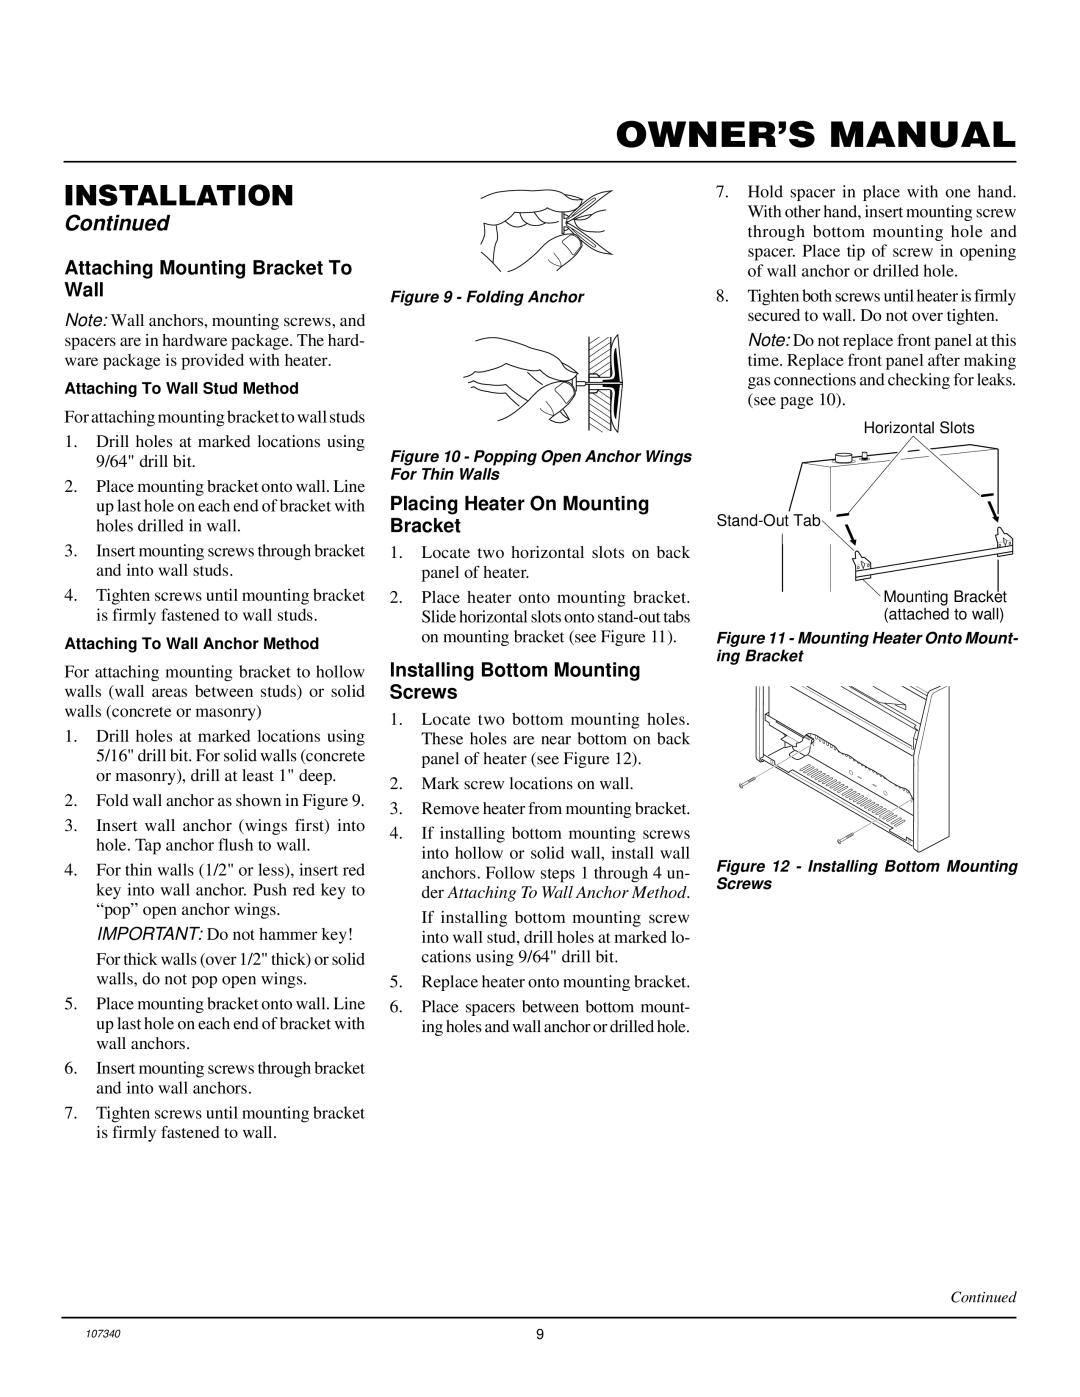
2.Fold wall anchor as shown in Figure 9.

3.Insert wall anchor (wings first) into hole. Tap anchor flush to wall.

4.For thin walls (1/2" or less), insert red key into wall anchor. Push red key to “pop” open anchor wings.

IMPORTANT: Do not hammer key!

For thick walls (over 1/2" thick) or solid walls, do not pop open wings.

5.Place mounting bracket onto wall. Line up last hole on each end of bracket with wall anchors.

6.Insert mounting screws through bracket and into wall anchors.

7.Tighten screws until mounting bracket is firmly fastened to wall.

Figure 9 - Folding Anchor

Figure 10 - Popping Open Anchor Wings For Thin Walls

Placing Heater On Mounting Bracket

1.Locate two horizontal slots on back panel of heater.

2.Place heater onto mounting bracket. Slide horizontal slots onto stand-out tabs on mounting bracket (see Figure 11).

Installing Bottom Mounting Screws

1.Locate two bottom mounting holes. These holes are near bottom on back panel of heater (see Figure 12).

2.Mark screw locations on wall.

3.Remove heater from mounting bracket.

4.If installing bottom mounting screws into hollow or solid wall, install wall anchors. Follow steps 1 through 4 un- der Attaching To Wall Anchor Method.

If installing bottom mounting screw into wall stud, drill holes at marked lo- cations using 9/64" drill bit.

5.Replace heater onto mounting bracket.

6.Place spacers between bottom mount- ing holes and wall anchor or drilled hole.

7.Hold spacer in place with one hand. With other hand, insert mounting screw through bottom mounting hole and spacer. Place tip of screw in opening of wall anchor or drilled hole.

8.Tighten both screws until heater is firmly secured to wall. Do not over tighten.

Note: Do not replace front panel at this time. Replace front panel after making gas connections and checking for leaks. (see page 10).

Horizontal Slots

Stand-Out Tab

Mounting Bracket (attached to wall)

Figure 11 - Mounting Heater Onto Mount- ing Bracket

Figure 12 - Installing Bottom Mounting Screws

Continued

107340

9

Page 9
Image 9
Desa FGHS30NGB Attaching Mounting Bracket To Wall, Placing Heater On Mounting Bracket, Installing Bottom Mounting Screws

FGHS30NGB specifications

The Desa FGHS30NGB is a leading model in the world of portable propane gas heaters, widely renowned for its exceptional performance, advanced features, and versatile applications. Designed to provide efficient heating, this model delivers warmth where it is needed most, perfect for both indoor and outdoor environments.

One of the standout features of the FGHS30NGB is its powerful heating capability, boasting an output of 30,000 BTUs. This makes it ideal for quickly warming up large spaces, whether that be a workshop, garage, or patio. The unit is designed with an adjustable heat setting, allowing users to customize their heating preferences according to their specific needs.

Another significant aspect of the FGHS30NGB is its safety features. The unit is equipped with a built-in automatic shut-off system that activates when the heater is tipped over or does not detect oxygen, ensuring peace of mind during usage. Additionally, the unit is designed with a sturdy and durable construction, making it suitable for outdoor use as well.

The FGHS30NGB incorporates modern technologies that enhance its efficiency. It features an innovative combustion system that allows for optimal fuel utilization, minimizing emissions and maximizing heat output. This not only makes it environmentally friendly but also economical for users, as they can expect reduced operational costs.

Portability is a key characteristic of the FGHS30NGB. It comes with a convenient handle and lightweight design, making it easy to transport from one location to another. Whether you're heading to a construction site or enjoying a weekend camping trip, this portable heater provides the flexibility needed for various situations.

In terms of design, the FGHS30NGB is both functional and aesthetically pleasing. Its compact size ensures it fits comfortably in tight spaces, while its modern look allows it to blend seamlessly with different decor styles.

In summary, the Desa FGHS30NGB propane heater is an excellent choice for anyone seeking reliable, efficient, and portable heating solutions. Its powerful performance, advanced safety features, and user-friendly design make it a top contender in today’s market, offering unmatched versatility for an array of heating needs.