OWNER’S MANUAL

INSTALLATION

Continued

For Built-In Installation

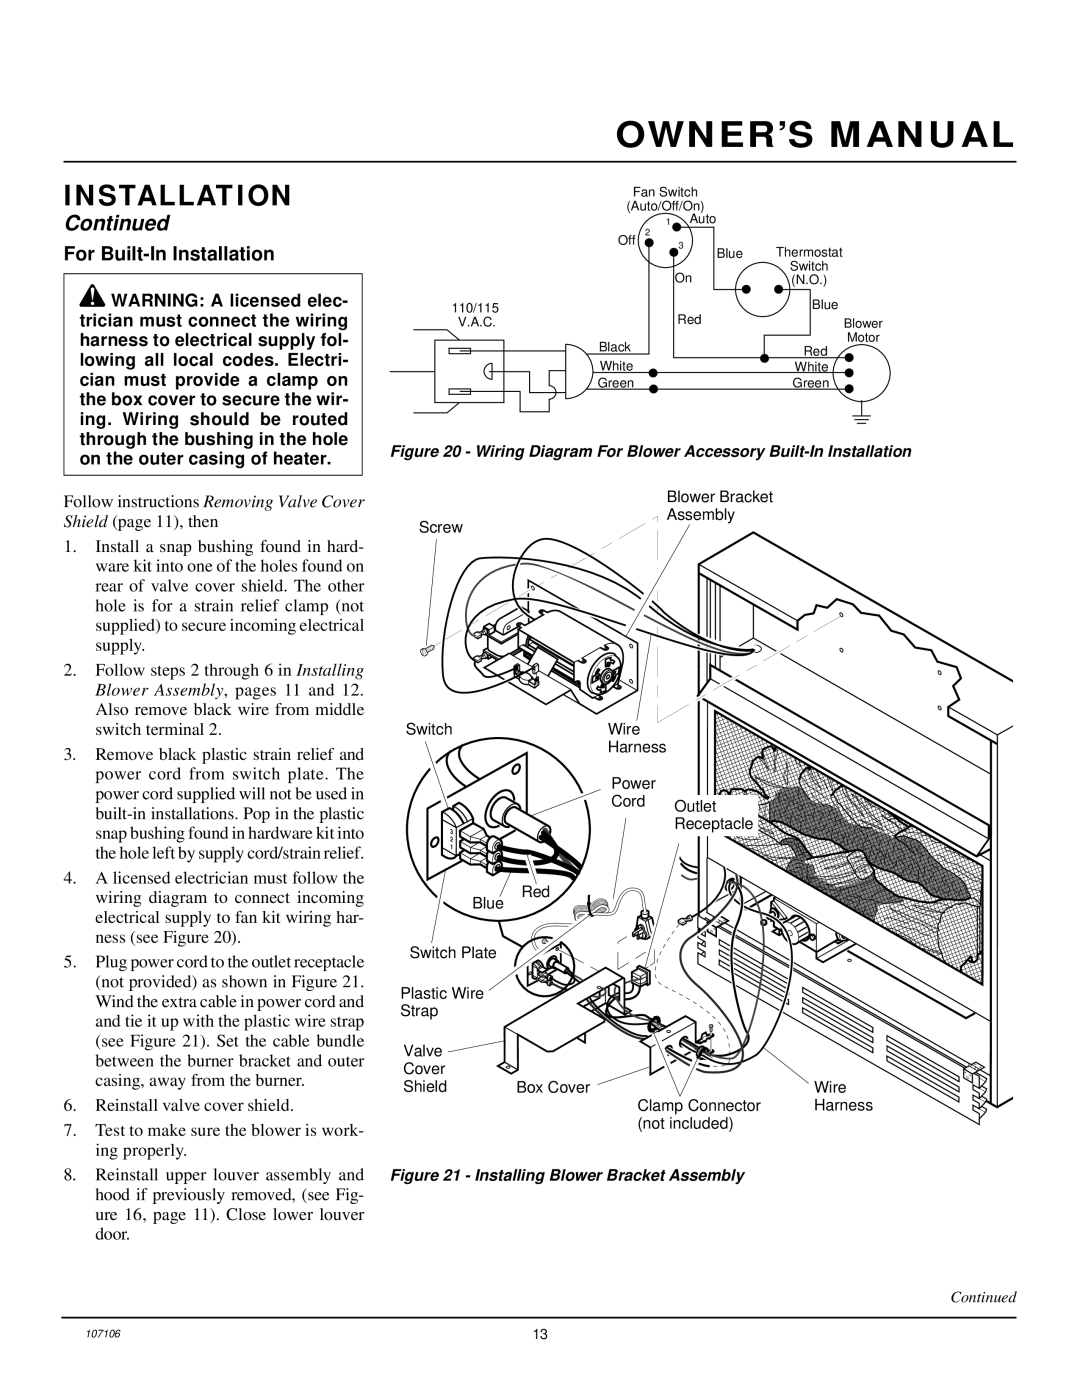
WARNING: A licensed elec- trician must connect the wiring harness to electrical supply fol- lowing all local codes. Electri- cian must provide a clamp on the box cover to secure the wir- ing. Wiring should be routed through the bushing in the hole on the outer casing of heater.

Follow instructions Removing Valve Cover Shield (page 11), then

1.Install a snap bushing found in hard- ware kit into one of the holes found on rear of valve cover shield. The other hole is for a strain relief clamp (not supplied) to secure incoming electrical supply.

2.Follow steps 2 through 6 in Installing Blower Assembly, pages 11 and 12. Also remove black wire from middle switch terminal 2.

3.Remove black plastic strain relief and power cord from switch plate. The power cord supplied will not be used in built-in installations. Pop in the plastic snap bushing found in hardware kit into the hole left by supply cord/strain relief.

4.A licensed electrician must follow the wiring diagram to connect incoming electrical supply to fan kit wiring har- ness (see Figure 20).

5.Plug power cord to the outlet receptacle (not provided) as shown in Figure 21. Wind the extra cable in power cord and and tie it up with the plastic wire strap (see Figure 21). Set the cable bundle between the burner bracket and outer casing, away from the burner.

6.Reinstall valve cover shield.

7.Test to make sure the blower is work- ing properly.

8.Reinstall upper louver assembly and hood if previously removed, (see Fig- ure 16, page 11). Close lower louver door.


Fan Switch


(Auto/Off/On)


1 Auto


Off

2


3

Blue


Thermostat


On


Switch


(N.O.)

110/115


Red


Blue

V.A.C.


Blower


Black


Motor


Red


White


White


Green


Green

Figure 20 - Wiring Diagram For Blower Accessory Built-In Installation

Blower Bracket

Assembly

Screw

Switch

Wire


Harness


Power


Cord

Outlet


3


Receptacle


2


1


Blue

Red


Switch Plate


Plastic Wire


Strap


Valve


Cover


Shield

Box Cover


Wire


Clamp Connector

Harness


(not included)


Figure 21 - Installing Blower Bracket Assembly

Continued

107106

13

Page 13
Image 13
Desa FMH26TP installation manual For Built-In Installation, Wiring Diagram For Blower Accessory Built-In Installation

FMH26TP specifications

Desa FMH26TP is a versatile and efficient heating solution that caters to a wide range of residential and commercial applications. Renowned for its innovative design and cutting-edge technology, this heater offers exceptional performance along with user-friendly features.

One of the standout characteristics of the FMH26TP is its ability to produce radiant heat quickly and efficiently. Equipped with a powerful heating capacity, it can seamlessly warm up large spaces, making it ideal for workshops, garages, and even outdoor settings. The installation is straightforward, and its compact design ensures that it can fit conveniently in various locations without obstructing valuable space.

The heater utilizes advanced thermal efficiency technologies, which not only enhance its heating performance but also contribute to energy savings. By effectively converting fuel into heat, the FMH26TP minimizes fuel consumption while delivering optimal warmth. This is particularly beneficial for users looking to reduce their energy bills without compromising on comfort.

Safety is a top priority with the Desa FMH26TP. The unit comes with several built-in safety features, including an automatic shut-off system that activates in case of overheating or if it detects any irregular functions. Additionally, the construction of the heater is robust, ensuring durability and longevity. The reliable design means it can withstand the demands of frequent use in various environments.

Another notable feature of the FMH26TP is its ease of operation. Users can conveniently control the heater with a user-friendly interface. It often includes a thermostat, allowing for precise temperature adjustments according to user preferences. Some models are also compatible with remote control systems, further enhancing user convenience.

The Desa FMH26TP is compatible with multiple fuel types, giving users flexibility. Whether powered by propane or natural gas, this heater adapts to the available fuel source, making it a practical choice for many households. Its adaptability ensures that it can serve a broader market, appealing to diverse consumer needs.

In conclusion, the Desa FMH26TP is a reliable heating solution that combines efficiency, safety, and flexibility. With its powerful heating capabilities and user-friendly features, it stands out as an excellent choice for anyone seeking an effective way to keep their spaces warm and comfortable during the colder months.