OWNER’S MANUAL

INSTALLATION

Continued

CAUTION: Do not remove the data plates attached to the heater base assembly. The data plates contain important warranty and safety information.

WARNING: Failure to position the parts in accordance with these diagrams or failure to use only parts specifically approved with this heater may result in property damage or personal injury.

CAUTION: After installation and periodically thereafter, check to ensure that no flame comes in contact with any log. With the heater set to High, check to see if flames contact any log. If so, re- position logs according to the log installation instructions in this manual. Flames contacting logs will create soot.

INSTALLING GAS LOG HEATER INTO STOVE

1.Remove log and gas log heater from carton. Note: Do not pick up gas log heater by the burner itself. This could damage heater. Always handle the gas log heater by the heater base only.

2.Remove all protective packaging applied to log and gas log heater for shipment.

3.Check all items for any shipping dam- age. If damaged, promptly inform dealer where you bought heater.

4.If not already removed, remove back panel from assembled stove body (see Figure 5, page 8). Use an adjustable wrench or a 10 mm socket. Remove six

(6) bolts and washers. Keep bolts and washers to reattach back panel later.

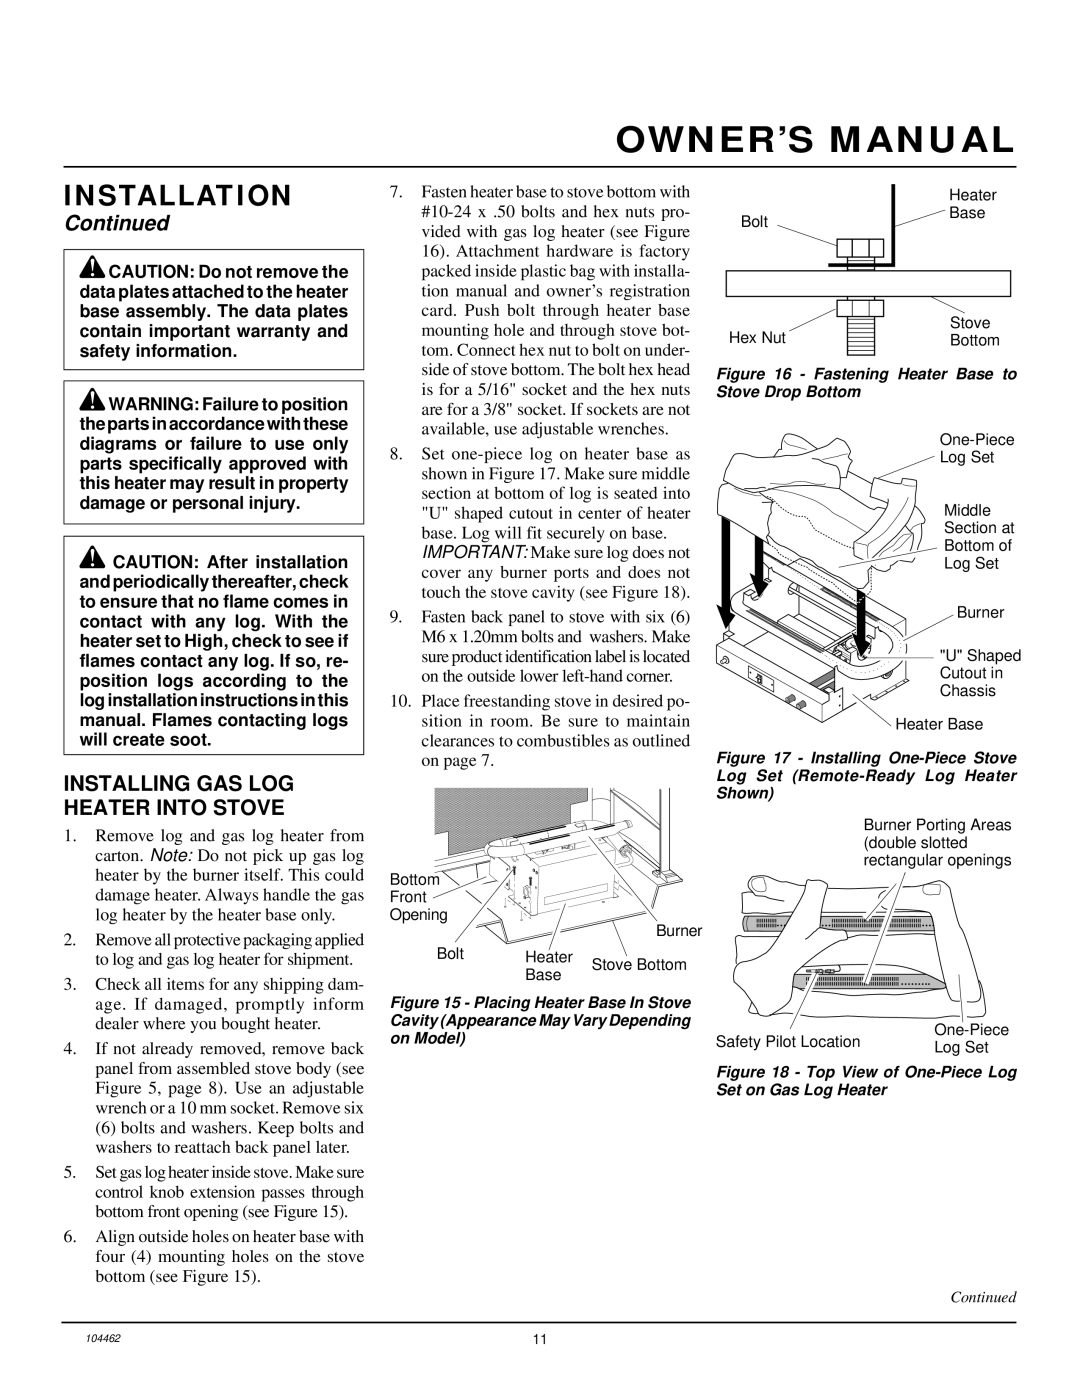
5.Set gas log heater inside stove. Make sure control knob extension passes through bottom front opening (see Figure 15).

6.Align outside holes on heater base with four (4) mounting holes on the stove bottom (see Figure 15).

7.Fasten heater base to stove bottom with #10-24 x .50 bolts and hex nuts pro- vided with gas log heater (see Figure 16). Attachment hardware is factory packed inside plastic bag with installa- tion manual and owner’s registration card. Push bolt through heater base mounting hole and through stove bot- tom. Connect hex nut to bolt on under- side of stove bottom. The bolt hex head is for a 5/16" socket and the hex nuts are for a 3/8" socket. If sockets are not available, use adjustable wrenches.

8.Set one-piece log on heater base as shown in Figure 17. Make sure middle section at bottom of log is seated into "U" shaped cutout in center of heater base. Log will fit securely on base.

IMPORTANT: Make sure log does not cover any burner ports and does not touch the stove cavity (see Figure 18).

9.Fasten back panel to stove with six (6) M6 x 1.20mm bolts and washers. Make sure product identification label is located on the outside lower left-hand corner.

10.Place freestanding stove in desired po- sition in room. Be sure to maintain clearances to combustibles as outlined on page 7.

Bottom

Front

Opening


Burner

Bolt

Heater

Stove Bottom


Base


Figure 15 - Placing Heater Base In Stove Cavity (Appearance May Vary Depending on Model)


Heater

Bolt


Base


Stove

Hex Nut


Bottom


Figure 16 - Fastening Heater Base to Stove Drop Bottom

One-Piece

Log Set

Middle

Section at

Bottom of

Log Set

Burner

"U" Shaped

Cutout in

Chassis

Heater Base

Figure 17 - Installing One-Piece Stove

Log Set (Remote-Ready Log Heater

Shown)

Burner Porting Areas (double slotted rectangular openings

Safety Pilot Location

One-Piece

Log Set


Figure 18 - Top View of One-Piece Log Set on Gas Log Heater

Continued

104462

11

Page 11
Image 11
Desa FSVYD18P installation manual Installing GAS LOG Heater Into Stove, Fastening Heater Base to Stove Drop Bottom

FSVYD18P specifications

Desa FSVYD18P is an innovative, high-performance appliance designed to enhance various environments, whether in commercial settings, industrial applications, or even advanced home use. This model stands as a testament to the forward-thinking technology and robust features that define modern equipment.

One of the standout attributes of the FSVYD18P is its energy efficiency. Built with the latest in energy-saving technology, it minimizes power consumption without sacrificing performance. The optimized design ensures that it efficiently uses resources, catering to eco-conscious consumers and businesses alike. This feature not only contributes to lower utility bills but also supports sustainable practices.

In terms of functionality, the FSVYD18P is equipped with a state-of-the-art control system. The intuitive interface allows users to easily navigate settings and customize operations to fit specific needs. This adaptability is particularly important in environments where demands shift frequently, making it a versatile choice for diverse applications.

Durability is a key characteristic of the FSVYD18P. Designed using high-quality materials, this appliance can withstand the rigors of everyday use. Whether in a bustling commercial kitchen or an industrial workspace, the robust construction ensures longevity and reliability, reducing the need for frequent repairs or replacements.

The FSVYD18P also integrates advanced technologies that enhance its overall performance. Features such as smart sensors allow for real-time monitoring of performance parameters, ensuring that the appliance operates optimally. These sensors can automatically adjust settings based on usage patterns, further enhancing efficiency and user convenience.

Safety is another critical aspect of the FSVYD18P. The appliance incorporates multiple safety mechanisms that prevent malfunctions and ensure safe operation under various conditions. This commitment to safety not only protects users but also extends the life of the appliance.

Overall, Desa FSVYD18P encapsulates a rich blend of advanced technology, user-friendly features, and durable design. Its emphasis on energy efficiency, adaptability, and safety make it an ideal solution for those seeking high-quality performance in their equipment. This appliance is a reliable companion in achieving both operational excellence and environmental responsibility, making it a standout choice in its category.