16
INSTALLATION
Installing Logs
INSTALLATION
INSTALLING LOGS
![]() CAUTION: Do not remove the data plates attached to the heater base assembly. The data plates contain important warranty and safety information.
CAUTION: Do not remove the data plates attached to the heater base assembly. The data plates contain important warranty and safety information.
![]() WARNING: Failure to position the parts in accor- dance with these diagrams or failure to use only parts specifically approved with this heater may result in property damage or personal injury.
WARNING: Failure to position the parts in accor- dance with these diagrams or failure to use only parts specifically approved with this heater may result in property damage or personal injury.
![]() WARNING: After installation and periodically thereafter, check to ensure that no flame comes in contact with any log. With the heater set to High, check to see if flame contact any log. If so, reposition logs according to the log installation instructions in this manual. Flames contacting logs will create soot.
WARNING: After installation and periodically thereafter, check to ensure that no flame comes in contact with any log. With the heater set to High, check to see if flame contact any log. If so, reposition logs according to the log installation instructions in this manual. Flames contacting logs will create soot.
It is very important to install the logs exactly as instructed. Do not modify logs. Only use logs supplied with fireplace.
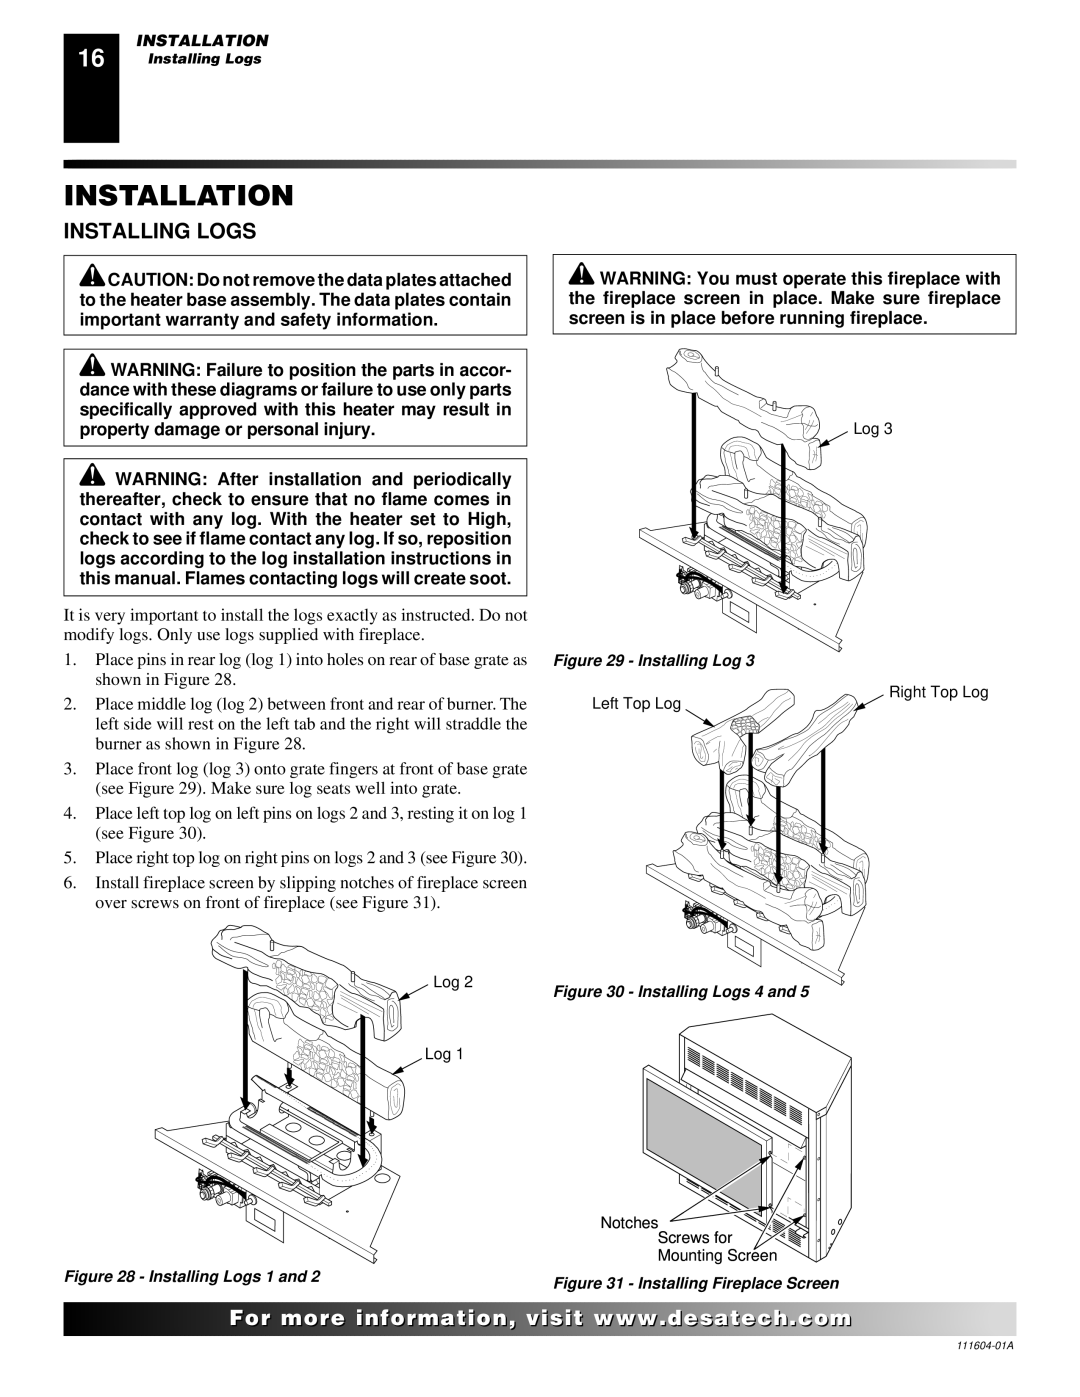
1.Place pins in rear log (log 1) into holes on rear of base grate as shown in Figure 28.
2.Place middle log (log 2) between front and rear of burner. The left side will rest on the left tab and the right will straddle the burner as shown in Figure 28.
3.Place front log (log 3) onto grate fingers at front of base grate (see Figure 29). Make sure log seats well into grate.
4.Place left top log on left pins on logs 2 and 3, resting it on log 1 (see Figure 30).
5.Place right top log on right pins on logs 2 and 3 (see Figure 30).
6.Install fireplace screen by slipping notches of fireplace screen over screws on front of fireplace (see Figure 31).
Log 2
Log 1
Figure 28 - Installing Logs 1 and 2
![]() WARNING: You must operate this fireplace with the fireplace screen in place. Make sure fireplace screen is in place before running fireplace.
WARNING: You must operate this fireplace with the fireplace screen in place. Make sure fireplace screen is in place before running fireplace.
Log 3
Figure 29 - Installing Log 3
Right Top Log
Left Top Log
Figure 30 - Installing Logs 4 and 5
Notches
Screws for
Mounting Screen
Figure 31 - Installing Fireplace Screen
![]()
![]()
![]()
![]()
![]() For
For![]()
![]()
![]()
![]()
![]()
![]()
![]()
![]()
![]()
![]()
![]()
![]()
![]() .
.![]()
![]()
![]()
![]() .com
.com![]()
![]()
![]()
![]()
![]()
